# News

Latest release news regarding DialoX Smart Apps and Skills

## 2026 September 7th

DialoX 4.4 is released, see [release notes](https://developer.dialox.ai/home/changelog/#version-440).

### New functionality

As part of this release the following changes are made in SmartApps and Skills.

<table data-search="false"><thead><tr><th width="100.58203125">Ticket</th><th width="147.00390625">Skills</th><th>Change</th></tr></thead><tbody><tr><td>DSA-288</td><td>AI Agent</td><td><strong>Generated opening message on Iterate: Agent</strong><br>If Iterate: Agent is entered with an empty conversation, an opening message is generated from the selected prompt.</td></tr><tr><td>DSA-252</td><td>AI Agent</td><td><strong>Opening hours tool call</strong><br>The AI Agent can check the bot’s opening hours and use that when deciding how to handle a conversation.</td></tr><tr><td>DSA-213</td><td>AI Agent</td><td><strong>Knowledge base prompt snippet</strong><br>Agent prompts include snippet that show how to use knowledge-base tool calls</td></tr><tr><td>DSA-278</td><td>AI Agent</td><td><strong>Limits and actions for KB indexing hints</strong><br>Indexing hints on knowledge-base articles now have length limits and action buttons, so the full article content is not copied into hints.</td></tr><tr><td>DSA-274</td><td>Shomi</td><td><strong>EU AI Act transparency in Shomi greeting</strong><br>Shomi now identifies itself as an AI assistant in the personal greeting.</td></tr><tr><td>DSA-273</td><td>Error batch skill</td><td><strong>More batch error cooldown options</strong><br>Batch error cooldown can be configured below the previous 1-hour minimum.</td></tr></tbody></table>

### Bugs fixed

<table><thead><tr><th width="101.421875">Ticket</th><th width="145.703125">Skill</th><th>Fix</th></tr></thead><tbody><tr><td>DSA-277</td><td>AI Agent</td><td>Current day/time injection now uses the bot’s local time instead of UTC</td></tr><tr><td>DSA-287</td><td>AI Agent</td><td>Agent prompt is rendered as system instructions when no <code>system:</code> prefix is present</td></tr><tr><td>DSA-286</td><td>AI Agent</td><td>Phone numbers in call forwards are sanitized (e.g. <code>(+31) - 36 - 536 2800</code>) before dialing</td></tr><tr><td>DSA-289</td><td>Phone Flows</td><td>Fuzzy extension lookup no longer forces a match on unknowns</td></tr><tr><td>DSA-280</td><td>Nudges</td><td>Selecting the Playbook flow no longer generates a script that calls the non-existent <code>flow_playbook</code> dialog</td></tr></tbody></table>

## 2026 August 10th

DialoX 4.3 is released, see [release notes](https://developer.dialox.ai/home/changelog/#version-430).

### New functionality

As part of this release the following changes are made in SmartApps and Skills.

<table data-search="false"><thead><tr><th width="100.58203125">Ticket</th><th width="147.00390625">Skills</th><th>Change</th></tr></thead><tbody><tr><td>DSA-223<br>DSA-242</td><td>Shomi</td><td><strong>Shomi Omni Aware</strong><br>Shomi Assistant is now aware of all of your previous conversations and can handle questions about them.</td></tr><tr><td>DSA-239</td><td>Shomi</td><td><strong>Full transcript push to Email and CRM</strong><br>Shomi Custom can opt in to push the full transcript (not only the summary) when pushing to Email and CRM via Contact Connect.</td></tr><tr><td>DSA-236</td><td>AI Agent</td><td><strong>Static opening message on Iterate: Agent node</strong><br>Ability to configure a static opening message for the Iterate Agent node.</td></tr><tr><td>DSA-255</td><td>AI Agent</td><td><strong>Current day/time variables for AI Agent</strong><br>Current day and time can be injected into the agent prompt.</td></tr><tr><td>DSA-261</td><td>Phone Flows</td><td><strong>Caller ID setting on Dial Smart and Dial number nodes</strong><br>Configure whether the outbound dial (SIP INVITE) presents the bot number or the original caller number (<code>bot</code> or <code>caller</code>).</td></tr><tr><td>DSA-240<br>DSA-265</td><td>Shiftbase</td><td><strong>Shiftbase on-call routing</strong><br>Route calls to the agent currently on shift in Shiftbase. Night shifts that started the previous calendar day are included correctly (no more fallback routing overnight).</td></tr></tbody></table>

### Bugs fixed

<table data-search="false"><thead><tr><th width="101.421875">Ticket</th><th width="145.703125">Skill</th><th>Fix</th></tr></thead><tbody><tr><td>DSA-217</td><td>Base Flows</td><td>Ask choice: local intents used as dialog triggers (with unknown) now fire correctly</td></tr><tr><td>DSA-231</td><td>Base Flows</td><td>Iterate node links without intents now supports the DTMF.</td></tr><tr><td>DSA-247</td><td>Base Flows</td><td>Corrected Ukrainian and Polish texts for Ask: Language node</td></tr><tr><td>DSA-224<br>DSA-250</td><td>LLM &#x26; LLM KB</td><td>Gemini prompt compatibility: LLM Run Prompt always includes both a system and an assistant message; follow-up fixes for OpenAI degradation issues in DE</td></tr><tr><td>DSA-251</td><td>Phone</td><td>Fallback to user-provided callee number when carrier-provided number is missing</td></tr><tr><td>DSA-246</td><td>Phone</td><td><code>$dial_return</code> correctly treats answered invites (<code>ANSWERED</code> vs <code>ANSWER</code>)</td></tr><tr><td>DSA-271</td><td>Phone / AI Agent</td><td>Voice agent no longer hangs up with "technical problem" when checking contact availability (Grid)</td></tr><tr><td>DSA-256</td><td>AI Agent</td><td>Guards against malformed / hallucinated tool calls</td></tr><tr><td>DSA-260</td><td>AI Agent</td><td>Automatically add <code>[[ full_transcript ]]</code> when missing from agentic prompt markdown</td></tr><tr><td>DSA-272</td><td>Smart IVR Basic</td><td>Missing translations for default intents; cleaned up obsolete <code>ivr.yaml</code></td></tr></tbody></table>

## 2026 June 8th

DialoX 4.2 is released, see [release notes](https://developer.dialox.ai/home/changelog/).

### Changes in SmartApps and Skills

As part of this release the following changes are made in SmartApps and Skills.

<table><thead><tr><th width="100.58203125">Ticket</th><th width="147.00390625">Skills</th><th>Change</th></tr></thead><tbody><tr><td>DSA-237</td><td>LLM &#x26; LLM KB</td><td><strong>Migrated from OpenAI ChatGPT LLM model and knowledgebase provider to Google Gemini with Vertex.</strong><br>This should solve the latency and availability issues that are experienced with the openAI services on Azure. For more information, see <a href="/store/skills/llm-knowledge-base#getting-started-with-google-vertex-knowledge-bases">LLM Knowledge base</a>.</td></tr><tr><td>DSA-232</td><td>Base skill</td><td><strong>Configurable error handler</strong><br>Ability to configure the "Oops that went wrong" message for technical errors in bots. See <a href="/settings/app-settings/error-handling">error handling</a></td></tr></tbody></table>

## 2026 May 11th

DialoX 4.1 was released two weeks later than planned due to staff availability.&#x20;

### Changes in SmartApps and Skills

<table><thead><tr><th width="100.58203125">Ticket</th><th width="147.00390625">Skills</th><th>Change</th></tr></thead><tbody><tr><td>DSA-221</td><td>Base skills</td><td><strong>Lookup node: fuzzy matching improved</strong><br>Fuzzy matching will be more precise in selecting a sensible match instead of choosing something anyway.</td></tr><tr><td>DSA-218</td><td>Agent skills</td><td><strong>Improved no input behaviour on chat channels</strong><br>Causing the bot to gracefully handle no input instead of keeping reminding the user to respond.</td></tr><tr><td>DSA-131</td><td>Agentic Studio helpdesk 2.0</td><td><strong>Studio Helpdesk 2.0</strong><br>A completely new version of the DialoX helpdesk studio widget that has access to the developer and user documentation. The studio helpdesk agent is able to provide detailed answers about both bot development as flow designing and will point to the relevant documentation. When it fails to be helpful and users ask to be forwarded to a human, it will still escalate to a human operator</td></tr><tr><td>DSA-225</td><td>Shomi</td><td><strong>Shomi to write summary in UK english</strong><br>Instead of US english</td></tr><tr><td>DSA-189</td><td>Shomi</td><td><strong>Push to CRM using Contact Connect improved</strong><br>Now Shomi will explain to which CRM the summary is pushed and if it succeeded or failed. If it succeeded, it will even provide a link to it in the specific CRM (if supported by that CRM)</td></tr></tbody></table>

## 2026 March 31st

With the DialoX version 4.0 release the platform is deemed to be ready to start supporting the introduction of Agentic capabilities to Enreach Contact based Smart App extensions.&#x20;

In the coming period the DialoX team will be bringing these capabilities to partners and customers by introducing the **AI Agent** skill that enables agentic capabilities to flow based bots. Currently this skill is only available to selected beta partners before making it generally available later this year. &#x20;

### New functionality

<table><thead><tr><th width="100.58203125">Ticket</th><th width="147.00390625">Skills</th><th>Change</th></tr></thead><tbody><tr><td>DSA-132<br>DSA-174<br>DSA-171<br>DSA-142</td><td>AI Agent 0.5<br><br>Agent Knowledge Base 0.2</td><td><strong>Iterate agent node</strong><br>Introducing Agentic behaviour to SmartApps that can respond and use tool call tasks autonomously.<br>The platform provides built in Agent Prompt templates for an Agentic Receptionist and an internal Colleague Router.<br><mark style="background-color:yellow;">currently a beta feature, only available on request</mark></td></tr><tr><td>DSA-158</td><td>Base Flows 3.4</td><td><strong>Lookup table node</strong><br>To allow flows to use a custom lookup table, this way a Smart App could find a subsdiary with a city name, or a phone number with a department name.<br><a href="https://manuals.dialox.ai/studio/flows/nodes/lookup-table">https://manuals.dialox.ai/studio/flows/nodes/lookup-table</a></td></tr><tr><td>DSA-166</td><td>Phone Flows 3.4</td><td><strong>Lookup extension node</strong><br>To allow Smart Apps that use the Grid adapter to find a specific extension based on the name or number of the extension returning information like presence, wait time, callers in queue, etc<br><a href="https://manuals.dialox.ai/studio/flows/nodes/lookup-extension">https://manuals.dialox.ai/studio/flows/nodes/lookup-extension</a> <br><mark style="background-color:yellow;">currently only available for native Enreach Contact customers (no Swyx) that are migrated to the Grid Adapter</mark></td></tr><tr><td>DSA-127</td><td>Phone Flows 2.4</td><td>Add built in variables for <code>callee</code> and <code>prefix</code> <br><mark style="background-color:yellow;">currently only available for native Enreach Contact customers (no Swyx) that are migrated to the Grid Adapter</mark></td></tr></tbody></table>

### Bugs fixed

<table><thead><tr><th width="101.421875">Ticket</th><th width="145.703125">Skill</th><th>Fix</th></tr></thead><tbody><tr><td>DSA-175</td><td>Shomi</td><td>Improved Shomi summary LLM timeout behaviour with longer timeout and retry mechanism</td></tr><tr><td>DSA-180</td><td>Shomi</td><td>Shomi translation issue DK</td></tr><tr><td>DSA-182</td><td>Shomi</td><td>Participants in Shomi summary are missing often for live transcriptions</td></tr><tr><td>DSA-193</td><td>Shomi</td><td>Push to CRM bug: timeStopped is required for Microsoft Dynamics</td></tr><tr><td>DSA-170</td><td>Base skill 3.4</td><td>Add locale specific texts for numbers in ask:language for Hungarian</td></tr><tr><td>DSA-194</td><td>Platform</td><td>Described all roles and permissions in DialoX<br><a href="https://staging.developer.dialox.ai/platform/roles_and_permissions/">https://developer.dialox.ai/platform/roles_and_permissions/</a></td></tr></tbody></table>


# Getting Started

Everything you need to know to get you started with DialoX.

This manual provides help setting up Smart Apps in the Enreach DialoX platform, formerly known as the Botsquad platform (the terms DialoX and Botsquad will be used in parallel throughout the documentation). The DialoX platform is the foundation for all Conversational AI solutions Enreach is offering.

<figure><img src="https://3356808761-files.gitbook.io/~/files/v0/b/gitbook-x-prod.appspot.com/o/spaces%2FEBQHGJABNTj5ISSOTRxM%2Fuploads%2FM67oihNSFDlyym9fyJF2%2Feva-hub.png?alt=media&amp;token=99161e84-d975-47ac-9092-de8f3aecc4f8" alt=""><figcaption></figcaption></figure>

The complete technical documentation for the DialoX platform is described at [DialoX Developer Documentation](https://developer.dialox.ai/). However, this manual only focuses on the following three solutions that are built on top of the platform:

## Step-by-step guide

{% stepper %}
{% step %}

### Start using DialoX

* Login to your account at [studio.dialox.ai](https://studio.dialox.ai/). If you don’t have an account, you can easily register by selecting the Sign Up option.
* Once inside, take a moment to explore the platform, where you’ll find all essential tools, analytics, and access to settings.
  {% endstep %}

{% step %}

### Exploring the platform

Explore the full range of available Smart Apps under **Store**, where you can discover the latest tools to optimize your workflow.&#x20;

Once you've familiarized yourself with the Smart Apps, delve into the **Settings** page to customize both Smart App configurations and user preferences, ensuring a tailored experience for your organization.&#x20;

For guidance on managing customer interactions, the **Inbox** page offers comprehensive insights into conversation handling.&#x20;

Additionally, the **Administration** page provides in-depth information on platform functionality and advanced configuration options.&#x20;

Lastly, a wealth of common inquiries and solutions can be accessed in our **FAQ** section, offering quick and reliable answers to your questions.
{% endstep %}

{% step %}

### Solutions

* **Social Messaging Inbox**; offers your team the ability to chat with your audience on your website and the major social messaging channels, like Whatsapp, Meta and Instagram. The bot can help route calls or provide automatic answers to questions.
* **Smart IVR**; allows you to answer the phone using a bot to apply routing, note taking, call deflection or automatic answering to questions. to enable smart routing based on speech
* **Call Deflection**; to deflect phone calls to Whatsapp using the capabilities introduced by the two solutions above.

Eager to find out more about these solutions, please check out our [Marketplace](/store/marketplace-apps).
{% endstep %}
{% endstepper %}

## Troubleshooting & Support

Having trouble? Here’s how to find help:

* [**Partner Documentation:**](https://manuals.dialox.ai/) Access detailed guides and troubleshooting tips within the platform for partners.
* [**Developer Documentation:**](https://developer.dialox.ai/) Access detailed guides and troubleshooting tips within the platform for development.
* **Contact Support**: Reach out to us via live chat or create a ticket via the [Enreach Servicedesk](https://servicedesk.enreach.com/).


# Ordering

Ordering and provisioning using Operator

Enreach wholesalers and customers use Operator to order their services with Enreach. The DialoX services are either ordered as standalone product in the Cloudstore or as embedded services as part of the Enreach portfolio, such as Managed Voice (MKB Pro and MKB Complete).

## Cloudstore Orders

In the Operator Cloudstore you can find, depending on your local offering and configuration, the following products:

<figure><img src="https://3356808761-files.gitbook.io/~/files/v0/b/gitbook-x-prod.appspot.com/o/spaces%2FEBQHGJABNTj5ISSOTRxM%2Fuploads%2FAbsmdkE4Q1TIos2Fq0Wr%2FScreenshot%202024-02-01%20at%2010.03.40.png?alt=media&amp;token=a2e526be-bb30-44af-a0fe-16929d4a8194" alt=""><figcaption></figcaption></figure>

Orders of DialoX services in the Cloudstore are provisioned manually by the Support and Delivery team of Enreach. They will create an account for you if not already available and set or increase the contract limits. Then they will create an environment in the platform and contact you regarding the delivery. You can then create your bots within the limits set in the account (as per Operator order).

## Enreach Contact Orders

Smart Apps can be ordered as extensions in Operator. You can order per level depending on your needs. The marketplace allows you to choose from Basic, Advanced, Professional and Expert.

* [Smart Apps Basic ](/store/marketplace-apps/level-1-basic)
* [Smart Apps Advanced](/store/marketplace-apps/level-2-advanced)
* [Smart Apps Professional](/store/marketplace-apps/level-3-professional)
* Smart Apps Expert&#x20;

{% hint style="info" %}
Expert level will require a Bubblescript training which you can apply for in the [Enreach Academy](https://portal.enreach.nl/academy).
{% endhint %}

<figure><img src="https://3356808761-files.gitbook.io/~/files/v0/b/gitbook-x-prod.appspot.com/o/spaces%2FEBQHGJABNTj5ISSOTRxM%2Fuploads%2FxIpEvtG41apIZuEtW4a1%2FScreenshot%202025-01-31%20at%2009.44.18.png?alt=media&amp;token=9eca758e-cb9b-4e81-b924-266b4d5be28d" alt=""><figcaption></figcaption></figure>

Smart App extensions ordered in Operator are automatically provisioned in the DialoX platform as "Premium channels". Automatic provisioning entails:

* An account is created for your customer if not already existing.
* An environment will be created when not already existing.
* The account limits will be increased of the customer account.
* A channel will be provisioned in the customer environment that is linked to the ordered extension.

{% hint style="info" %}
Automatic provisioning will only work when you or your wholesaler is onboarded and trained on the DialoX platform and as such administered, i.e. the wholesaler ID is linked to the account.&#x20;
{% endhint %}

Once the Premium channel is provisioned, you (as a Wholesaler) can now continue to deliver the bot in the DialoX platform. For this, open the DialoX platform and navigate to the (newly created) customer environment or simply navigate directly from Operator using the **Edit in studio** button which can be found in the action menu of your order.


# Signup

Signing up to the Dialox platform to get access

When you are invited to the platform you will receive an email with the invite link. The link is presented as a blue button. Click on it.&#x20;

<figure><img src="https://3356808761-files.gitbook.io/~/files/v0/b/gitbook-x-prod.appspot.com/o/spaces%2FEBQHGJABNTj5ISSOTRxM%2Fuploads%2Fxi6IxDScLsRVdgkdhWCd%2FScreenshot%202024-02-01%20at%2010.18.29.png?alt=media&amp;token=feb25bb9-52a3-4936-aad2-97b6f9ad4ff3" alt=""><figcaption></figcaption></figure>

{% hint style="info" %}
Sometimes the invitation email is directed to your spam folder. Make sure to check your spam or junk folder if you can't find the invitation email.
{% endhint %}

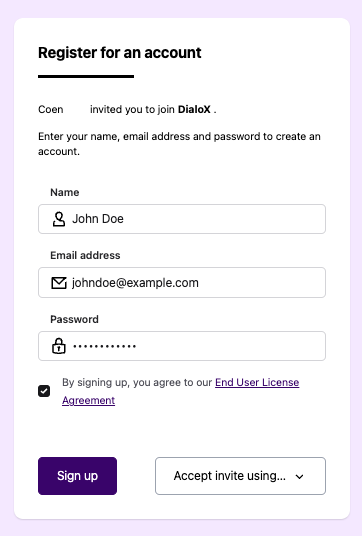
Click on the blue button in the email to sign up. When you haven't signup before, you will be redirected to the signup form. You can sign up using a username and password, or using one of your accounts at Enreach (Operator), Microsoft, Google or Facebook.

<figure><img src="https://3356808761-files.gitbook.io/~/files/v0/b/gitbook-x-prod.appspot.com/o/spaces%2FEBQHGJABNTj5ISSOTRxM%2Fuploads%2FBlw1PDJwYJxGRcCHd3oV%2FScreenshot%202024-02-01%20at%2010.24.09.png?alt=media&amp;token=930aa1ac-2867-46d4-af7a-a34f71692336" alt=""><figcaption></figcaption></figure>

When you sign up using a username and password you need to provide

1. Your name
2. Your email address
3. A password that is secure. Preferably 8 or more characters, containing at least a capital, a special character and a number.

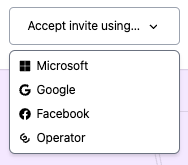
By clicking on Accept invite using, you can choose between the following options depending on how to log in:

<figure><img src="https://3356808761-files.gitbook.io/~/files/v0/b/gitbook-x-prod.appspot.com/o/spaces%2FEBQHGJABNTj5ISSOTRxM%2Fuploads%2FysUG4CflHiC9oBy88oel%2FScreenshot%202024-02-01%20at%2010.26.24.png?alt=media&amp;token=fa2be08e-94c5-4af0-bc00-57adfeadb867" alt=""><figcaption></figcaption></figure>

Then read the end user license agreement and agree to it by selecting the checkbox.

Click the "Sign up" button to proceed. This will continue to the apps overview page within the environment you were invited to. When you don't have a bot yet, you can do so now by clicking **Create your first bot**.


# Switcher

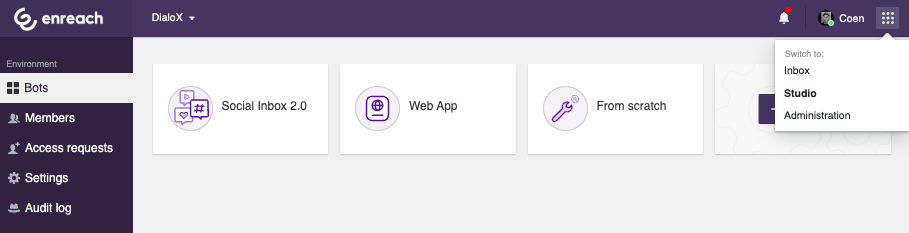
In our platform we distinguish two area’s through our switcher, which you can find in the top right corner of your screen when you are inside our platform. With this switcher you can simply access either the Studio or the Administration area.

<figure><img src="https://3356808761-files.gitbook.io/~/files/v0/b/gitbook-x-prod.appspot.com/o/spaces%2FEBQHGJABNTj5ISSOTRxM%2Fuploads%2FK2jiNE7LXvap4GLJkfzf%2FSwitCHER.png?alt=media&amp;token=2c76e4e7-591d-4a12-be46-8ff42a176ec4" alt=""><figcaption></figcaption></figure>

## Studio

Inside the Studio view you can manage your bots, invite and manage members, grant access requests, settings and keep track of everything through an audit log. The Studio view will help you organise everything specifically your bots and the users.

<figure><img src="https://3356808761-files.gitbook.io/~/files/v0/b/gitbook-x-prod.appspot.com/o/spaces%2FEBQHGJABNTj5ISSOTRxM%2Fuploads%2FH2tKRbjfHKkaNoGaKSyU%2FScreenshot%202024-04-04%20at%2015.01.32.png?alt=media&amp;token=b8b3bc9d-77a9-4046-a76d-174b550d4aae" alt=""><figcaption></figcaption></figure>

## Administration

Inside the Administration view, you an overall view of your partner status as a wholesaler. You can manage your agency settings, environment settings but also keep track of your end customers.

<figure><img src="https://3356808761-files.gitbook.io/~/files/v0/b/gitbook-x-prod.appspot.com/o/spaces%2FEBQHGJABNTj5ISSOTRxM%2Fuploads%2FBZWdbr0fMqB3JtQb9A0L%2FScreenshot%202024-02-06%20at%2008.48.29.png?alt=media&amp;token=59f3f004-cea4-4598-9000-28af033df07d" alt=""><figcaption></figcaption></figure>


# Marketplace Apps

Marketplace Smart Apps

The DialoX platform supports the creation and maintenance of Apps. Apps are composed of one or more [skills](/store/skills), which in their turn comprise of [flows](/studio/flows), [intents](/studio/ai/intents), [content](/studio/content) and [settings](/settings/user-settings) that together automate one or more use cases to end users.&#x20;

The words **Bot, App and Smart App** all refer to the same concept and are mixed throughout the platform and documentation.

End of 2024 the Marketplace was introduced to the Enreach Contact portfolio. As part of this introduction the Apps (also referred to as Bots) are offered as part of an App Tier (also referred to as level). Each tier has its own price, conditions and capabilities.&#x20;

The following table provides a rough overview of the differences between the levels (tiers).

<table><thead><tr><th width="146">Level</th><th width="92">Content</th><th width="76">Flows</th><th width="63">API</th><th width="125">Integrations</th><th width="88">Planner</th><th width="58">KB</th><th>Scripting</th></tr></thead><tbody><tr><td><a href="/store/marketplace-apps/level-1-basic">Basic</a></td><td><a data-footnote-ref href="#user-content-fn-1">✅</a> </td><td></td><td></td><td></td><td></td><td></td><td></td></tr><tr><td><a href="/store/marketplace-apps/level-2-advanced">Advanced</a></td><td>✅</td><td>✅</td><td>✅</td><td></td><td></td><td></td><td></td></tr><tr><td><a href="/store/marketplace-apps/level-3-professional">Professional</a></td><td>✅</td><td>✅</td><td>✅</td><td>✅</td><td>✅</td><td>✅</td><td></td></tr><tr><td>Expert</td><td>✅</td><td>✅</td><td>✅</td><td>✅</td><td>✅</td><td>✅</td><td>✅</td></tr></tbody></table>

{% hint style="info" %}
Depending on the country, the levels could also be named Level 1 - Basic, Level 2 - Advanced, Level 3 - Professional and Level 4 - Expert.
{% endhint %}

## Legacy Apps (before 2025)

The following apps were offered as part of the Enreach Contact portfolio between 2022 and 2024 before the introduction of the Marketplace.&#x20;

* Smart IVR
* Whatsapp Calldeflector

Most of the Smart Apps, still available today in the Marketplace were already available for these legacy tiers and some are decommissioned or replaced by newer versions. These [legacy Smart Apps ](/store/legacy-apps)can be found here.

[^1]:


# Level 1 - Basic

**Level 1 - Basic** Smart Apps are simple to use, providing out-of-the-box solutions with minimal setup for a variety of use cases.


# Callback Note Basic

Smart App to create Callback Notes from incoming phone calls

## Introduction

The Callback Note Basic app is designed to streamline communication within your team by allowing agents to easily create callback notes during conversations. This smart app provides a straightforward way to track follow-up requests, ensuring that no important tasks are missed. It’s an essential tool for teams that prioritize efficient communication and task management.

<figure><img src="https://3356808761-files.gitbook.io/~/files/v0/b/gitbook-x-prod.appspot.com/o/spaces%2FEBQHGJABNTj5ISSOTRxM%2Fuploads%2F74IP5cMso3UkrIcnkzGU%2FScreenshot%202024-10-02%20at%2011.01.12.png?alt=media&amp;token=0ef717a3-fa16-4186-b24f-3df0d541437b" alt=""><figcaption></figcaption></figure>

## Getting Started

### Channel Requirements

* [**Phone**](/studio/channels/phone)\
  The Callback Note Basic will summarize the user's reason for calling.

### Installation Process

The bot requires no extra information to get started.

## Using the Callback Note Basic App

### App Settings

To adjust the settings for Callback Note Basic:

{% stepper %}
{% step %}

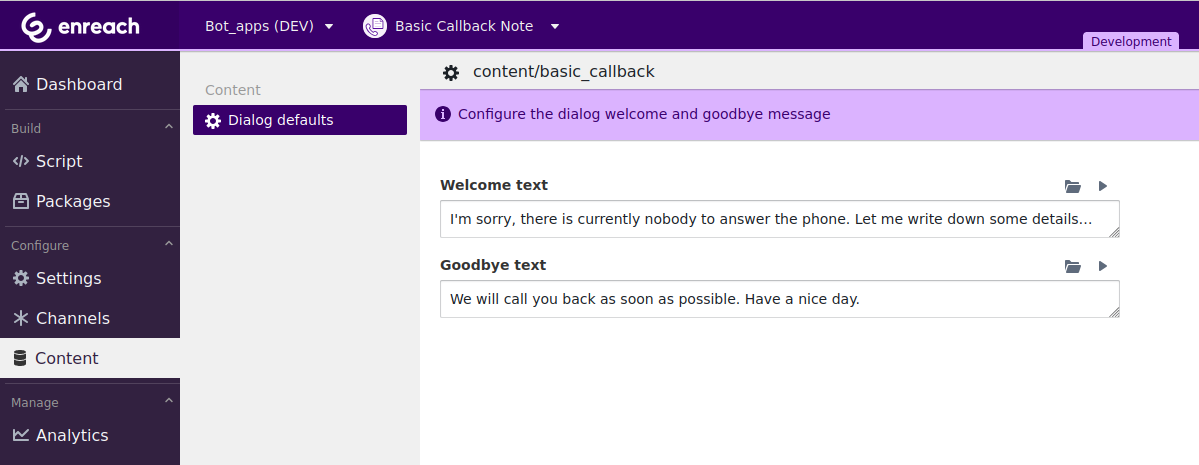
### Add a welcome text

Fill in a welcome text to let the user know there is currently no one to answer the phone.&#x20;
{% endstep %}

{% step %}

### Close the conversation with a goodbye text

Let the user know that there is a follow up after using this service.
{% endstep %}
{% endstepper %}

<figure><img src="https://3356808761-files.gitbook.io/~/files/v0/b/gitbook-x-prod.appspot.com/o/spaces%2FEBQHGJABNTj5ISSOTRxM%2Fuploads%2FkwRK2RnKaPLbQDU9HH2E%2FScreenshot%202024-10-02%20at%2010.59.45.png?alt=media&amp;token=7c713847-17cf-4e8c-ba9a-38270e95075f" alt=""><figcaption></figcaption></figure>

### Roles

Any of the following roles can be assigned to manage the CMS, and thus the contents of the survey:

* **Agent**
* **Operator**

### App Workflow

Here’s how the Callback Note Basic app works. Fill in the necessary details, such as the follow-up date and a brief description. Once the note is saved, it appears in the Notes accessible by authorized users. When it’s time for the follow-up, the app will send a reminder to the assigned agent or supervisor via push notification or email. This can be set up in your personal profile. Completed callbacks can be marked as Resolved to keep the dashboard organized.

## FAQ

<details>

<summary><strong>Who can view callback notes?</strong></summary>

Depending on the role a user has in the customer environment, they can handle the callback notes accordingly. A specific user role for this action would be Operator.

</details>

<details>

<summary><strong>Can I set a default reminder time for all callback notes?</strong></summary>

No, the callback note basic simply allows callers to leave behind their name, phone number and reason for calling, which can be handled by the designated Operator in the environment.&#x20;

</details>

<details>

<summary><strong>How do I disable the Callback Note Basic app?</strong></summary>

You can disable the app if you have the Producer role by navigating to Settings -> Extra options and **Deactivate** the Smart App.

</details>

### Languages

The app will determine the language of the user based on their phone number. The app falls back on the default language of the app in case the language cannot be determined (e.g. French or Dutch in Belgium).

### Opening hours

The opening hours have no effect on the Callback Note Basic app.

## Resources

* [Notes](/studio/notes)
* [Phone](/studio/channels/phone)


# On-call Router Basic

## Introduction

The On-call Router Basic app is a simple and effective solution for managing after-hours or emergency calls. This app allows your team to route incoming calls to the correct on-call staff member based on a predefined schedule. It ensures that urgent calls are handled promptly, improving customer satisfaction and internal efficiency.

## Getting Started

### Channel Requirements

* [**Phone**](/studio/channels/phone)\
  The On-call Router Basic offers companies a service to their customers via phone that can set configuration schedules.  <br>

### Installation Process

{% stepper %}
{% step %}

### Setting up On-call Phonebook

In order for the router to work the system must know which agents there are to whom it can route the call. The on-call agents can be configured in the Content section.

* Go to Content in the left menu, then open the On-call Phonebook.
* Click on the Add button to add an agent to the phonebook.&#x20;
* <img src="https://3356808761-files.gitbook.io/~/files/v0/b/gitbook-x-prod.appspot.com/o/spaces%2FEBQHGJABNTj5ISSOTRxM%2Fuploads%2F1xgwtp2pOwPxvaEwBuJ6%2FScreenshot%202024-10-07%20at%2011.02.41.png?alt=media&amp;token=d60b43d8-67f5-4e1b-b7fb-824bab6beec2" alt="" data-size="original">

{% endstep %}

{% step %}

### Setting up On-call Schedule

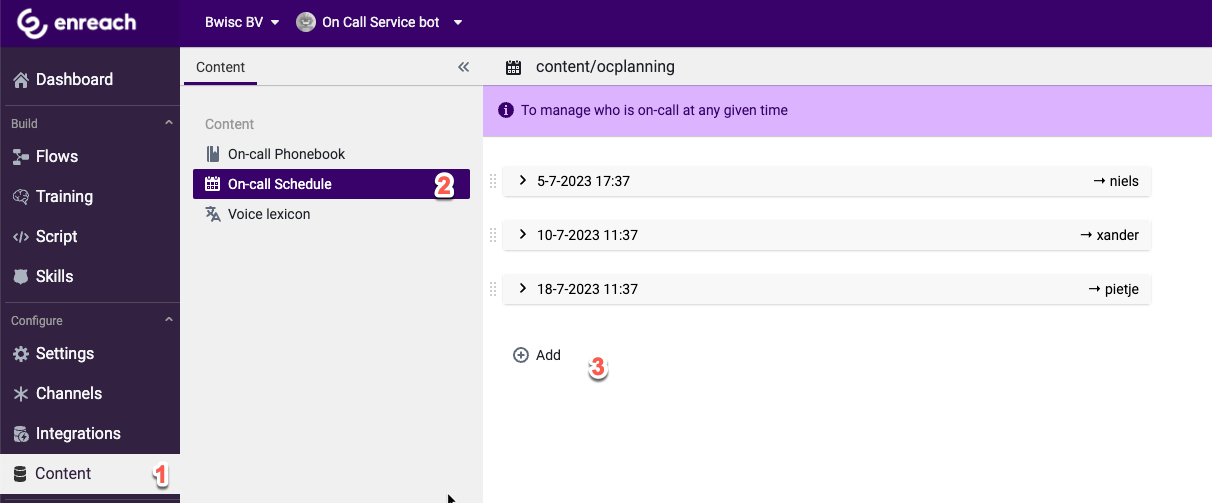
When the agents are configured we can configure the schedule. This will help the system to know when to route the call to which agent.

* Go to Content in the left menu, then open the On-call Schedule.
* Click Add to create a new entry in the schedule.
* <img src="https://3356808761-files.gitbook.io/~/files/v0/b/gitbook-x-prod.appspot.com/o/spaces%2FEBQHGJABNTj5ISSOTRxM%2Fuploads%2FoU6v7vRWkeEZR3kOg8lE%2FScreenshot%202024-10-07%20at%2011.03.06.png?alt=media&amp;token=bc6b408b-c66b-4547-a5df-2edad09e0bdb" alt="" data-size="original">

{% endstep %}
{% endstepper %}

## Using the On-call Router Basic App

### App Settings

To make sure you have a working On-call Router, you must have added users to the Phonebook. Users registered in the phonebook can call and set themselves as the current active on-call employee.

### Roles

Any of the following roles can be assigned to manage the CMS, and thus the contents of the survey:

* **Operator**
* **Content Manager**
* **Producer**

### App Workflow

By registering your agents in the phonebook, the app can do two things. It can route incoming phone calls towards the agent that is currently on-call. When an agent calls towards the same app, it allows them to set themselves as the current on-call agent.&#x20;

{% hint style="info" %}
When setting yourself as the on-call agent via the app, you will be on-call until the start of the next shift in the On-call Schedule.
{% endhint %}

Once the agents are configured you can configure the schedule. This will help the system to know when to route the call to which agent. Go to Content in the left menu, then open the On-call Schedule. Click Add to create a new entry in the schedule.

{% hint style="info" %}
The system always searches for the schedule that is closest to the current date time.
{% endhint %}

### Languages

The app will determine the language of the user based on their phone number. The app falls back on the default language of the app in case the language cannot be determined (e.g. French or Dutch in Belgium).

### Opening hours

The opening hours have no effect on the On-call Router Basic. The schedule is solely based on the On-call Schedule.

### Resources

* [Phone](/studio/channels/phone)


# Smart Group Voicemail

## Introduction

The Smart Group Voicemail app enhances voicemail management by allowing incoming messages to be routed and shared among specific teams or departments. This app streamlines how voicemails are handled, ensuring that each message reaches the right group without delay. It’s designed for organizations that prioritize quick responses and efficient communication.

## Getting Started

### Channel Requirements

* [**Phone**](/studio/channels/phone)\
  The Smart Group Voicemail will record and transcribe answers provided over the phone.<br>
### Installation Process

{% stepper %}
{% step %}

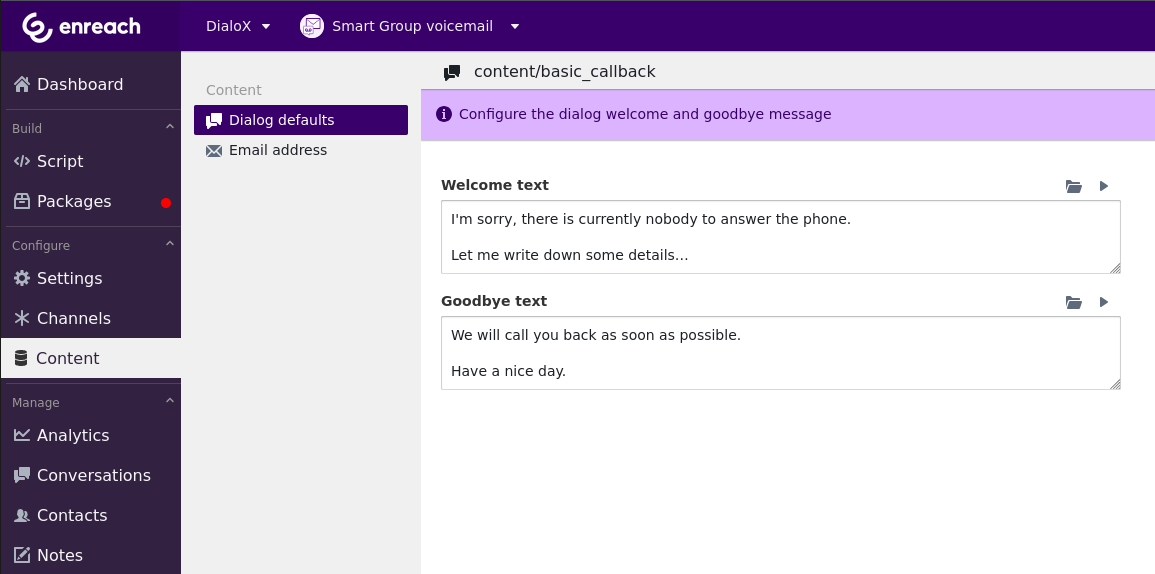
### Add a welcome and goodbye text&#x20;

Fill in a welcome text to let the user know there is currently no one to answer the phone. By adding a close confirmation you let the user know that there is a follow up after using this service.&#x20;

<img src="https://3356808761-files.gitbook.io/~/files/v0/b/gitbook-x-prod.appspot.com/o/spaces%2FEBQHGJABNTj5ISSOTRxM%2Fuploads%2FhMBJGOqQa9oA4c2Xd8tc%2Fimage.png?alt=media&amp;token=53d043a7-ad94-4ba8-9d5d-d4ff2da0a4ef" alt="" data-size="original">
{% endstep %}

{% step %}

### Add the recipient of the Smart Group Voicemail

Go to "Content - Email settings" and fill out the "Email address", so you will receive the answer of the call via email.

If you leave this field empty, the answers will be stored in a [note](/studio/notes).&#x20;

<img src="https://3356808761-files.gitbook.io/~/files/v0/b/gitbook-x-prod.appspot.com/o/spaces%2FEBQHGJABNTj5ISSOTRxM%2Fuploads%2FnA613inq7NsUOhiEEUli%2Fimage.png?alt=media&amp;token=44fbd7a9-2e38-4411-a9eb-c0f7f3664429" alt="" data-size="original">
{% endstep %}
{% endstepper %}

## Limitations

The bot will ask for name and phone number of the caller and the reason of the call. The text for these questions as well as adding or changing the questions is not possible in this basic app. For this you would need to buy the Advanced level Smart App called [Callback note](/store/marketplace-apps/level-2-advanced/callback-note). In this bot the entire flow can be customized.

## Using the Smart Group Voicemail App

### App Settings

The app can be configured with a welcome and a goodbye message. By default, the app will create a note with the details left by the caller. However, when you provide an email address, the app will send the details to that email address instead of creating a note in the Inbox.&#x20;

### Roles

Any of the following roles can be assigned to manage the CMS, and thus the contents of Smart Group Voicemail:

* **Agent**
* **Operator**
* **Content Manager**

### App Workflow

The Smart Group Voicemail app can be used as an alternative voicemail box. Simply forward your calls to this app whenever you are unavailable. The app will ask for the caller's name, phone number, and reason for the call. These details will be stored so you can follow up on the call at a later time.

We record the audio when asking the caller for their reason of calling. The audio will be attached to the email, or when using notes, a link to the audio fragment will be provided.

{% hint style="info" %}
Notes that are generated by your voicemail are collected in the Notes section. There notes can be followed up by marking them as completed. This way you'll never forget to follow up on promises made by your app.
{% endhint %}

## FAQ

<details>

<summary><strong>How do I add or remove members?</strong></summary>

Members can be managed in the environment section as an Organisation Manager. You can add or remove individuals by [inviting](/administration/users#invite-users) members to the environment.

</details>

<details>

<summary><strong>Can I receive email notifications for new voicemails?</strong></summary>

Yes, email notifications can be enabled in the **Email Settings** section within the app settings.

</details>

### Languages

The app will determine the language of the user based on their phone number. The app falls back on the default language of the app in case the language cannot be determined (e.g. French or Dutch in Belgium).

### Opening hours

The opening hours have no effect on the Smart Group Voicemail.

## Resources

* [Notes](/studio/notes)
* [Phone](/studio/channels/phone)


# Smart IVR Basic

Smart App to forward incoming phone calls

## Introduction

The Smart IVR Basic app provides a user-friendly, customizable Interactive Voice Response (IVR) system. This app allows you to automate call routing, guiding callers to the right department or agent without manual intervention. Smart IVR Basic is designed to improve call efficiency and customer experience by offering clear menu options and seamless call management.

## Getting Started

### Channel Requirements

* [**Phone**](/studio/channels/phone)\
  The Smart IVR Basic will route incoming callers to the designated area(s). <br>

### Installation Process

{% stepper %}
{% step %}

### Opening hours&#x20;

Make sure your [opening hours](/settings/app-settings/opening-hours) are configured.
{% endstep %}

{% step %}

### Phone channel

Make sure your [phone](/studio/channels/phone) channel is enabled.
{% endstep %}

{% step %}

### Welcome text

Fill in a welcome text for customers calling.
{% endstep %}

{% step %}

### Routing

Configure the various forwarding options to whom the Smart App will be forwarding incoming calls.
{% endstep %}
{% endstepper %}

## Using the Smart IVR Basic App

### App Settings

After installing the app, go to Content -> Configuration to register the forwarding options.

<figure><img src="https://3356808761-files.gitbook.io/~/files/v0/b/gitbook-x-prod.appspot.com/o/spaces%2FEBQHGJABNTj5ISSOTRxM%2Fuploads%2FE994o2Eou067HJYVwY7Q%2FScreenshot%202024-10-02%20at%2010.58.30.png?alt=media&amp;token=14db52ff-ad71-47ae-9433-2b8300cb6190" alt=""><figcaption></figcaption></figure>

Then navigate to AI -> Intents to configure your App's [intents](/studio/ai/intents).

* **Label:** Provide short and clear labels for each forward option.\
  The labels are used by the app to let the caller know which options to choose from.&#x20;
* **Description:** In the description field the instructions to the AI need to be provided which helps the bot to decide to whom it will be forwarding the call.

{% hint style="info" %}
Descriptions are used by the bot as extra information in deciding to which number the caller will be forwarded.&#x20;

When asking about printers in an office we most likely need to talk to the IT department, whereas if we'd ask about printers at an electronics department, we might need to talk to Sales.
{% endhint %}

### Roles

Any of the following roles can be assigned to manage the CMS, and thus the contents of the Smart IVR Basic:

* **Operator**
* **Content Manager**
* **Producer**

### App Workflow

The Smart IVR Basic app follows a streamlined workflow:

A caller dials into your business, and the Smart IVR greets them with a pre-recorded welcome message. The caller selects an option from the menu choices provided (e.g., "Press 1 for Sales"). The call is routed to the appropriate department or agent based on the caller's input. Supervisors can review the call flow and adjust the menu options as needed to optimize call handling. Administrators have full control over editing and updating the IVR menu and routing rules at any time.

## FAQ

<details>

<summary><strong>How do I change the menu options in the IVR system?</strong></summary>

You can edit menu options in the Content section of the Smart App. Simply add, remove, or modify the choices as needed.

</details>

<details>

<summary><strong>Can I set up different call flows for different times of the day?</strong></summary>

Yes, you can use the [Timeplans](/store/skills/timeplans) feature to create custom call flows based on business hours, holidays, or other schedules.

</details>

<details>

<summary><strong>Is it possible to add multiple languages to the IVR menu?</strong></summary>

Yes, the supported languages can be set in the Smart App [identity](/settings/app-settings/app-identity). This allows you to offer the IVR menu in multiple languages, enhancing accessibility for your customers.

</details>

### Languages

The app will determine the language of the user based on their phone number. The app falls back on the default language of the app in case the language cannot be determined (e.g. French or Dutch in Belgium).

### Opening hours

The opening hours determine whether or not the call will be forwarded to the chosen destination. Make sure configure them correctly.

## Resources

* [Phone](/studio/channels/phone)
* [Opening hours](/settings/app-settings/opening-hours)


# SMS Call Deflector

Redirect incoming calls via SMS to any chat based solution

## Introduction

The SMS Call Deflector app will redirect incoming calls to a chat-based channel via SMS. The app will send a text message to the caller, containing a link to either a webpage, the PWA, or new WhatsApp chat to a number of your choosing.

The PWA of this app accepts incoming messages and will escalate to an operator via the Inbox.\
If the operator doesn't join the chat within the preconfigured time, it will ask the customer to leave their contact details. This way the customer will receive either an email or a text message once the operator joins the chat, allowing them to re-engage in their own time.

## Getting Started

### Channel Requirements

* [**Phone**](/studio/channels/phone)\
  The SMS Call Deflector will redirect incoming calls to chat based channels.<br>
* [**PWA**](/studio/channels/progressive-web-app-pwa)\
  (Optionally added channel).

{% hint style="warning" %}
When redirecting to PWA, also enable your PWA channel and/or [chatwidget](/studio/channels/chat-widget) channel
{% endhint %}

### Installation Process

{% stepper %}
{% step %}

### Opening hours&#x20;

Make sure your [opening hours](/settings/app-settings/opening-hours) are configured.&#x20;
{% endstep %}

{% step %}

### Phone channel

Make sure your [phone](/studio/channels/phone) channel is enabled.
{% endstep %}

{% step %}

### Configure the SMS deflection

Set up the behavior in the content section, see below
{% endstep %}

{% step %}

### Finalize

[Invite](/administration/users#invite-users) your users and let them configure their [availability](/settings/user-settings/availability-settings) settings, [profile](/settings/user-settings/profile-settings) settings, [notification preferences](/inbox/notifications) and optionally [security settings](/settings/user-settings/security), such as multi-factor authentication.
{% endstep %}
{% endstepper %}

## Using the SMS Call Deflector App

### App Settings

#### SMS configuration

Here you can change the destination of the deflection. The three options are:

* **SMS to PWA**\
  This will include a link to the PWA (chat interface) of this app. When the chat is opened by the customer, the app will escalate the conversation to a human operator. The conversation can then be handled from the [Inbox](/inbox/inbox/assigning).\
  \
  [Learn how to enable the PWA here](/studio/channels/progressive-web-app-pwa).<br>
* **SMS to Web URL**\
  The SMS will contain a link to a webpage of your choosing.<br>
* **SMS to WhatsApp**\
  If your license doesn't include a [WhatsApp integration](/store/legacy-apps/whatsapp-calldeflector-1.0), you can also deflect to any other WhatsApp number. This doesn't need to be a WhatsApp Business account.&#x20;

{% hint style="warning" %}
Unlike the WhatsApp integration, available for Advanced apps, any conversation with the customers via the SMS to WhatsApp route will not be handled in the Inbox.
{% endhint %}

#### Auto responses

After being deflected to the Inbox via an SMS, the app will use a couple of predefined messages to welcome the user. These messages can be configured via the Auto responses in the Content section.

When a customer sends a message in the Inbox, it might take a while before your team is able to respond. Setting the expectations is crucial for customer success. Therefore the system is designed to send a short auto response, directly after a customer sends a message. In this response the expectations for the response time can be set. Go to the content section and open the Auto responses page. Here you can configure what auto response should be given when a new conversation is started.

<figure><img src="https://3356808761-files.gitbook.io/~/files/v0/b/gitbook-x-prod.appspot.com/o/spaces%2FEBQHGJABNTj5ISSOTRxM%2Fuploads%2FCelUNXO6fBDbHoOD0JjD%2Fimage.png?alt=media&amp;token=7aab9099-7051-40f8-8f83-34448d6edc68" alt=""><figcaption></figcaption></figure>

#### Deflector dialog

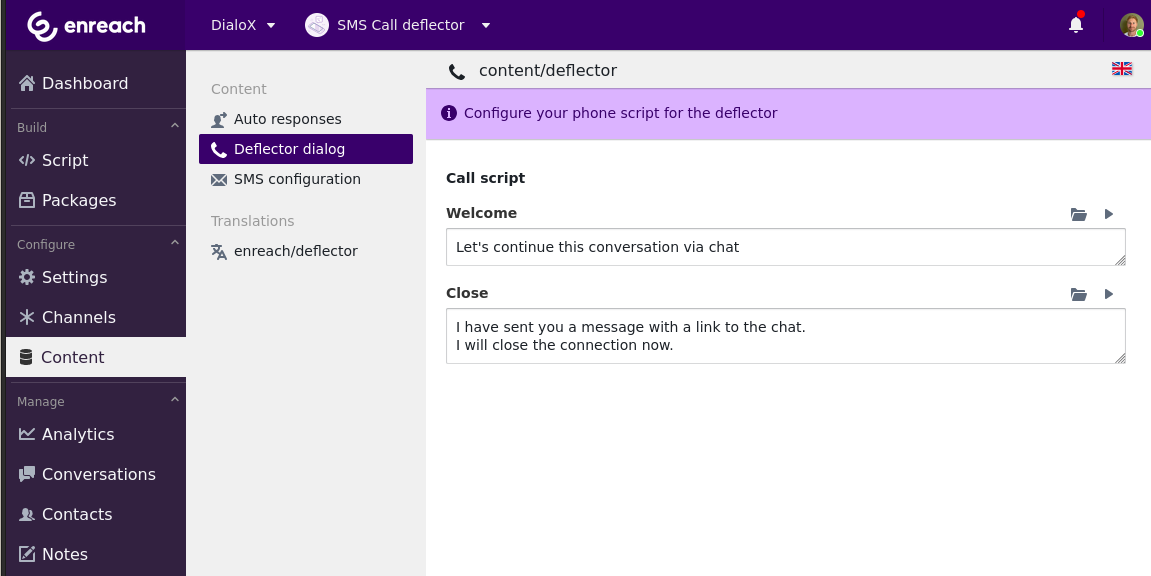
The SMS Call Deflector will start the converstion with the Welcome message from the 'Deflector dialog'. Then it will ask the customer on which phone number they can be reached via a text message. After receiving their phone number, an SMS will be sent, followed by notifying the customer with the Close message of the dialog. Go to the content section and open the 'Deflector dialog'. Here you can configure the messages sent to the customer.

<figure><img src="https://3356808761-files.gitbook.io/~/files/v0/b/gitbook-x-prod.appspot.com/o/spaces%2FEBQHGJABNTj5ISSOTRxM%2Fuploads%2FAmWBxgdL0xXv2mnXkNgR%2Fimage.png?alt=media&amp;token=962bbfa7-def3-4b8f-aafa-c87b4fb7a550" alt=""><figcaption></figcaption></figure>

### Roles

Any of the following roles can be assigned to manage the CMS, and thus the conents of the SMS Call Deflector

* **Agent**
* **Operator**
* **Content Manager**

## App Workflow

The SMS Call Deflector app operates as follows:

An incoming call triggers the app, which assesses the deflection criteria. If the call meets the deflection rules, the system automatically sends an SMS message using a predefined template. The SMS message offers the caller a choice to continue the conversation via text. Agents can monitor and respond to SMS interactions using the integrated SMS dashboard. Calls that do not meet the deflection criteria are routed through standard channels as usual.

## FAQ

<details>

<summary><strong>Can I set different SMS templates for various call scenarios?</strong></summary>

Yes, you can create multiple SMS templates in the SMS Configuration section, each tailored to specific scenarios such as missed calls or after-hours inquiries.

</details>

### Languages

The app will determine the language of the user based on their phone number. The app falls back on the default language of the app in case the language cannot be determined (e.g. French or Dutch in Belgium).

### Opening hours

When using the SMS Call Deflector to deflect to PWA, the office hours will let the user know if they're reaching out within or outside office hours. This helps set the expectation on how long to wait for a reply.

## Resources

* [Phone](/studio/channels/phone)
* [Inbox](/inbox/inbox)


# Survey Basic

Take a survey over the phone with audio transcription

## Introduction

The Survey Basic app allows you to ask a list of questions and route them through different outputs, such as a note or an email.&#x20;

## Getting Started

### Channel Requirements

* [**Phone**](/studio/channels/phone)\
  The Survey Basic will record and transcribe answers provided over the phone.

### Installation Process

{% stepper %}
{% step %}

### Add the recipient of the survey

Go to "Content - Email settings" and fill out the "To" field, so you receive the answers of the survey via email.

If you leave this field empty, the answers will be stored in a [note](/studio/notes).
{% endstep %}

{% step %}

### Add questions to the survey

Go to "Content - Questionnaire" and add questions to the survey via the "Add question" button.&#x20;
{% endstep %}
{% endstepper %}

## Using the Survey Basic

### App Settings

In the Email Settings page, you can configure the email sent after completing the survey. It's possible to change the subject, header, and any additional recipients via the CC.

<figure><img src="https://3356808761-files.gitbook.io/~/files/v0/b/gitbook-x-prod.appspot.com/o/spaces%2FEBQHGJABNTj5ISSOTRxM%2Fuploads%2FRMzl5V20mJQsXRvjdQg0%2Fimage.png?alt=media&amp;token=38d1c6e2-f06f-4dcd-8772-ff58c78077b5" alt=""><figcaption></figcaption></figure>

The survey itself can be altered via the Questionnaire CMS.

The opening and closing text and the questions are freely configurable to your liking.

{% hint style="warning" %}
The Survey Basic records and transcribes every answer.&#x20;

It keeps recording until the user presses the hash key (#) on their phone.&#x20;

Make sure to mention it to your users in your questions to prevent confusion.
{% endhint %}

<figure><img src="https://3356808761-files.gitbook.io/~/files/v0/b/gitbook-x-prod.appspot.com/o/spaces%2FEBQHGJABNTj5ISSOTRxM%2Fuploads%2FfqQfoHPVzjfm1izuONCQ%2Fimage.png?alt=media&amp;token=2ba657ac-903a-4251-8428-3c2cf9a12959" alt=""><figcaption></figcaption></figure>

### Roles

Any of the following roles can be assigned to manage the CMS, and thus the contents of the survey:

* **Content manager**
* **Supervisor**
* **Producer**

### App Workflow

The Survey Basic starts out by prompting the Opening text, followed by the questions defined in the CMS.&#x20;

The user can speak to provide answers to the questions, followed by a hash key (#) to indicate the end of their answer.

After completing the round of questions, the app will wrap up the conversation with the Closing text.&#x20;

The answers to the survey will be transcribed and stored in a [note](/studio/notes). \
There you can read the transcription, as well as listen back to the audio input for the question. This can be useful when the transcribing did not completely get it right.&#x20;

<figure><img src="https://3356808761-files.gitbook.io/~/files/v0/b/gitbook-x-prod.appspot.com/o/spaces%2FEBQHGJABNTj5ISSOTRxM%2Fuploads%2FTffYUs4wDOM1GrhjpSyd%2Fimage.png?alt=media&amp;token=173d113d-0584-4a88-a879-e6f2ba7708e1" alt=""><figcaption></figcaption></figure>

### Languages

The app will determine the language of the user based on their phone number. The app falls back on the default language of the app in case the language cannot be determined (e.g. French or Dutch in Belgium).

### Opening hours

The opening hours have no effect on the Callback Note Basic.

## Resources

* [Notes](/studio/notes)
* [Phone](/studio/channels/phone)


# Caller Based Router

Route a call based on Caller details

## Introduction

The Caller Based Routing skill enables a Smart App to take a call and route it based on the caller's number. By configuring Routing Rules, the Smart App will be able to implement several use cases, like:

* when a number starts with +49, route it to our German speaking department
* when a caller called before, route it to a second line department
* when a caller never called before, route it to our new customers department
* route the caller to a predefined department based on a tag set in the CRM
* etc

## Getting Started

### Channel Requirements

* [**Phone**](/studio/channels/phone)\
  The Caller Based Router will route the call to a specific extension or phone number based on the caller's details.

### Installation Process

The bot requires no extra information to get started.

## Using the Caller Based Router App

### App Settings

To be able to use this Smart App there are two configuration items to configure:

1. Fallback number
2. Routing rules

#### Fallback number

In the content section of the Smart App, click on the "Fallback number" page.

<figure><img src="https://3356808761-files.gitbook.io/~/files/v0/b/gitbook-x-prod.appspot.com/o/spaces%2FEBQHGJABNTj5ISSOTRxM%2Fuploads%2FczygcW5vvwBdsXs1f9JQ%2Fimage.png?alt=media&amp;token=69b0d714-a21d-43ed-b9f2-b09dc592a401" alt=""><figcaption><p>Configure Fallback number</p></figcaption></figure>

Now configure the extension or phone number this Smart App should refer to when none of the Routing Rules apply based on the incoming number. This way, a phone call never gets lost, even if the rules you configured don't cover all possible cases.

#### Routing rules

Click on Routing rules in the content section of your Smart App in order to define the rules that should apply.

<figure><img src="https://3356808761-files.gitbook.io/~/files/v0/b/gitbook-x-prod.appspot.com/o/spaces%2FEBQHGJABNTj5ISSOTRxM%2Fuploads%2FfBkCa9ARjmkMOewmhgKf%2Fimage.png?alt=media&amp;token=8129d52b-de6a-40a0-9556-cf8ad4482d14" alt=""><figcaption><p>Configure routing rules</p></figcaption></figure>

1. Click on the Add rule button to add a new rule.&#x20;
2. Select the Type
3. Fill in the specific details needed for this type, like the number in case of the "number equals" type
4. Fill in the target number to which the call should be routed (this can be an extension or queue too)
5. Optionally add a tag that should be set in order to measure the number of times this rule was triggered in your Smart App in a time period

### Routing Rules

The following rules are supported:

| Routing rule       | Applies when                                                  | Example                     |
| ------------------ | ------------------------------------------------------------- | --------------------------- |
| Number equals      | the caller's number equals the configured **number**          | +316123456789               |
| Number starts with | the caller's number starts with a given **pattern**           | +49                         |
| Anonymous caller   | no phone or extension number is available in the call details |                             |
| Returning contact  | this contact called before with this number                   |                             |
| New contact        | this contact has never called before with this number         |                             |
| Number in the list | the number is included in the given **list of numbers**       | 101, 102, 103, 104, 105     |
| Custom condition   | the caller's details match a given **custom condition**       | has tags \[vip] \[customer] |

### Custom conditions

The routing rules described in the table above are quite straightforward. The "Custom condition" rule requires a bit more explanation. It uses the [Flow Conditions](/studio/flows/conditions) option to let you define a custom condition based on multiple expressions. This way you can base a rule on certain variables (user fields) and/or user tags.&#x20;

The ability to configure a custom condition allows for more complex use cases. For instance, using the [REST API contacts endpoint](https://developer.dialox.ai/dev/rest/#/User%20operations) or by uploading a CSV file with your customer data, it is possible to feed the DialoX CRM with your customers. You can use specific user fields or tags to indicate certain customer attributes, like which department they belong to, their customer number, their region or location, etc. Based on this information you can then configure routing rules.


# Level 2 - Advanced

**Level 2 - Advanced** Smart Apps are customizable using [Flows](/studio/flows). They also enable the use of our API.

## Flows

Apps in the Advanced Smart App tier come with a built-in Flows that define their behaviour. These Flows can be used as they are, with minimal configuration, or fully customised to suit your specific use case. Learn more in the [Flows](/studio/flows) section.


# Call Deflector

Deflect phone or web chat conversations to WhatsApp for easy re-engagement

## Introduction

The Call Deflector app enables your bot to answer incoming chat messages on your social channels. It can be used to configure any type of social messaging assistant. By default, it is configured to forward messages to an employee (escalate) while sending an automatic reply, but it can also be configured for automatic answering on recognized questions.

On other channels than WhatsApp it will deflect to WhatsApp when it takes too long for an employee to join and respond. This way your audience is forced to continue in WhatsApp which makes them re-engageable, even when they are offline.&#x20;

## Getting started

### Channel requirements

The app requires a chat channel to handle incoming messages.  It can also handle the phone channel to redirect callers to a chat-based channel.

* [Phone](/studio/channels/phone)
* [WhatsApp API](/studio/channels/whatsapp/whatsapp)

### Installation process

{% stepper %}
{% step %}

### Define opening hours

The app uses your [opening hours](/settings/app-settings/opening-hours) to determine whether or not you are online. \
Via 'Settings - Opening hours' you can modify the availability of your bot.

<img src="https://3356808761-files.gitbook.io/~/files/v0/b/gitbook-x-prod.appspot.com/o/spaces%2FEBQHGJABNTj5ISSOTRxM%2Fuploads%2FwdhcNBS1ti6iU2iqPgvZ%2Fimage.png?alt=media&amp;token=74ea9db4-83d2-47be-8022-8946886d8e7b" alt="" data-size="original">
{% endstep %}

{% step %}

### Enable a chat channel

The Call Deflector requires at least one social chat channel, such as [WhatsApp](/studio/channels/whatsapp/whatsapp).
{% endstep %}
{% endstepper %}

## Using the Call Deflector

### App settings

The only settings required for the app are the opening hours. Based on the opening hours the Smart: Escalate node can redirect users to WhatsApp for easier re-engagement.&#x20;

### Roles

* **Agent**
* **Operator**
* **Supervisor**
* **Producer**

### App workflow

The app is configured up with 4 flow files

* Playbook
* Inbox&#x20;
* Phone2wa
* Web2wa

#### Playbook

The playbook allows starting the conversation on three separate channels in order to elicit the user intention. You can see this by inspecting the little badges at the [main](/studio/flows/triggers#main) entry point, this will be telephony, chat and WhatsApp channel related situations. The user, depending on calling or chatting will then try to answer the questions created (in this case no questions are trained) therefore the unknown flow will trigger the auto reply flow.

<figure><img src="https://3356808761-files.gitbook.io/~/files/v0/b/gitbook-x-prod.appspot.com/o/spaces%2FEBQHGJABNTj5ISSOTRxM%2Fuploads%2FmRb3sB24VxUlOcFhyoqm%2Fimage.png?alt=media&amp;token=e1884d9f-734f-41cc-89a4-7227519e544b" alt=""><figcaption></figcaption></figure>

#### Inbox

The Inbox will open the conversation on Web using a [say node](https://manuals.dialox.ai/studio/flows/nodes/say) and a [prompt](https://manuals.dialox.ai/studio/flows/nodes/prompt) in order to elicit the user intention. You can see this by inspecting the little badges at the [main](https://manuals.dialox.ai/studio/flows/triggers#main) entry point. The prompt will then try to answer the question (in this case no questions are trained) therefore the unknown flow will trigger the [Escalate: smart ](/studio/flows/nodes/escalate-smart)flow.

However, on WhatsApp the conversation is never started by the bot (unless a template message is sent) but only by a Contact. Therefore, the Escalate: smart kick in directly when a message is sent that isn't automatically replied by a [dialog trigger](https://manuals.dialox.ai/studio/flows/nodes/flow-control-invoke-dialog).&#x20;

<figure><img src="https://3356808761-files.gitbook.io/~/files/v0/b/gitbook-x-prod.appspot.com/o/spaces%2FEBQHGJABNTj5ISSOTRxM%2Fuploads%2Fs6l64V0YKDc06MoAMOWU%2Fimage.png?alt=media&amp;token=d089362e-dbe3-4d22-9b31-a37a74341892" alt="" width="563"><figcaption></figcaption></figure>

#### Phone2wa

The Phone to WhatsApp (Phone2wa) flow deflects incoming phone calls to WhatsApp. The app asks the user to which phone number it can send a WhatsApp message:

<figure><img src="https://3356808761-files.gitbook.io/~/files/v0/b/gitbook-x-prod.appspot.com/o/spaces%2FEBQHGJABNTj5ISSOTRxM%2Fuploads%2Fsypx0GwQPVram9zhxgGv%2Fimage.png?alt=media&amp;token=ab52a984-3875-422a-8067-d4b7fdab8511" alt=""><figcaption></figcaption></figure>

Once the connected has been closed, the caller will receive a WhatsApp message based on the number the call has given up to be contacted on. See the [Ask: phone](/studio/flows/nodes/ask-phone) for reference. After the caller reacts to the incoming WhatsApp message, the conversation moves from speech to chat. &#x20;

#### Web2wa

The Web to WhatsApp (Web2wa) flow, pushes the chat conversation to WhatsApp. When it takes too long for an operator to join the chat, the user will be shown a QR code. If the user scans the QR Code, their phone will open WhatsApp, allowing them to continue the conversation there.

The deflection to WhatsApp is useful for two reasons:

1. It allows you to re-engage more easily. People don't tend to keep their browser tab with the chat widget open all the time. WhatsApp offers a familiar experience, and users know they can close a conversation.
2. On web, users expect to be answered directly, whereas on WhatsApp they're used to a more slow chat.

<figure><img src="https://3356808761-files.gitbook.io/~/files/v0/b/gitbook-x-prod.appspot.com/o/spaces%2FEBQHGJABNTj5ISSOTRxM%2Fuploads%2FAzUcxi4aqq54D0spEBVi%2Fimage.png?alt=media&amp;token=7d55c174-7970-4cd1-b204-5799b3486bd1" alt=""><figcaption></figcaption></figure>

## FAQ

<details>

<summary>Is it possible to escalate to a certain department in the Inbox?</summary>

Using the tags in the Smart: Escalate node, you can specify to which team or department the chat will be escalated. Please read [Multiple inboxes](/inbox/inbox/multiple-inboxes) for more information about setting up multiple departments for different scenarios.

</details>

### Languages

The app will determine the language of the user based on their phone number. The app falls back on the default language of the app in case the language cannot be determined (e.g. French or Dutch in Belgium).

It's possible to add an "Ask: Language" node to allow users to switch to their preferred language.

### Opening hours

The app will let the user know if they're reaching out within or outside office hours. This helps set the expectation on how long to wait for a reply.

## Resources

* [Flows](/studio/flows)
* [Inbox](/inbox/inbox)
* [Phone](/studio/channels/phone)
* [WhatsApp API](/studio/channels/whatsapp/whatsapp)
* [Chat widget](/studio/channels/chat-widget)
* [Opening hours](/settings/app-settings/opening-hours)


# Callback Note

Takes the call and creates a note.

## Introduction

The Callback Note app is a valuable tool that enables your team to efficiently handle and track callback requests. This smart app is designed to streamline the follow-up process by creating detailed callback notes that can be shared with team members. The Callback Note app ensures that no customer request goes unanswered, helping you improve communication and customer satisfaction.

<figure><img src="https://3356808761-files.gitbook.io/~/files/v0/b/gitbook-x-prod.appspot.com/o/spaces%2FEBQHGJABNTj5ISSOTRxM%2Fuploads%2FoIlPa8flW3k4vz243o5K%2FScreenshot%202024-11-14%20at%2011.17.45.png?alt=media&amp;token=c35ec980-a260-4dfa-8b29-dab2dc266b33" alt=""><figcaption></figcaption></figure>

## Getting Started

### Channel Requirements

* [**Phone**](https://manuals.dialox.ai/studio/channels/phone) \
  The Callback Note takes the call and creates a note.

### Installation Process

The bot requires no extra information to get started.

## Using the Callback Note App

### App Settings

To configure the Callback Note app:

{% stepper %}
{% step %}

### Set up your automated flow

Edit the default flow or create a new one to ask your customer essential questions and record them in a [Note](/studio/flows/nodes/note-create) or [Email](/studio/flows/nodes/send-email).
{% endstep %}

{% step %}

### Assigning callback notes

Go into the [Notes](/inbox/notes) interface and select yourself or a coworker as owner of a note. Mark as done when handled.

<img src="https://3356808761-files.gitbook.io/~/files/v0/b/gitbook-x-prod.appspot.com/o/spaces%2FEBQHGJABNTj5ISSOTRxM%2Fuploads%2FXFlqkxwFH7bwNC8eFNdk%2FScreenshot%202024-10-02%20at%2011.09.22.png?alt=media&amp;token=7dd5ed3c-a89f-4c57-90ed-be4e1e408714" alt="" data-size="original">
{% endstep %}
{% endstepper %}

### Roles

The Callback Note app includes the following roles:

* **Agent**
* **Operator**
* **Supervisor**

## App Workflow

The Callback Note app follows a straightforward workflow. An agent or operator receives a callback request during a customer interaction or from missed calls. The agent or operator handles relevant details such as the customer’s input. Predefined [variables](/studio/flows/variables) are populated from the nodes assigned in the configuration, ensuring consistent data capture. The callback note is stored in the platform and can be shared or assigned to the appropriate team member. Notifications are sent to the assigned agent or team when a callback is due. Once the callback is completed, the note is updated, and the status is marked as done.

## FAQ

<details>

<summary><strong>How do I create a callback note using a template?</strong></summary>

Go to the [Home](/studio/home) section in the DialoX platform, select the Callback Note smart app and fill in the required information. The template will automatically include the relevant variables. Feel free to change the context.

</details>

<details>

<summary><strong>Can I customize which details are captured in a callback note?</strong></summary>

Yes, you can assign specific nodes to variables in the [Assign Variables](/studio/flows/variables) section, allowing you to track only the information you need.

</details>

<details>

<summary><strong>How do I notify an agent/operator about an upcoming callback?</strong></summary>

In the [Notes](/studio/notes) interface, locate the **Assigned Agent** or **Assigned Operator** dropdown or field. Choose the agent or operator from the list of available team members. This selection assigns the note to them directly.

The **Mark as done** button allows agents or operators to finalize a callback note, indicating that the follow-up is complete. This updates the status to "Done" and removes the task from active assignments being greyed out.

</details>

### Languages

The app will determine the language of the user based on their phone number. The app falls back on the default language of the app in case the language cannot be determined (e.g. French or Dutch in Belgium).

It's possible to add an "Ask: Language" node to allow users to switch to their preferred language.

### Opening hours

The office hours have no effect on this app.

## Resources

* [Phone](/studio/channels/phone)


# Order Assistant

Assists in submitting an order over the phone.

## Introduction

The Order Assistant app is a comprehensive tool designed to streamline and automate the ordering process for your customers. This app allows you to create an interactive ordering system, providing an efficient way to manage order placements, confirmations, and updates. The Order Assistant integrates seamlessly with your communication channels to deliver a smooth and hassle-free customer experience.

## Getting Started

### Channel Requirements

* [**Phone**](/studio/channels/phone)\
  The Order Assistant takes incoming orders via phone.&#x20;

### Installation Process

The bot requires no extra information to get started.

## Using the Order Assistant App

### App Settings

To adjust the settings for the Order Assistant:

{% stepper %}
{% step %}

### Set up your automated flow

Edit the default flow or create a new one to ask your customer essential questions and record them in a [Note](/studio/flows/nodes/note-create) or [Email](/studio/flows/nodes/send-email).
{% endstep %}

{% step %}

### Assigning nodes

It is essential to assign nodes to [variables](/studio/flows/variables) that you can include in your notes or emails. This allows you to capture specific details throughout the order process and ensure that important information is communicated accurately.

You can assign a node to a variable via the **Assign To** input field.

<img src="https://3356808761-files.gitbook.io/~/files/v0/b/gitbook-x-prod.appspot.com/o/spaces%2FEBQHGJABNTj5ISSOTRxM%2Fuploads%2FAVXp4BOnW9bs7OvLkmUn%2FScreenshot%202024-11-14%20at%2009.30.09.png?alt=media&amp;token=a96be85d-63b0-42d5-ba3a-01d5ec0160f0" alt="" data-size="original">
{% endstep %}

{% step %}

### Send node configuration

Setting up your Send node using the following settings as an example:

<table><thead><tr><th width="174">Node</th><th width="176">Variable (example)</th><th>Details</th></tr></thead><tbody><tr><td>Ask: name</td><td>/name</td><td>Asking the customer's name</td></tr><tr><td>Ask: date</td><td>/birthday</td><td>Asking the customer's date of birth</td></tr><tr><td>Ask: phone</td><td>/phone</td><td>Asking the customer's phone number</td></tr><tr><td>Send: email</td><td></td><td>Include all relevant variables into your send node</td></tr></tbody></table>

When using the example above, you should have something like this:

<img src="https://3356808761-files.gitbook.io/~/files/v0/b/gitbook-x-prod.appspot.com/o/spaces%2FEBQHGJABNTj5ISSOTRxM%2Fuploads%2Fgml8B1b91XJu8nmxeXSy%2FScreenshot%202024-11-14%20at%2009.33.15.png?alt=media&amp;token=18e38fb5-99a2-46e2-9ca2-69827003d087" alt="" data-size="original">
{% endstep %}
{% endstepper %}

{% hint style="info" %}
If you want to know more about variables and how to set them up, please take a look at [Variables](/studio/flows/variables).
{% endhint %}

### Roles

The following roles can be assigned to manage the Flows for the Order Assistant.

* **Agent**
* **Operator**
* **Producer**
* **Content Manager**

## App Workflow

The Order Assistant app follows a structured workflow:

Customers place an order via a supported communication channel, interacting with a predefined order menu or options. An order confirmation is sent to the company through the chosen notification channel such as [Notes](/studio/flows/nodes/note-create) or [Email](/studio/flows/nodes/send-email).

## FAQ

<details>

<summary><strong>Can I customize the order menu for different products or services?</strong></summary>

Yes, the Flowdesigner allows you to set up custom context and/or content to fit your business needs.

</details>

<details>

<summary><strong>Is it possible to notify customers about the order process?</strong></summary>

Yes, you can set up a flow to make a summary for the customer in the Flow designer.

</details>

### Languages

The app will determine the language of the user based on their phone number. The app falls back on the default language of the app in case the language cannot be determined (e.g. French or Dutch in Belgium).

It's possible to add an "Ask: Language" node to allow users to switch to their preferred language.

### Opening hours

The office hours have no effect on this app.

## Resources

* [Phone](/studio/channels/phone)
* [Notes](/studio/notes)
* [Inbox](/inbox/inbox)


# Smart IVR

Handle incoming calls both during and outside opening hours

## Introduction

The Smart IVR app can automate incoming phone calls. It directs callers to the appropriate department based on their inputs. If the office is closed or agents are unavailable it can capture callback notes or redirect to WhatsApp. &#x20;

## Getting Started

### Channel Requirements

* [**Phone**](/studio/channels/phone)\
  Ensure the phone channel is enabled.<br>
* [**WhatsApp**](/studio/channels/whatsapp/whatsapp)\
  This channel is optional. You can use it to deflect users to WhatsApp when no one is available.

### Installation Process

{% stepper %}
{% step %}

### Define opening hours

The app uses your [opening hours](/settings/app-settings/opening-hours) to determine whether or not you are online. \
Via 'Settings - Opening hours' you can modify the availability of your bot.

<img src="https://3356808761-files.gitbook.io/~/files/v0/b/gitbook-x-prod.appspot.com/o/spaces%2FEBQHGJABNTj5ISSOTRxM%2Fuploads%2FwdhcNBS1ti6iU2iqPgvZ%2Fimage.png?alt=media&amp;token=74ea9db4-83d2-47be-8022-8946886d8e7b" alt="" data-size="original">
{% endstep %}

{% step %}

### Enable phone

To accept incoming calls, enable the [phone channel](/studio/channels/phone) via 'Settings - Channels'.
{% endstep %}

{% step %}

### Update forward options in flows

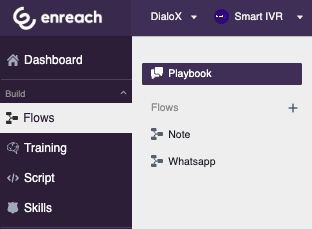
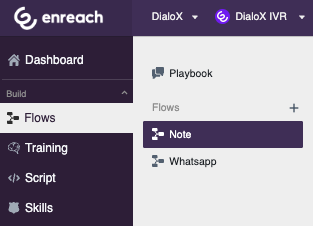
Go to 'Build - Flows'. There you will see the pre-configured flow of the app.&#x20;

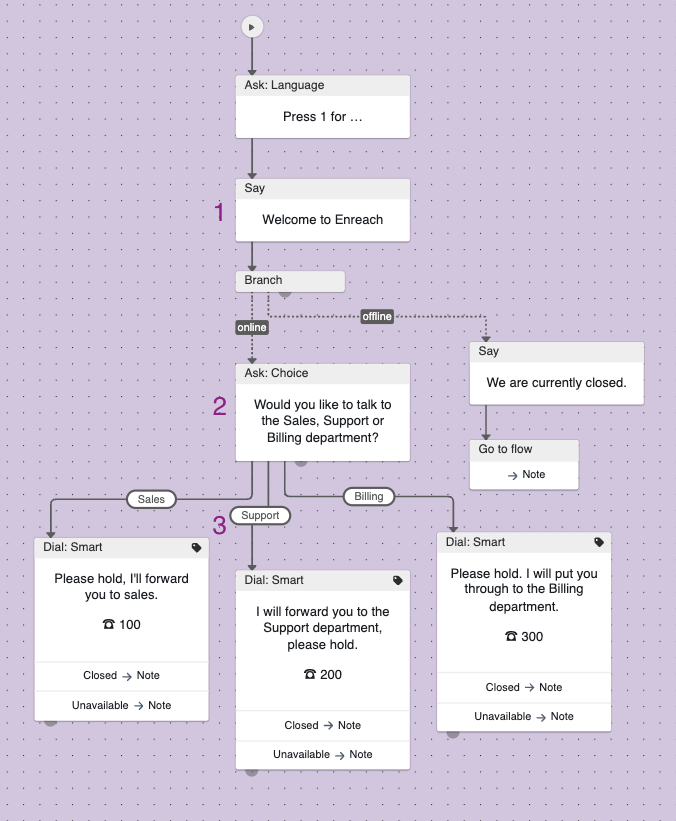
The flow is preconfigured with three departments. Change or add departments to reflect to your business needs. You may for example need to forward to a marketing department instead of a billing department.

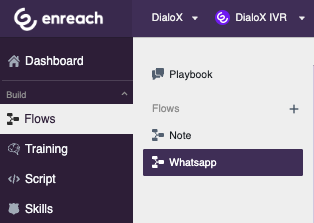
By default, the app will redirect to the 'Note' flow, prompting users to leave some details for you to get back to them. It's possible to change this to the 'WhatsApp' flow. Then they'll be asked to continue the conversation on WhatsApp, making it easier for you to re-engage.
{% endstep %}

{% step %}

### Update intents to match the forwarding options

To make sure the Smart IVR correctly forwards to the departments, you need to set up a correct intent to match it. First remove the intent currently linked to one of the options.

<img src="https://3356808761-files.gitbook.io/~/files/v0/b/gitbook-x-prod.appspot.com/o/spaces%2FEBQHGJABNTj5ISSOTRxM%2Fuploads%2FwCvq6CbQaCAPH4yO6Xbt%2Fimage.png?alt=media&amp;token=44e0de8f-6cbf-4c41-97dd-5abc2decbf2d" alt="" data-size="original">

Then, create a new intent via the intent picker and provide a label and a description.

<img src="https://3356808761-files.gitbook.io/~/files/v0/b/gitbook-x-prod.appspot.com/o/spaces%2FEBQHGJABNTj5ISSOTRxM%2Fuploads%2FA5GL4xwQW20iaQi8gUfX%2Fimage.png?alt=media&amp;token=3b94d482-6dd9-4166-a898-66363d3b8f1a" alt="" data-size="original">

<img src="https://3356808761-files.gitbook.io/~/files/v0/b/gitbook-x-prod.appspot.com/o/spaces%2FEBQHGJABNTj5ISSOTRxM%2Fuploads%2F4jrMI2gGhCAsRdd4AVEy%2Fimage.png?alt=media&amp;token=20d4e23a-f951-4018-90c1-a8dc7f5ed2e5" alt="" data-size="original">

You no longer need to add training phrases, as AI will use the description to determine the intent of the user.
{% endstep %}
{% endstepper %}

## Using the Smart IVR

### Roles

* **Operator**
* **Analyst**
* **Producer**
* **Supervisor**

### App Workflow

When someone calls within opening hours, the Smart IVR will ask the user who they would like to speak to. It will then forward the call to the correct department.&#x20;

If the IVR is unable to forward the call, e.g. when the user calls outside opening hours, or a department is unavailable, it will fall back to creating a callback note.&#x20;

#### Callback Note

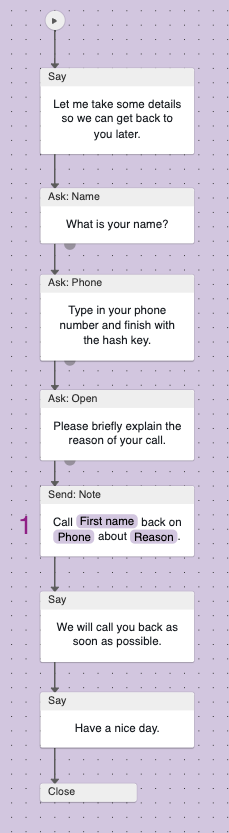
The handling of callback notes is done in the 'Note' flow in the flow editor.&#x20;

Depending on your use case you can change or extend the questions asked but at least you need to consider whether you want the callback notes to be collected in the [Notes](/studio/notes) section of the platform, or to be sent as an email.&#x20;

By default, the Smart IVR will create a note. You can change the node to '[Send: email](/studio/flows/nodes/send-email)' instead if you want an email to be sent.

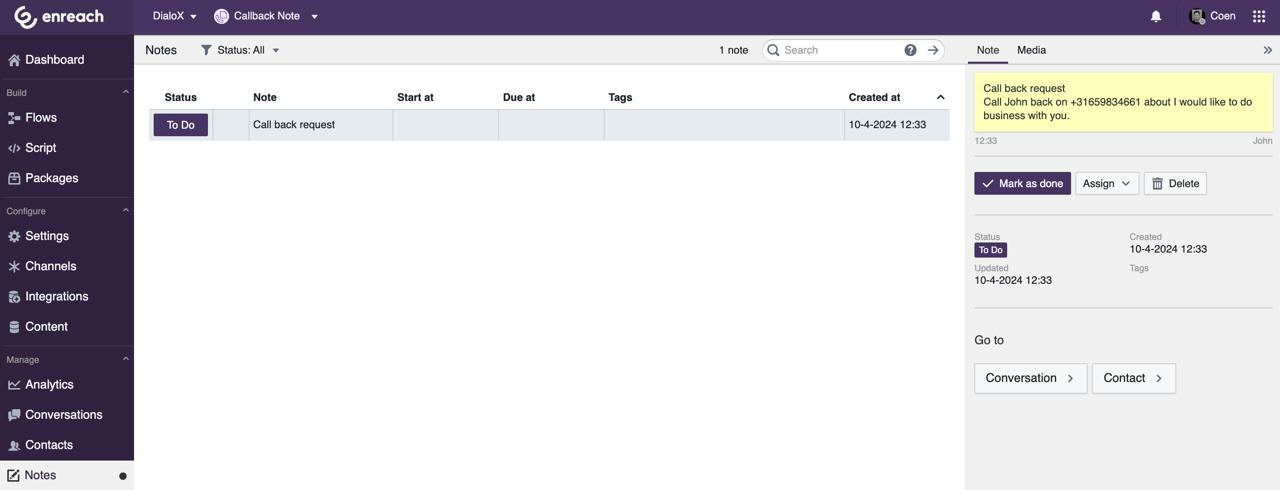
Notes that are generated by your Smart IVR are collected in the Notes section. Notes can be followed up by marking them as completed. Notes can also be integrated in your (back office) systems using the [nodes API](https://developer.dialox.ai/dev/rest/#/Notes) and [note webhook](https://developer.dialox.ai/dev/webhooks/#note-events).

#### WhatsApp

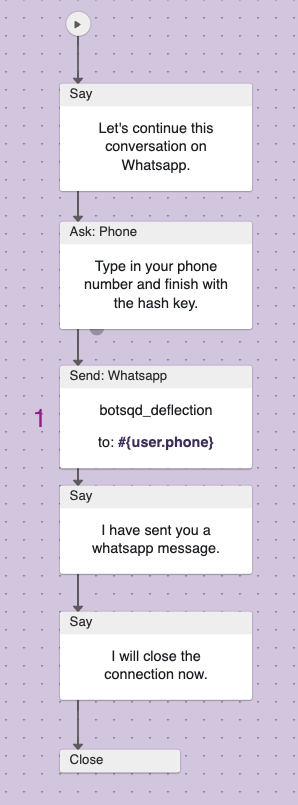
Choosing the WhatsApp flow will cause the Smart IVR to send your caller a WhatsApp message so your caller only needs to respond in order to get in touch.

The WhatsApp flow is by default configured to verify the phone number of the caller and then send them a WhatsApp message.&#x20;

You can customize this via the 'WhatsApp' flow in the flow editor.&#x20;

The message sent to the customer has to be created and verified as a template in [360Dialog](/advanced-topics/360dialog).

## FAQ

<details>

<summary><strong>Can I integrate the notes with other platforms?</strong></summary>

Yes, you can configure a [webhook](https://developer.dialox.ai/dev/webhooks/#note-events) to listen to any notes created. Then via the [Notes API](https://developer.dialox.ai/dev/rest/#/Notes) you can retrieve and act on them.

</details>

<details>

<summary>Do I need WhatsApp for the Smart IVR?</summary>

WhatsApp is not required. The Smart IVR creates notes by default.&#x20;

If you'd like to use WhatsApp, you need to register a WhatsApp Business account and integrate it via 360 Dialog.&#x20;

</details>

### Languages

The app will determine the language of the user based on their phone number. The app falls back on the default language of the app in case the language cannot be determined (e.g. French or Dutch in Belgium).

It's possible to add an "Ask: Language" node to allow users to switch to their preferred language.

### Opening hours

The opening hours are used to determine whether you are online or not. The IVR will only forward calls within opening hours.

## Resources

* [Phone](/studio/channels/phone)
* [WhatsApp API](/studio/channels/whatsapp/whatsapp)
* [Opening hours](/settings/app-settings/opening-hours)
* [Notes](/studio/notes)
* [Flows](/studio/flows)
* [Intents](/studio/ai/intents#new-ui-for-nlp-intents)


# Survey

Take short surveys over the phone

## Introduction

The Survey app allows you to ask a list of questions and route them through different outputs, such as a note or an email.&#x20;

The app is preconfigured to take an [NPS](https://en.wikipedia.org/wiki/Net_promoter_score) (Net promotor score) by phone. \
Based on the score given, the app replies appropriately and asks whether or not the user can be contacted by the support team for feedback.&#x20;

The app then stores all that information in a note.&#x20;

## Getting Started

### Channel Requirements

* **Phone**\
  The app is configured to take the survey via a phone conversation. \
  [Phone](/studio/channels/phone)

## Using the Survey

### Roles

The following roles can be assigned to manage the Flows for the Survey.

* **Producer**
* **Operator**
* **Supervisor**

### App Workflow

The app starts by asking the preferred language of the user, as this isn't always the same as the country code of the phone number. <br>

<figure><img src="https://3356808761-files.gitbook.io/~/files/v0/b/gitbook-x-prod.appspot.com/o/spaces%2FEBQHGJABNTj5ISSOTRxM%2Fuploads%2F9O2Q5BXi2syrtcv7CNjq%2Fimage.png?alt=media&amp;token=173d7e07-e2d5-4348-ba30-49e3d3fd837f" alt="" width="215"><figcaption></figcaption></figure>

Then it asks to rate the their customer service on a scale from 1 to 5. The rating can be given either through speech or via DTMF. After receiving the rating, the user can give extra feedback on why that score was given via the '[Ask: Open](/studio/flows/nodes/ask-open)' node.

<figure><img src="https://3356808761-files.gitbook.io/~/files/v0/b/gitbook-x-prod.appspot.com/o/spaces%2FEBQHGJABNTj5ISSOTRxM%2Fuploads%2FEtJSOW62hntON87pXzT1%2Fimage.png?alt=media&amp;token=3bc3cf66-4b09-47df-a802-47c6919a24c4" alt=""><figcaption></figcaption></figure>

After receiving the feedback, the app asks the user whether or not the support team can reach out to the customer for any further details. If so, the app asks for the user's phone number.

Because this flow takes place on the phone, the '[Ask: Phone](/studio/flows/nodes/ask-phone)' node can ask the user if they can be reached via the phone number currently calling.

<figure><img src="https://3356808761-files.gitbook.io/~/files/v0/b/gitbook-x-prod.appspot.com/o/spaces%2FEBQHGJABNTj5ISSOTRxM%2Fuploads%2FeRRyfFydbo8edvXPcaIV%2Fimage.png?alt=media&amp;token=07b96b68-9ed6-454f-8086-59b976406ea7" alt=""><figcaption></figcaption></figure>

Finally the results are stored in a note, which can be viewed when going to 'Manage - Notes'.

<figure><img src="https://3356808761-files.gitbook.io/~/files/v0/b/gitbook-x-prod.appspot.com/o/spaces%2FEBQHGJABNTj5ISSOTRxM%2Fuploads%2FbVXy6pT21rmJsjQYsXEc%2Fimage.png?alt=media&amp;token=82d448e9-c97e-4dd6-9860-a79ec03bd5b8" alt=""><figcaption></figcaption></figure>

## FAQ

<details>

<summary>Where can I find the stored ratings?</summary>

Ratings are stored both in the [notes](/studio/notes), accessed via 'Manage - Notes', and on the contact itself.&#x20;

In the [contacts screen](/studio/contacts), any given ratings are directly visible via the tag.

</details>

<details>

<summary>Can I store multiple answers in the notes?</summary>

Yes, when using different '[Ask: Open](/studio/flows/nodes/ask-open)' nodes, assign the answer to a variable.&#x20;

After you've assigned the answer to a variable, you can insert that variable in the '[Note: Create](/studio/flows/nodes/note-create)' node by typing a "/" (forward slash) followed by the name of the variable.&#x20;

</details>

### Languages

The app will determine the language of the user based on their phone number. The app falls back on the default language of the app in case the language cannot be determined (e.g. French or Dutch in Belgium).

It's possible to add an "Ask: Language" node to allow users to switch to their preferred language.

### Opening hours

The opening hours have no effect on this app.

## Resources

Find more info here:

* [Phone](/studio/channels/phone)
* [Contacts](/studio/contacts)
* [Ask: Open](/studio/flows/nodes/ask-open)
* [Ask: Phone](/studio/flows/nodes/ask-phone)
* [Note: Create](/studio/flows/nodes/note-create)


# Website Chat

Answer any incoming social chat message

## Introduction

The Website Chat app allows you to manage and automate responses to incoming chat messages on your website via the [Chatwidget](/studio/channels/chat-widget) and [WhatsApp](/studio/channels/whatsapp/whatsapp) channels. It supports automatic responses, escalation to human agents, and deflection to WhatsApp for continued engagement.

## Getting Started

### Channel Requirements

The Website Chat requires a Chat widget channel to be deployed on your own website. The WhatsApp channel is optional to handle chat conversations.&#x20;

* [**Chat widget**](/studio/channels/chat-widget)
* [**WhatsApp**](/studio/channels/whatsapp/whatsapp) \
  Optional but recommended for fallback options.

### Installation Process

{% stepper %}
{% step %}

### Define opening hours

The app uses your [opening hours](/settings/app-settings/opening-hours) to determine whether or not you are online. \
Via 'Settings - Opening hours' you can modify the availability of your bot.

<img src="https://3356808761-files.gitbook.io/~/files/v0/b/gitbook-x-prod.appspot.com/o/spaces%2FEBQHGJABNTj5ISSOTRxM%2Fuploads%2FwdhcNBS1ti6iU2iqPgvZ%2Fimage.png?alt=media&amp;token=74ea9db4-83d2-47be-8022-8946886d8e7b" alt="" data-size="original">
{% endstep %}

{% step %}

### Enable the chat channel

Go to 'Configure - Channels' and activate your [Chat widget](/studio/channels/chat-widget) channel.&#x20;
{% endstep %}
{% endstepper %}

## Using the Website Chat

### App Settings

The only required settings for this app are the opening hours.

### Roles

* **Agent**
* **Operator**
* **Content Manager**

### App Workflow

The app is preconfigured with three flows:

* **Playbook**: Configure initial greeting and prompts to understand user intent.
* **Auto reply Flow**: Set up automatic responses and escalation behavior.
* **WhatsApp redirect Flow**: Redirect users to WhatsApp if no agent is available on other channels.

#### Playbook

Any incoming chat messages will be handled by the default Playbook found in the Flows section.

<figure><img src="https://3356808761-files.gitbook.io/~/files/v0/b/gitbook-x-prod.appspot.com/o/spaces%2FEBQHGJABNTj5ISSOTRxM%2Fuploads%2FTF9rVsyx5BKEjClkhqI8%2FScreenshot%202024-10-02%20at%2010.52.07.png?alt=media&amp;token=c2646a9b-2a67-4892-bd64-5698eea518c8" alt=""><figcaption></figcaption></figure>

The playbook will open the conversation on Web using a [say node](/studio/flows/nodes/say) and a prompt in the form of an [iterate node](/studio/flows/nodes/iterate-iterate) in order to elicit the user intention. You can see this by inspecting the little badges at the [main](/studio/flows/triggers) entry point. The prompt will try to answer the question (in case no questions are trained, the unknown flow will trigger the auto\_reply flow).

However, on WhatsApp the conversation is never started by the bot (unless a template message is sent) but only by a Contact. Therefore, the auto\_reply will kick in directly when a message is sent that isn't automatically replied by a [dialog trigger](https://manuals.dialox.ai/studio/flows/nodes/flow-control-invoke-dialog). The auto\_reply flow is invoked by the node [Go to flow](https://manuals.dialox.ai/studio/flows/nodes/flow-control-go-to-flow).

<figure><img src="https://3356808761-files.gitbook.io/~/files/v0/b/gitbook-x-prod.appspot.com/o/spaces%2FEBQHGJABNTj5ISSOTRxM%2Fuploads%2Fol7vcn3YxFP5CNsUTdu0%2Fimage.png?alt=media&amp;token=67eb3daf-b7c4-46ce-b78c-a8c1a7dec4c4" alt=""><figcaption></figcaption></figure>

#### Auto reply

The Auto reply flow is configured to escalate to a human employee. You can also use this flow to ask some more preliminary or qualifying questions before escalating to a human. To change the behavior, go to Flows and open the Auto reply flow.

The default Auto reply flow will only explain the fact that the message is escalated to a human. When closed or when no agents are available, it can display another message. See the [Smart Escalate node](https://manuals.dialox.ai/studio/flows/nodes/escalate-smart) for explanation about the behavior of this node.

<figure><img src="https://3356808761-files.gitbook.io/~/files/v0/b/gitbook-x-prod.appspot.com/o/spaces%2FEBQHGJABNTj5ISSOTRxM%2Fuploads%2FmH5KiZG9PMExG1cLLCT5%2Fimage.png?alt=media&amp;token=5c6d5c67-c9f9-4bb1-bba3-9415488b2133" alt="" width="272"><figcaption></figcaption></figure>

When no agent is available, it will continue to the WhatsApp redirect flow.

#### WhatsApp redirect

It is not possible to re-engage users on the Chat widget or PWA channels, so the WhatsApp redirect flow will trigger on those channels. This is indicated by the little badges that are displayed next to the entry point.

We try to redirect the user to WhatsApp for easy re-engagement. The [Show WhatsApp link node](/studio/flows/nodes/show-whatsapp-link) needs to be properly configured in order for it to work.

## FAQ

<details>

<summary>Can the bot handle multiple channels?</summary>

Yes, the bot manages chats via both Web and WhatsApp channels.

</details>

<details>

<summary><strong>How can I customize responses?</strong></summary>

Adjust the [Say](/studio/flows/nodes/say) and [Prompt](/studio/flows/nodes/iterate-iterate) nodes in the Playbook flow.

</details>

### Languages

The app will determine the language of the user based on their phone number. The app falls back on the default language of the app in case the language cannot be determined (e.g. French or Dutch in Belgium).

It's possible to add an "Ask: Language" node to allow users to switch to their preferred language.

### Opening hours

The app will let the user know whether or not they are reaching out within office hours. This helps set the expectation on how long to wait for a reply.

## Resources

* [Say](/studio/flows/nodes/say)
* [Iterate: Iterate](/studio/flows/nodes/iterate-iterate)
* [WhatsApp API](/studio/channels/whatsapp/whatsapp)
* [Chat widget](/studio/channels/chat-widget)
* [Opening hours](/settings/app-settings/opening-hours)


# QR Connect

Start conversations based on scanned objects

## Introduction

QR Connect is a Smart App that enables conversations through QR code scanning. Each code is tied to an object managed in your CMS, creating contextual interactions.

### How It Works

Users scan a QR code to instantly open a relevant chat conversation. No downloads or complex navigation required.

### Use Cases

* Scan codes on playground equipment to report broken features
* Access additional information about museum exhibits
* Get support for products or services

## Getting Started

### Channel Requirements

The QR Connect app requires the PWA channel to start the conversations.&#x20;

* [**PWA**](/studio/channels/progressive-web-app-pwa)

### Installation Process

{% stepper %}
{% step %}

### Enable the PWA channel

The app can generate QR codes which, when scanned with your mobile phone, open a new conversation on the PWA channel. In order for the QR codes to be generated, we first need to know which URL we should redirect users to.
{% endstep %}

{% step %}

### Create launch codes

Go to 'Content - Launch codes' and add a new item. Click on the Preview button to see the QR code and copy it to anywhere you will use it.
{% endstep %}
{% endstepper %}

<figure><img src="https://3356808761-files.gitbook.io/~/files/v0/b/gitbook-x-prod.appspot.com/o/spaces%2FEBQHGJABNTj5ISSOTRxM%2Fuploads%2Fbuod84U4AAFmwkPOHmkO%2FCleanShot%202025-06-16%20at%2015.18.46.png?alt=media&amp;token=afd34519-ee1e-4faa-9072-8651ebee2fba" alt=""><figcaption></figcaption></figure>

## Using the QR Connect

### App Settings

There are no other required settings besides the launch codes.

### Roles

* **Agent**
* **Operator**
* **Content Manager**

### App Workflow

The app is configured with three flows:

* **Playbook**: Here we branch on whether or not we have received a correct launch code.
* **Launch code**: This flow will be used when we have a correct launch code.
* **No launch code**: This flow will be used if no (correct) launch code was received.

The launch code flow is preconfigured with a script for the user to leave feedback on a scanned physical object. This could be anything from a shared space of an HOA, public playgrounds, or just a waiting room at a dental clinic.

## FAQ

<details>

<summary>Can the bot handle multiple channels?</summary>

No, the bot will only handle chat messages via the PWA.

</details>

<details>

<summary><strong>How can I customize responses?</strong></summary>

Adjust the [Say](/studio/flows/nodes/say) and [Prompt](/studio/flows/nodes/iterate-iterate) nodes in the Playbook flow.

</details>

<details>

<summary>Why do I receive an error when I click Preview on the launch code?</summary>

To preview the launch code, you first need to enable the PWA channel.

</details>

## Resources

* [Say](/studio/flows/nodes/say)
* [Iterate: Iterate](/studio/flows/nodes/iterate-iterate)
* [Progressive Web App (PWA)](/studio/channels/progressive-web-app-pwa)


# Level 3 - Professional

**Level 3 - Professional** Smart Apps are customizable using Flows, and offer access to advanced features like [integrations](/store/skills/integrations), [planner](/store/skills/planner) capabilities, and [knowledge bases](/studio/ai/knowledge-bases).

## Planning & Scheduling Apps

The planner skill allows users to reserve time slots in your calendar. The [Appointment Planner](/store/marketplace-apps/level-3-professional/appointment-planner) App uses chat features to schedule specific appointment times sent directly to your calendar. The [Callback Planner](/store/marketplace-apps/level-3-professional/callback-planner) App is a phone implementation that lets users choose a window of time in which you will call them back to follow up, leaving a callback note with relevant information.


# Callback Planner

Schedule callback appointments in your own calendar when you're unavailable to take a call right now

## Introduction

The Callback Planner allows callers to request callbacks within flexible time windows (like "between 2-4 PM") that you can set up in your calendar. They will be asked to provide relevant information that will be summarized in a callback note.

## Getting Started

### Channel Requirements

* **Phone**\
  The Callback Planner can be used to deflect incoming calls and plan callback appointments.\
  \
  [Phone](/studio/channels/phone)

### Installation Process

The Callback planner comes with a predefined calendar and planner. The only thing left for you to do is to create availability slots, in which callers can schedule their callback appointment.

{% stepper %}
{% step %}

#### Create slots

Go to "Planning" in the left menu.

Click and drag somewhere on the calendar view to create a slot.\
You can set the capacity per slot, constraining the number of appointments that can be scheduled in that time window.\
\
Optionally you can make the slot recurring, saving you from having to create the same slot every week.
{% endstep %}
{% endstepper %}

<figure><img src="https://3356808761-files.gitbook.io/~/files/v0/b/gitbook-x-prod.appspot.com/o/spaces%2FEBQHGJABNTj5ISSOTRxM%2Fuploads%2FuMydRa3fGRxQL4loIQH5%2Fimage.png?alt=media&amp;token=852e3d38-2bc4-43be-bbd3-105047b2435f" alt=""><figcaption></figcaption></figure>

## Using the Callback Planner

### App Settings

The planner can be configured with the following settings:

* **Planning title**\
  A name for you to recognise the right planner.
* **Create a note**\
  For appointments to be visible in your external calendar, this option should be left unchecked.
* If a note is created, the appointment will be listed in the 'Notes' view. They will also show up in the Inbox - Today view.

{% hint style="danger" %}
It's important to have this option checked to be able to work with the notes from the Inbox
{% endhint %}

* **Day limit**\
  Use this to limit how far ahead customers can schedule their appointment.
* **Minutes from now**\
  How many minutes need to be between the time of making the appointment and the start of the booking itself.
* **Free/busy or Slots**\
  The free/busy search strategy attempts to find gaps in the calendar that haven't been filled yet. As a result, events will not overlap. Free/busy can work with multiple calendars to find the first one that has an open spot.

  Free/busy requires *availability slots* which determine the hours within which to search for an open spot (for example, your opening hours).\
  \
  The slots search strategy requires you to create specific slots up front. Each slot has a maximum capacity. The planner tries to find slots that haven't been completely filled yet, and plans an event that matches the start and end time of the slot. Events will overlap if the capacity is greater than one.

### Roles

* **Operator**\
  To reply to inbox channels
* **Planner**\
  To manage the calendar and planners

### App Workflow

The playbook is set up with an opening message and two flow files.

* The Appointment flow handles the scheduling of the callback appointment.
* The Details flow is invoked after finding a slot for the callback appointment. It is used to elicit all information that is needed to create an appointment, like the user's name, their phone number, reason for calling, etc.

<figure><img src="https://3356808761-files.gitbook.io/~/files/v0/b/gitbook-x-prod.appspot.com/o/spaces%2FEBQHGJABNTj5ISSOTRxM%2Fuploads%2FEOePWuokyH4j4GnOnKFt%2FScreenshot%202024-10-07%20at%2015.28.55.png?alt=media&amp;token=547beb43-e248-4d1d-be4d-c80d5c40ef17" alt=""><figcaption></figcaption></figure>

The [Plan node](/studio/flows/nodes/plan) is responsible for determining a date and time to make the appointment, going back and forth with the user to confirm availability.

Once the date and time are selected, the plan node will invoke the Details flow, which gathers the details needed to make the callback appointment. In this case users are asked for the name, phone number and reason for the call:

<figure><img src="https://3356808761-files.gitbook.io/~/files/v0/b/gitbook-x-prod.appspot.com/o/spaces%2FEBQHGJABNTj5ISSOTRxM%2Fuploads%2F0el84kv7O0LXihAFeIbx%2Fimage.png?alt=media&amp;token=4341eff2-f2dc-4dc3-94a8-6ce205e22865" alt=""><figcaption></figcaption></figure>

When the details flow is finished, the appointment will be planned in the calendar of this bot. Inbox users will be able to find the callback appointments in the [Today view of the inbox](/inbox/today).

## FAQ

<details>

<summary>Can I use an external calendar?</summary>

It is possible to use external calendars for the Callback planner.

When creating a calendar, you can choose to link it to your Outlook or Google calendar too.\
After granting permission to read/write to your calendar, you can choose the exact calendar to sync the created callback appointments to.

</details>

<details>

<summary>Can I get an overview of the events stored in the local calendar?</summary>

The created callback appointments are visible in the [Inbox - Today](/inbox/today) view.

It's also possible to import the local calendar into your own calendar app.

Click on the publish button in the Calendars view to create a public link. In your own calendar app, you can add an external calendar using this link.

<img src="https://3356808761-files.gitbook.io/~/files/v0/b/gitbook-x-prod.appspot.com/o/spaces%2FEBQHGJABNTj5ISSOTRxM%2Fuploads%2FB6RfriVgV5tqDbnymGs3%2Fimage.png?alt=media&amp;token=8d4c4944-dfd7-4654-89e9-01d26a556edb" alt="Publish a local calendar elsewhere via the publish button" data-size="original">

</details>

<details>

<summary>Why are my events not showing up in the Google/Outlook calendar?</summary>

When the planner is configured to create notes for scheduled bookings, we export the appointments via Ical as a [VTODO](https://en.wikipedia.org/wiki/ICalendar).

Uncheck the "Create a note when an event is created" on the Planner settings to create regular events.

</details>

### Languages

The app will determine the language of the user based on their phone number. The app falls back on the default language of the app in case the language cannot be determined (e.g. French or Dutch in Belgium).

It's possible to add an "Ask: Language" node to allow users to switch to their preferred language.

### Opening hours

The office hours have no effect on this app.

## Resources

* [Base flows](/store/skills/base-flows)
* [Phone flows](/store/skills/phone-flows)
* [Planner](/store/skills/planner)
* [Planner](/studio/flows/nodes/plan)
* [Today](/inbox/today)


# Appointment Planner

Schedule one-on-one appointments in your private calendar

## Introduction

The Appointment Planner enables customers to book appointments through chat channels. Customers select time slots that are automatically added to your calendar, perfect for one-on-one appointments.

## Getting Started

### Channel Requirements

The app requires you to have at least one of the following channels:

* **Chat widget**\
  Can be embedded on your website\
  \
  [Chat widget](/studio/channels/chat-widget)
* **PWA**\
  Can be hosted on a bsqd.me subdomain\
  \
  [Progressive Web App (PWA)](/studio/channels/progressive-web-app-pwa)

### Installation Process

The Appointment Planner comes with a predefined calendar and planner.

The only thing left for you to do is to link your personal calendar and create availability slots, in which people can schedule their appointment.

1. **Link your Calendar**

Go to "Settings - Calendars", and click on the Edit (:pencil2:) button for the existing calendar.

From there you can change the Data source of the calendar:

<figure><img src="https://3356808761-files.gitbook.io/~/files/v0/b/gitbook-x-prod.appspot.com/o/spaces%2FEBQHGJABNTj5ISSOTRxM%2Fuploads%2FLdXIhxD4AblvDPRnjdll%2Fimage.png?alt=media&amp;token=07fbc2ae-1a3a-474a-8d8f-53d547c59d65" alt=""><figcaption></figcaption></figure>

When choosing Google Calendar or Microsoft Outlook, click the "Connect to .." button.

<figure><img src="https://3356808761-files.gitbook.io/~/files/v0/b/gitbook-x-prod.appspot.com/o/spaces%2FEBQHGJABNTj5ISSOTRxM%2Fuploads%2Fo3tGx7iXU3AiOziic3HZ%2Fimage.png?alt=media&amp;token=8584ed45-6cf2-49a3-acad-018191e47137" alt=""><figcaption></figcaption></figure>

You will be shown a login screen if not yet logged in to Google or Microsoft. \\

<figure><img src="https://3356808761-files.gitbook.io/~/files/v0/b/gitbook-x-prod.appspot.com/o/spaces%2FEBQHGJABNTj5ISSOTRxM%2Fuploads%2FPlrPiKN1vC1aekZgGmg2%2Fimage.png?alt=media&amp;token=3ff125eb-3bea-46ad-9bd4-6c86c746d095" alt=""><figcaption></figcaption></figure>

After choosing the correct account, you need to grant the application access to your calendar to allow it to create appointments:\\

<div><figure><img src="https://3356808761-files.gitbook.io/~/files/v0/b/gitbook-x-prod.appspot.com/o/spaces%2FEBQHGJABNTj5ISSOTRxM%2Fuploads%2FYMjmH86ufHzq91eV9O7l%2Fimage.png?alt=media&amp;token=64695823-1a50-4d32-a522-1bfca2510d50" alt=""><figcaption></figcaption></figure> <figure><img src="https://3356808761-files.gitbook.io/~/files/v0/b/gitbook-x-prod.appspot.com/o/spaces%2FEBQHGJABNTj5ISSOTRxM%2Fuploads%2FNKwtCbpFA7yVZplb038I%2Fimage.png?alt=media&amp;token=8a3d368d-14fe-4e38-9fb7-e4fca8cf97bd" alt=""><figcaption></figcaption></figure></div>

Then select the correct calendar, to which you want the appointments to be added:

<figure><img src="https://3356808761-files.gitbook.io/~/files/v0/b/gitbook-x-prod.appspot.com/o/spaces%2FEBQHGJABNTj5ISSOTRxM%2Fuploads%2FqQkiEhsvwyNlr6wlLZGQ%2Fimage.png?alt=media&amp;token=a4606940-d65c-4d8c-af65-d7cc59825d54" alt=""><figcaption></figcaption></figure>

2. **Create availability slots**

Go to "Planning" in the left menu.

Click and drag somewhere on the calendar view to create an availability slot. Optionally you can make the slot recurring, saving you from having to create the same slot every week.

<figure><img src="https://3356808761-files.gitbook.io/~/files/v0/b/gitbook-x-prod.appspot.com/o/spaces%2FEBQHGJABNTj5ISSOTRxM%2Fuploads%2FbB4bZdM54DNoBlokc8XP%2Fimage.png?alt=media&amp;token=2ae6a731-2135-487c-a1ae-fdbc2c033eb6" alt=""><figcaption></figcaption></figure>

## Using the Appointment planner

### App Settings

The planner can be configured with the following settings:

* **Planning title**\
  A name for you to recognise the right planner.
* **Create a note**\
  For appointments to be visible in your external calendar, this option should be left unchecked.\
  If you leave this option unchecked, they will not show up in the 'Notes' view, but they will show up in your external calendar.

{% hint style="info" %}
Appointments are exported to your external calendar via the iCal protocol.\
When they're created as notes, they will be exported as VTODO's instead of VEVENT's.

Most calendars only show VEVENT's in the calendar view, so it's best to leave this option unchecked.
{% endhint %}

* **Day limit**\
  Use this to limit how many days ahead customers can schedule their appointment
* **Minutes from now**\
  How many minutes need to be between the time of making the appointment and the start of the booking itself. This prevents customers from booking appointments that start in 5 minutes.
* **Free/busy or Slots**\
  The free/busy search strategy attempts to find gaps in the calendar that haven't been filled yet. As a result, events will not overlap. Free/busy can work with multiple calendars to find the first one that has an open spot.

  Free/busy requires *availability slots* which determine the hours within which to search for an open spot (for example, your opening hours).

{% hint style="warning" %}
For scheduling one-on-one appointments, we strongly recommend to use the "Free/busy" strategy.
{% endhint %}

### Roles

* **Operator**\
  To reply to inbox channels
* **Planner**\
  To manage the calendar and planners

### App Workflow

The playbook is set up with an opening message and two flow files.

* The Appointment flow handles the scheduling of the appointment.
* The Request details flow is invoked after finding a slot for the appointment. It's used to elicit any information from the user to create the appointment, such as their name, email, reason for the appointment.

<figure><img src="https://3356808761-files.gitbook.io/~/files/v0/b/gitbook-x-prod.appspot.com/o/spaces%2FEBQHGJABNTj5ISSOTRxM%2Fuploads%2F1slcj0wwcQHHXydYe7vZ%2Fimage.png?alt=media&amp;token=aa55c077-1791-4602-9b3d-2111095971e8" alt=""><figcaption></figcaption></figure>

The [Plan node](/studio/flows/nodes/plan) is responsible for having the dialog with the user to elicit the right date and time to make the appointment.

Once the date and time are selected, the plan node will fire the Request details flow for gathering the details needed to making the appointment, which are in this case asking for the name, email and the reason for the appointment:

<figure><img src="https://3356808761-files.gitbook.io/~/files/v0/b/gitbook-x-prod.appspot.com/o/spaces%2FEBQHGJABNTj5ISSOTRxM%2Fuploads%2FtrVQW0fqFkPYjhBMXv97%2Fimage.png?alt=media&amp;token=1586478e-4803-4063-b5de-47be6975c7ec" alt="" width="259"><figcaption></figcaption></figure>

When the details flow is finished, the appointment will be created in the configured calendar.

## FAQ

<details>

<summary>Can I use an external calendar?</summary>

It's possible to use external calendars for the Appointment Planner.

When creating a calendar, you can choose to either link it to your Outlook or Google calendar too.\
After granting permission to read/write to your calendar, you can choose the exact calendar to which we'll sync the created appointments.

</details>

<details>

<summary>Why are my events not showing up in the Google/Outlook calendar?</summary>

When the planner is configured to create notes for scheduled bookings, we export the appointments via iCal as a [VTODO](https://en.wikipedia.org/wiki/ICalendar).

Uncheck the "Create a note when an event is created" on the Planner settings to create regular events.

</details>

### Languages

The app will determine the language of the user based on their phone number. The app falls back on the default language of the app in case the language cannot be determined (e.g. French or Dutch in Belgium).

It's possible to add an "Ask: Language" node to allow users to switch to their preferred language.

### Opening hours

The office hours have no effect on this app.

## Resources

* [Base flows](/store/skills/base-flows)
* [Planner](/store/skills/planner)
* [Planner](/studio/flows/nodes/plan)


# \[\[Smart App Name]]

One-liner of the smart app

## Introduction

Brief intro of the smart app.

## Getting Started

### Channel Requirements

* **Phone**\
  We use this channel for accepting phone calls\
  \
  [Phone](/studio/channels/phone)<br>
* **Whatsapp**\
  Used when the user only wants to chat\
  \
  [WhatsApp API](/studio/channels/whatsapp/whatsapp)

### Installation Process

The bare minimum installation process, any extra or optional configuration can be listed under App Settings.

{% stepper %}
{% step %}

### Purchasing the app

Pay money
{% endstep %}

{% step %}

### Adding content to CMS

Add some information
{% endstep %}
{% endstepper %}

## Limitations

The limitations of this app, like the behaviour or fields that cannot be adjusted.

## Using the \[\[Smart App Name]]

### App Settings&#x20;

Guide users on configuring basic and advanced settings for apps.

### Roles

* **Operator**\
  To reply to inbox channels
* **Planner**\
  To manage the calendar and planners

### App Workflow

Description of the core functionality of the app, containing all the steps it takes to reach its goal.

Include screenshots

## FAQ

<details>

<summary>How to modify the app settings</summary>

Go to the settings page

</details>

<details>

<summary>How to back-up my app</summary>

Go to settings - back-ups

</details>

### Languages

List the languages&#x20;

### Opening hours

Setting the opening hours via 'Settings - Opening hours'  \[has / has no] effect on this app.&#x20;

## Resources

Find more info here:

* [#installation-process](#installation-process "mention")
* [Whatsapp Calldeflector 2.0](/store/legacy-apps/whatsapp-calldeflector-2.0)
* [ChatGPT](http://chatgpt.com)


# Level 4 - Expert

**Level 4 - Expert** provides access to all the skills and apps available in the other Levels. In addition to that, you can build fully custom bots via Scripting (Creator).

See also [DialoX Developer](https://developer.dialox.ai/bubblescript/getting_started/)


# AI Agent

{% hint style="info" %}
In the coming period, the DialoX team will bring these capabilities to partners and customers by introducing the **AI Agent** skill that enables agentic capabilities for flow-based bots. This skill is currently available only to selected beta partners and will be made generally available later this year.

Currently a beta feature, available on request only.
{% endhint %}

## Introduction

The AI Agent works on **any channel**. It comes with ready-made agent prompts for a **Receptionist** and a **Co-worker router**. These defaults are mainly tuned for **phone** conversations; you can use them as-is or adapt the wording and tool guidance for web chat, messaging, or other channels.

## Getting Started

### Channel Requirements

* **Phone**\
  The bundled prompts assume telephony-style interaction: short, clear turns and simple tool use.\
  phone.md<br>
* **Any other channel**\
  The same playbook and **Iterate: Agent** flow apply. Review prompts for tone, length, and when to call tools so they match the channel (e.g., richer answers on chat vs. voice).

### Installation Process

The playbook comes with an **Iterate: Agent** node and a **Close** node so the conversation can end cleanly and **conversation evaluations** can run afterward. Optional steps beyond that belong under App Settings.

{% stepper %}
{% step %}

#### Configure the Iterate: Agent node

This node decides **which agent prompt** is active and drives the **LLM** on each turn of the loop. Point it at the prompt set you want for this part of the flow.
{% endstep %}

{% step %}

#### Optional: Define a static opening message

In order to be compliant with the EU AI act, it's now mandatory to disclose the user is interacting with an AI system. This can be incorporated in the opening message.
{% endstep %}

{% step %}

#### Add or rewrite your prompts

Open **AI → Agent prompts**. Describe behavior, tone, and **when to use tools** (and any channel-specific rules—e.g., shorter replies on voice, more detail on chat). Ensure the **Iterate: Agent** node uses the prompt you intend.
{% endstep %}

{% step %}

#### Plan how the conversation ends

After the agent loop, a **Close** node (or equivalent) should end the exchange so the flow advances and evaluations can run. The agent should be steered to finish via the **Complete the conversation** tool when the dialogue is done.
{% endstep %}
{% endstepper %}

### Limitations

* The default **Receptionist** and **Co-worker router** prompts are optimized for **phone**; other channels need a quick review so length and tool usage fit the medium.
* **Conversation evaluations** run only in the **post-close** phase—if the conversation never reaches your close path (e.g., in certain handoffs), those rules may not apply as you expect.

## Using the AI Agent

### App Settings

* **AI → Agent prompts** — Create and edit prompts; connect them to the **Iterate: Agent** node in the playbook.
* **AI → Conversation evaluations** — Define criteria for tagging or judging conversations **after** they close.
* **Settings → Tags** — Under the **Judged** tag group, create tags that evaluations can assign.

### App Workflow

<figure><img src="https://3356808761-files.gitbook.io/~/files/v0/b/gitbook-x-prod.appspot.com/o/spaces%2FEBQHGJABNTj5ISSOTRxM%2Fuploads%2F5b2amxpPgEBhQT5kKxK1%2FCleanShot%202026-04-03%20at%2014.06.34%402x.png?alt=media&amp;token=6f78e676-0e64-4733-a3bc-61d1de442e9b" alt="" width="373"><figcaption></figcaption></figure>

1. The **Iterate: Agent** node runs the model with the selected **agent prompt** for each turn.
2. The model can call **tools** you reference in the prompt (see Tool calls).
3. When the goal is reached, the agent should use **Completed** so the playbook moves on—typically to a **Close** node.
4. After closing, **conversation evaluations** run and may apply **Judged** tags according to your rules.

#### **Tool Calls**

Embed tools in the prompt so the model knows what exists and **when** to use them:

<table data-search="false"><thead><tr><th>Tool</th><th>Purpose</th></tr></thead><tbody><tr><td><strong>Create note</strong></td><td>Adds a note (e.g., for inbox or record-keeping).</td></tr><tr><td><strong>Send mail</strong></td><td>Sends email when appropriate.</td></tr><tr><td><strong>Completed</strong></td><td>Ends the exchange and advances to the next node in the flow.</td></tr><tr><td><strong>Search contact directory</strong></td><td>Searches for extensions configured in Enreach Contact</td></tr><tr><td><strong>Check contact availability</strong></td><td>Checks if an extension is available for calls</td></tr><tr><td><strong>Forward call</strong></td><td>Forwards the call to another extension number</td></tr><tr><td><strong>List documentation pages</strong></td><td>Lists the files in the knowledge base</td></tr><tr><td><strong>Get page content</strong></td><td>Retrieves the contents of a knowledge base article</td></tr></tbody></table>

**Inserting tools in the prompt:** In the prompt editor, type **`/`** to open the **tool picker**, then choose a tool to insert a placeholder or reference.

#### **Variables**

Insert variables in the prompt that contain information from skills or about the user.

<table data-search="false"><thead><tr><th>Variable</th><th>Description</th></tr></thead><tbody><tr><td><strong>First name</strong></td><td>The user's first name</td></tr><tr><td><strong>Last name</strong></td><td>The user's last name</td></tr><tr><td><strong>Phone</strong></td><td>The user's phone number</td></tr><tr><td><strong>Email</strong></td><td>The user's email address</td></tr><tr><td><strong>Language</strong></td><td>The user's preferred language</td></tr><tr><td><strong>Knowledge base hints</strong></td><td>The aggregated indexing hints for knowledge base articles</td></tr><tr><td><strong>Current date</strong></td><td>The current date in {Weekday}, {YYYY-MM-DD} format.</td></tr><tr><td><strong>Current time</strong></td><td>The current time in {HH:MM} format.</td></tr></tbody></table>

## FAQ

<details>

<summary>Can I use the AI Agent only on chat, not on phone?</summary>

Yes. Use any channel; adjust **Agent prompts** for longer or richer messages, and for how proactively you want tools used compared to voice.

</details>

<details>

<summary>How can I tell whether a conversation went wrong?</summary>

You can write evaluations in the **AI → Conversation evaluations** section. Evaluations will tag a conversation when the defined criteria are met. Closing the conversation triggers the post-close phase, during which evaluations are run.

</details>

<details>

<summary>How do I add tools to a prompt?</summary>

In the prompt editor, type **`/`** to open the tool picker and insert the tool reference so the model is steered toward concrete actions.

</details>

#### Languages

The agent's language follows your **prompts** configuration; align prompt language with the locales you support on each channel.

#### Opening Hours

Whether **Settings → Opening hours** affects this app depends on how your **playbook** and **channels** are set up (e.g., if business hours gate the flow before the AI Agent). There is no separate “opening hours” switch inside the AI Agent itself.

## Resources

Quick reference:

| Topic                    | Where to configure                                          |
| ------------------------ | ----------------------------------------------------------- |
| Agent behavior & prompts | **AI → Agent prompts** + **Iterate: Agent** in the playbook |
| Tools in prompts         | Type **`/`** in the prompt editor (tool picker)             |
| Closing the conversation | **Close** node (or equivalent) after **Iterate: Agent**     |
| Post-close evaluation    | **AI → Conversation evaluations**                           |
| Tags from evaluations    | **Settings → Tags** → **Judged** group                      |


# Legacy Apps

Previously called Bot Templates

{% hint style="info" %}
These are the legacy smart apps which will be no longer available after the Marketplace release on 21st of November 2024. Please go to the [Marketplace](/store/marketplace-apps) for the current list of Smart Apps available for your company and-or customers.
{% endhint %}

Now you are logged in you can create your bot.

<figure><img src="https://3356808761-files.gitbook.io/~/files/v0/b/gitbook-x-prod.appspot.com/o/spaces%2FEBQHGJABNTj5ISSOTRxM%2Fuploads%2FdJzMBHg11kPt1Ev6MSrA%2FScreenshot%202024-02-13%20at%2009.11.56.png?alt=media&amp;token=1c0dfd23-9dee-4574-ad80-703161b020e6" alt=""><figcaption></figcaption></figure>

The button will open a popup to select which bot template to use when creating your bot. Depending on your role and environment settings, as well as order(s), you will get a list of templates to choose from.

<figure><img src="https://3356808761-files.gitbook.io/~/files/v0/b/gitbook-x-prod.appspot.com/o/spaces%2FEBQHGJABNTj5ISSOTRxM%2Fuploads%2FSO3uZTolOaK9oluANVAp%2FScreenshot%202024-05-08%20at%2009.54.28.png?alt=media&amp;token=08d44955-fa53-422f-98ae-50b171abb271" alt=""><figcaption></figcaption></figure>

{% hint style="info" %}
Developers might also have the "From scratch" and "Base template" to use as a foundation for their own developments.
{% endhint %}

The bot template you have chosen will consist out of one or more skills. The skills provide the functionality and node types you need to configure the behaviour and content of your bot. See the [skills section](/store/skills) for more information.


# Survey Extension

{% hint style="info" %}
Read this if you have Smart Apps in use that have been ordered before 21 october 2024. New Smart Apps documentation can be found within the [Marketplace](/store/marketplace-apps).
{% endhint %}

The Survey Extension allows you to ask a list of questions and route them through different outputs, such as a note or an email. The allowed channel on which the Survey Extension can be used is the[ Smart IVR](/store/legacy-apps/smart-ivr-2.0). Once you have installed the correct template you can fill in the following fields.

<figure><img src="https://3356808761-files.gitbook.io/~/files/v0/b/gitbook-x-prod.appspot.com/o/spaces%2FEBQHGJABNTj5ISSOTRxM%2Fuploads%2FAzPZUmnrClPpdQRFHbIO%2FScreenshot%202024-04-09%20at%2015.20.52.png?alt=media&amp;token=4e8f9814-ce65-4390-bd62-1d94c39ea086" alt=""><figcaption></figcaption></figure>

<table><thead><tr><th width="172">Field</th><th>Explanation </th><th data-hidden></th></tr></thead><tbody><tr><td>Openings text</td><td>Welcome your customer with a simple text. Make sure that you explain the customer to use a hash sign at the end of each question to progress the survey.</td><td></td></tr><tr><td>Questions</td><td>Fill in your survey accoringly. If you want to add more questions click on the '+ Add question' button.</td><td></td></tr><tr><td>Closing text</td><td>Close your survey with a closing text.</td><td></td></tr></tbody></table>

Once you have completed all the input fields, the next step is to configure your specific output. This could be a note but also an email. In the screenshot below you can see how you can define your output in settings.

<figure><img src="https://3356808761-files.gitbook.io/~/files/v0/b/gitbook-x-prod.appspot.com/o/spaces%2FEBQHGJABNTj5ISSOTRxM%2Fuploads%2FaSC6dnuC4HvloMP6wM1N%2FScreenshot%202024-04-09%20at%2015.58.04.png?alt=media&amp;token=00ac7daf-c599-4dcd-9913-a08e80dc3d28" alt=""><figcaption></figcaption></figure>

1. Go to Settings.
2. Click on Survey email settings.
3. Specify your customers email domain (leave open to create Note, which can be found in [Notes](/studio/flows/nodes)).
4. Fill in the email Subject.
5. Fill in the the Header.
6. Optionally set an email domain as a CC.


# Prescription Assistant

{% hint style="info" %}
Read this if you have Smart Apps in use that have been ordered before 21 october 2024. New Smart Apps documentation can be found within the [Marketplace](/store/marketplace-apps).
{% endhint %}

The Prescription Assistant allows you to ask a list of questions and route them through different outputs, such as a note or an email. The allowed channel on which the Prescription Assistant can be used is the[ Smart IVR](https://manuals.dialox.ai/studio/bot-apps/smart-ivr-2.0). This a specific solution designed for quickly asking an x ​​number of questions that are immediately pushed to your email after completion of the telephone conversation.&#x20;

## Set up your Prescription Assistant

Once you have installed the correct template you can fill in the Opening text, Questions and Closing text input fields. Example shown down below:

<figure><img src="https://3356808761-files.gitbook.io/~/files/v0/b/gitbook-x-prod.appspot.com/o/spaces%2FEBQHGJABNTj5ISSOTRxM%2Fuploads%2FugACKJVmA8iZ8xErdxmn%2FScreenshot%202024-04-22%20at%2013.58.34.png?alt=media&amp;token=2c6721c9-d0f4-4f62-a531-2fa3934d3f7f" alt=""><figcaption></figcaption></figure>

<table><thead><tr><th width="189">Field</th><th>Explanation</th><th data-hidden></th></tr></thead><tbody><tr><td>Opening text</td><td>Welcome your customer with a simple text. Make sure that you explain the customer to use a hash sign at the end of each question to progress the call.</td><td></td></tr><tr><td>Questions</td><td>Fill in your prescription survey accordingly, if you want to add more questions click ' + add question ' button.</td><td></td></tr><tr><td>Closing text</td><td>Close your call with a closing text.</td><td></td></tr></tbody></table>

## Set up your Settings&#x20;

The last steps are setting up your email settings. Down below you can find the steps needed to finalise and use your Prescription Assistant bot app.&#x20;

1. Navigate to Settings&#x20;
2. Click on Questionnaire
3. Fill in the the email you want the prescription call to be sent to
4. Optionally add people in CC

<figure><img src="https://3356808761-files.gitbook.io/~/files/v0/b/gitbook-x-prod.appspot.com/o/spaces%2FEBQHGJABNTj5ISSOTRxM%2Fuploads%2FA0wJ0koxqAOrX3UMzpGr%2FScreenshot%202024-04-22%20at%2014.05.25.png?alt=media&amp;token=e3c75099-d1e0-4dc9-896c-caff6358ca2c" alt=""><figcaption></figcaption></figure>


# Smart IVR Basic

Bot template to forward incoming phone calls

{% hint style="info" %}
Read this if you have Smart Apps in use that have been ordered before 21 october 2024. New Smart Apps documentation can be found within the [Marketplace](/store/marketplace-apps).
{% endhint %}

The Smart IVR Basic enables your bot to answer and forward incoming phone calls. The Smart IVR Basic is configured to forward your call to the right department based on an opening question.

## Quick steps

### Generic setup

1. Make sure your [opening hours](/settings/app-settings/opening-hours) are configured
2. Make sure your [phone channel](/studio/channels/phone) is enabled
3. Add a welcome text
4. Configure the various forwarding options to whom the bot will be forwarding incoming calls

### Configuration

After installing the app, go to Content -> Configuration to register the forwarding options.

<figure><img src="https://3356808761-files.gitbook.io/~/files/v0/b/gitbook-x-prod.appspot.com/o/spaces%2FEBQHGJABNTj5ISSOTRxM%2Fuploads%2FUuAdn3CSoeB2gaG7zFrT%2Fimage.png?alt=media&amp;token=b3e39e24-d50b-41b6-ada9-b1de33959a32" alt=""><figcaption><p>The Configuration screen allows you to update the welcome text and the forwarding options</p></figcaption></figure>

1. **Label:** Provide short and clear labels for each forward option.\
   The labels are used by the bot to let the caller know which options to choose from.&#x20;
2. **Description:** In the description field the instructions to the AI need to be provided which helps the bot to decide to whom it will be forwarding the call.
3. **Number:** Fill out the extension or phone number

{% hint style="info" %}
Descriptions are used by the bot as extra information in deciding to which number the caller will be forwarded.&#x20;

When asking about printers in an office we most likely need to talk to the IT department, whereas if we'd ask about printers at an electronics department, we might need to talk to Sales.
{% endhint %}

## Skills

* [Base flows](/store/skills/base-flows)
* [Phone flows](/store/skills/phone-flows)


# Smart IVR 2.0

Bot template to answer calls

{% hint style="info" %}
Read this if you have Smart Apps in use that have been ordered before 21 october 2024. New Smart Apps documentation can be found within the [Marketplace](/store/marketplace-apps).
{% endhint %}

The Smart IVR template enables your bot to answer incoming phone calls. A Smart IVR template can be used to configure any type of voice assistant. In the basis it is configured to forward your call to the right department based on an opening question. It also contains flows for taking a call back note and deflect to whatsapp when no agents are available or the office is closed.

For this, the Smart IVR is configured with three Flows:

* Playbook
* Note
* Whatsapp

Read about flows in the [Flows](/studio/flows) section to understand what type of nodes your can use for configuring the Smart IVR for your use case.

## Quick steps

### Generic setup

1. Make sure your [opening hours](/settings/app-settings/opening-hours) are configured
2. Make sure your [phone channel](/studio/channels/phone) is enabled
3. Optionally make sure a [Whatsapp integration](/studio/channels/whatsapp/whatsapp/how-to-integrate-whatsapp) to your Social Inbox bot is configured

### Playbook

Make sure to review and change the following nodes in the Playbook flow. Click on Flows and then open your Playbook.

<figure><img src="https://3356808761-files.gitbook.io/~/files/v0/b/gitbook-x-prod.appspot.com/o/spaces%2FEBQHGJABNTj5ISSOTRxM%2Fuploads%2FbyNtWu57ZTse7omDVKjk%2FScreenshot%202024-02-13%20at%2010.10.47.png?alt=media&amp;token=db61c356-6a71-44ae-81be-06029667d35e" alt=""><figcaption></figcaption></figure>

Review the following nodes:

1. [say](/studio/flows/nodes/say) welcome text
2. [ask choice](/studio/flows/nodes/ask-choice) and its labels
3. [dial: smart](/studio/flows/nodes/dial-smart) nodes with the right text, number and fallback logic

<figure><img src="https://3356808761-files.gitbook.io/~/files/v0/b/gitbook-x-prod.appspot.com/o/spaces%2FEBQHGJABNTj5ISSOTRxM%2Fuploads%2FKEZckjeV4JfJkU0gBJVa%2FScreenshot%202024-02-13%20at%2010.12.14.png?alt=media&amp;token=8c48161b-ba24-4e3d-a9ac-487794de3f51" alt=""><figcaption></figcaption></figure>

### Fallback

Now you need to decide what you like the Smart IVR to do when the office or one of the departments is closed. Either go to the Note flow, go to the Whatsapp flow or do something else.&#x20;

#### Fallback to Whatsapp

Choosing the Whatsapp flow will cause the Smart IVR to send your caller a Whatsapp message so your caller only needs to respond in order to get in touch.

The Whatsapp flow is by default configured to verify the phone number of the caller and then send a whatsapp message. Go to the Whatsapp flow:

<figure><img src="https://3356808761-files.gitbook.io/~/files/v0/b/gitbook-x-prod.appspot.com/o/spaces%2FEBQHGJABNTj5ISSOTRxM%2Fuploads%2FsQSjuf0RGChVWkPXcpmc%2FScreenshot%202024-02-13%20at%2010.15.04.png?alt=media&amp;token=1787e195-7d4d-41eb-84eb-bad2f301cfad" alt=""><figcaption></figcaption></figure>

And change the following:

1. Customize the whatsapp flow: [Send whatsapp](/studio/flows/nodes/send-whatsapp) node.

<figure><img src="https://3356808761-files.gitbook.io/~/files/v0/b/gitbook-x-prod.appspot.com/o/spaces%2FEBQHGJABNTj5ISSOTRxM%2Fuploads%2F26YiabkLnihjJu7YvQGL%2FScreenshot%202024-02-13%20at%2010.15.49.png?alt=media&amp;token=28d01766-41ab-4864-9d0e-e2e043829d24" alt=""><figcaption></figcaption></figure>

#### Fallback to Note

When you don't want to deflect to Whatsapp in case of inavailability of your team you can also choose to take a note (in order to call the caller back later).

The flow for this is configured in the flow Note.

<figure><img src="https://3356808761-files.gitbook.io/~/files/v0/b/gitbook-x-prod.appspot.com/o/spaces%2FEBQHGJABNTj5ISSOTRxM%2Fuploads%2FVFTHA9s1lleuFJ7Est6s%2FScreenshot%202024-02-13%20at%2010.16.30.png?alt=media&amp;token=ce16e287-da99-499d-b506-f301b7d9e351" alt=""><figcaption></figcaption></figure>

Depending on your use case you can change or extend the questions asked but at least you need to consider wether you want the call back notes to be collected in the Notes section of the platform or to be send as an email. By default it will create a note (see 1). Change it to Send: email instead when you want an email to be sent.

<figure><img src="https://3356808761-files.gitbook.io/~/files/v0/b/gitbook-x-prod.appspot.com/o/spaces%2FEBQHGJABNTj5ISSOTRxM%2Fuploads%2FLB6pBpKUXu0weLbp63TF%2FScreenshot%202024-02-13%20at%2010.18.13.png?alt=media&amp;token=b69cc234-994b-4bd4-b68c-839ac0d4f953" alt=""><figcaption></figcaption></figure>

Notes that are generated by your Smart IVR are collected in the Notes section. There notes can be followed up by marking them as completed. This way you'll never forget to follow up on made promisses by your bot. Notes can also be integrated in your (back office) systems using the [nodes API](https://developer.dialox.ai/dev/rest/#/Notes) and [Note Webhook](https://developer.dialox.ai/dev/webhooks/#note-events).

## Skills

* [Base flows](/store/skills/base-flows)
* [Phone flows](/store/skills/phone-flows)

The node type [Send SMS](/studio/flows/nodes/send-sms) is excluded in this template.


# Whatsapp Calldeflector 1.0

{% hint style="info" %}
Read this if you have Smart Apps in use that have been ordered before 21 october 2024. New Smart Apps documentation can be found within the [Marketplace](/store/marketplace-apps).
{% endhint %}

The Whatsapp Calldeflector 1.0 bot app allows you to respond to incoming chat messages on your social channels (primarily Whatsapp and Web). This template doesn't allow for [Flows](/studio/flows), so little customization is possible.

It is only built to forward messages to an employee (escalate) while sending an automatic response.

On other channels then Whatsapp it will deflect to Whatsapp after waiting for too long on an employee to join and respond. This way your audience is forced to continue in Whatsapp which makes them re-engageable, even when they are offline.&#x20;

## Quick steps

At minimum you need to take care of the following

1. Make sure your [opening hours](/settings/app-settings/opening-hours) are configured
2. Make sure your [whatsapp channel](/studio/channels/whatsapp/whatsapp) is enabled
3. Optionally configure your [chatwidget](/studio/channels/chat-widget) channel
4. Configure the auto reply behaviour in the contect section, see below
5. [Invite](/administration/users#invite-users) your users and let them configure their [availability settings](/settings/user-settings/availability-settings), [profile settings](/settings/user-settings/profile-settings), [notification preferences](/inbox/notifications) and optionally [security settings](/settings/user-settings/security), such as multi-factor authentication.

## Content -> Auto responses

When a customer sends a message it might take a while before your team is able to respond. Setting the expectations is crucial for customer success. Therefore the system is designed to send a short auto response, directly after a customer sent a message. In this response the expectations for the response time can be communicated.

<figure><img src="https://3356808761-files.gitbook.io/~/files/v0/b/gitbook-x-prod.appspot.com/o/spaces%2FEBQHGJABNTj5ISSOTRxM%2Fuploads%2FbuW5a9zcjDnA9QIoNK77%2FScreenshot%202024-04-22%20at%2015.22.47.png?alt=media&amp;token=4681ca48-2f9b-407f-98bb-b2b924bede36" alt=""><figcaption></figcaption></figure>

Go to the content section and open the Auto responses page. Here you can configure what auto response should be given when a new conversation is started.

1. Click on Content in the main menu on the left hand side
2. Click on Auto responses
3. Fill in the text that you want to reply when the company is open (online), e.g. *Thank you for your question, we generally respond within 1 hour.*
4. Fill in the text that you want to reply when the company is closed (offline), e.g. *Sadly we are closed right now. We will come back to you when our office is open again.*
5. Fill in the text that you want to reply when the company is open (online) but there are no operators available
6. Choose the timeout amount in seconds after which the system will deflect to whatsapp.&#x20;

## Content -> Call deflector

When the call calls the number and nobody is available to take the call, setting up your call deflector flow will give you(r) and or your team the opportunity to deflect the customer to Whatsapp. Therefore the system is designed to send a couple of questions before sending out a call deflection template to which the customer can reply to start the conversation via Whatsapp.

<figure><img src="https://3356808761-files.gitbook.io/~/files/v0/b/gitbook-x-prod.appspot.com/o/spaces%2FEBQHGJABNTj5ISSOTRxM%2Fuploads%2FlRyX0c24YDu8XExUTUI6%2FScreenshot%202024-04-22%20at%2015.25.22.png?alt=media&amp;token=b8b09566-734f-4fad-bf52-8ff81c863865" alt=""><figcaption></figcaption></figure>

Go to the content section and open Call deflector page. Here you can configure what questions should be given before you can deflect your customer to a Whatsapp conversation.

<table><thead><tr><th>Field</th><th>Explanation</th><th data-hidden></th></tr></thead><tbody><tr><td>Welcome</td><td>Explain the customer what is about to happen via a welcome text.</td><td></td></tr><tr><td>Reuse question</td><td>Ask the customer their phonenumber to deflect to Whatsapp. </td><td></td></tr><tr><td>Try again</td><td>Second try if the first question fails to ask the customer their phonenumber to deflect to Whatsapp.</td><td></td></tr><tr><td>Phone question</td><td>Let the customer type in their phone number and close with a hash key.</td><td></td></tr><tr><td>Try again</td><td>Second try to let the customer type in their phone number and close with a hash key.</td><td></td></tr><tr><td>Close</td><td>Close your conversation with a  result and goodbye text.</td><td></td></tr></tbody></table>

{% hint style="info" %}
Timeout is only relevant for conversations on Web to make sure your website visitors get a way to reach out to you even when you are not available.

Another way to deal with this situation is to prevent web chat when there are no operators available. This you can configure in the [Chatwidget](/studio/channels/chat-widget) design page.
{% endhint %}


# Whatsapp Calldeflector 2.0

{% hint style="info" %}
Read this if you have Smart Apps in use that have been ordered before 21 october 2024. New Smart Apps documentation can be found within the [Marketplace](/store/marketplace-apps).
{% endhint %}

The Whatsapp Calldeflector 2.0 bot app enables your bot to answer incoming chat messages on your social channels. It can be used to configure any type of social messaging assistant. In the basis it is configured to forward messages to an employee (escalate) while sending an automatic response, but it can also be configured for automatic answering on recognized questions.

On other channels then Whatsapp it will deflect to Whatsapp after waiting for too long on an employee to join and respond. This way your audience is forced to continue in Whatsapp which makes them re-engageable, even when they are offline.&#x20;

For this, the Whatsapp Calldeflector 2.0 bot app is configured with three flows:

* Playbook
* Inbox
* Phone2wa
* Web2wa

Read about flows in the [Flows](/studio/flows) section to understand what type of nodes your can use for configuring the Social Inbox for your use case.

## Quick steps

### Generic setup

At minimum you need to take care of the following

1. Make sure your [opening hours](/settings/app-settings/opening-hours) are configured
2. Make sure your [whatsapp channel](/studio/channels/whatsapp/whatsapp) is enabled (or another chat channel)

### Playbook

Make sure to review and change the following nodes in the Playbook flow. Click on Flows and then open your Playbook.

<figure><img src="https://3356808761-files.gitbook.io/~/files/v0/b/gitbook-x-prod.appspot.com/o/spaces%2FEBQHGJABNTj5ISSOTRxM%2Fuploads%2FKJwQ4PrvW3ZdNt64b2a1%2FScreenshot%202024-04-22%20at%2014.34.26.png?alt=media&amp;token=16ffcf32-b684-4ada-85ec-558013edab12" alt=""><figcaption></figcaption></figure>

The playbook will open the conversation on 3 separate channels in order to elicit the user intention. You can see this by inspecting the little badges at the [main](/studio/flows/triggers#main) entry point, this will be telephony, chat and whatsapp channel related situations. The user, depending on calling or chatting will then try to answer the questions created (in this case no questions are trained) therefore the unknown flow will trigger the auto reply flow.

<figure><img src="https://3356808761-files.gitbook.io/~/files/v0/b/gitbook-x-prod.appspot.com/o/spaces%2FEBQHGJABNTj5ISSOTRxM%2Fuploads%2FvGXOD5p329faRj6MfvuY%2FScreenshot%202024-04-22%20at%2014.57.09.png?alt=media&amp;token=625a08c1-b70c-4c02-bc6a-82b036297441" alt=""><figcaption></figcaption></figure>

However, on Whatsapp the conversation is never started by the bot (unless a template message is sent) but only by a Contact. Therefore, the auto\_reply will kick in directly when a message is sent that isn't automatically replied by a [dialog trigger](/studio/flows/nodes/control-flow-invoke-dialog). The auto\_reply flow is invoked by the node [Go to flow](/studio/flows/nodes/control-flow-go-to-flow).

### Inbox

The Inbox will open the conversation on Web using a [say node](https://manuals.dialox.ai/studio/flows/nodes/say) and a [prompt](https://manuals.dialox.ai/studio/flows/nodes/prompt) in order to elicit the user intention. You can see this by inspecting the little badges at the [main](https://manuals.dialox.ai/studio/flows/triggers#main) entry point. The prompt will then try to answer the question (in this case no questions are trained) therefore the unknown flow will trigger the [Escalate: smart ](/studio/flows/nodes/escalate-smart)flow.

<figure><img src="https://3356808761-files.gitbook.io/~/files/v0/b/gitbook-x-prod.appspot.com/o/spaces%2FEBQHGJABNTj5ISSOTRxM%2Fuploads%2FxvrFXqQVlmXy6XdvhmYb%2FScreenshot%202024-04-22%20at%2014.50.05.png?alt=media&amp;token=99e16c38-4211-4386-aa43-a30fabe4d7bd" alt=""><figcaption></figcaption></figure>

However, on Whatsapp the conversation is never started by the bot (unless a template message is sent) but only by a Contact. Therefore, the Escalate: smart kick in directly when a message is sent that isn't automatically replied by a [dialog trigger](https://manuals.dialox.ai/studio/flows/nodes/flow-control-invoke-dialog).&#x20;

### Phone2wa&#x20;

Also called Phone to Whatsapp is the functionality which causes Speech to deflect to Whatsapp, making the Whatsapp Calldeflector complete. When someone calls the extension the caller can be deflected to the Whatsapp inbox using the following flows:

<figure><img src="https://3356808761-files.gitbook.io/~/files/v0/b/gitbook-x-prod.appspot.com/o/spaces%2FEBQHGJABNTj5ISSOTRxM%2Fuploads%2F7tVNAHS2wkmXDpbw9mXa%2FScreenshot%202024-04-22%20at%2014.49.26.png?alt=media&amp;token=24bfa21a-cfa1-4004-82fb-92e85963aae0" alt=""><figcaption></figcaption></figure>

Once the connected has been closed, the caller will receive a Whatsapp based on the number the call has given up to be contacted on. See the [Ask: phone](/studio/flows/nodes/ask-phone) for reference. After the caller reacts to the incoming whatsapp deflection template the conversation has officially been moved from speech to chat. &#x20;

### Web2wa

Also call Webchat to Whatsapp is the functionality to drag the live Chatwidget based conversation to a Whatsapp conversation. When the user wants to connect via the Chat widget and it takes to long, the user will be shown a QR which can be scanned to deflect to Whatsapp, as shown down below.

<figure><img src="https://3356808761-files.gitbook.io/~/files/v0/b/gitbook-x-prod.appspot.com/o/spaces%2FEBQHGJABNTj5ISSOTRxM%2Fuploads%2Fi2zwl9ugSeTPXojhpisP%2FScreenshot%202024-04-22%20at%2015.02.28.png?alt=media&amp;token=a6fb8760-31ff-4e1f-b327-b4ea9b2d3f9b" alt=""><figcaption></figcaption></figure>


# Social Inbox 1.0

{% hint style="info" %}
Read this if you have Smart Apps in use that have been ordered before 21 october 2024. New Smart Apps documentation can be found within the [Marketplace](/store/marketplace-apps).
{% endhint %}

The Social Inbox template enables your bot to answer incoming chat messages via the [Chatwidget](/studio/channels/chat-widget) and [Whatsapp](/studio/channels/whatsapp/whatsapp) channels. It can be used to configure any type of social messaging assistant. In the basis it is configured to forward messages to an employee (escalate) while sending an automatic response, but it can also be configured for automatic answering on recognized questions.

On other channels then Whatsapp it will deflect to Whatsapp after waiting for too long on an employee to join and respond. This way your audience is forced to continue in Whatsapp which makes them re-engageable, even when they are offline.

## Setup

At minimum you need to take care of the following:

1. Make sure your [opening hours](/settings/app-settings/opening-hours) are configured
2. Make sure your [Whatsapp](/studio/channels/whatsapp/whatsapp) channel is enable (or another chat channel)

<figure><img src="https://3356808761-files.gitbook.io/~/files/v0/b/gitbook-x-prod.appspot.com/o/spaces%2FEBQHGJABNTj5ISSOTRxM%2Fuploads%2FAN2n1rjMulUzh4Cr16nb%2FScreenshot%202024-04-10%20at%2013.04.51.png?alt=media&amp;token=111ce9f5-f8f2-4e60-8fc8-26e1d3f86f0e" alt=""><figcaption></figcaption></figure>

<table><thead><tr><th width="216">Status</th><th>Explanation</th><th data-hidden></th></tr></thead><tbody><tr><td>When online</td><td>Automatic reply to give employee(s) time to join and respond.</td><td></td></tr><tr><td>When offline</td><td>Automatic reply to let the customer know your business is closed.</td><td></td></tr><tr><td>When unavailable</td><td>Automatic reply for when <a href="/administration/users#roles">Operators</a> / <a href="/administration/users#roles">Agents</a> are currently not available to join or respond. </td><td></td></tr><tr><td>Wait timeout</td><td>Timer to wait for an operator before deflecting from Web to Whatsapp</td><td></td></tr></tbody></table>


# Social Inbox 2.0

{% hint style="info" %}
Read this if you have Smart Apps in use that have been ordered before 21 october 2024. New Smart Apps documentation can be found within the [Marketplace](/store/marketplace-apps).
{% endhint %}

The Social Inbox 2.0 template enables your bot to answer incoming chat messages via the [Chatwidget](/studio/channels/chat-widget) and [Whatsapp](/studio/channels/whatsapp/whatsapp) channels. It can be used to configure any type of social messaging assistant. In the basis it is configured to forward messages to an employee (escalate) while sending an automatic response, but it can also be configured for automatic answering on recognized questions.

On other channels then Whatsapp it will deflect to Whatsapp after waiting for too long on an employee to join and respond. This way your audience is forced to continue in Whatsapp which makes them re-engageable, even when they are offline.

## Setup

At minimum you need to take care of the following:

1. Make sure your [opening hours](/settings/app-settings/opening-hours) are configured
2. Make sure your [Whatsapp](/studio/channels/whatsapp/whatsapp) channel is enable (or another chat channel)

## Playbook

Make sureto review and change the following nodes in the Playbook flow. Click on Flows (1) and then open your Playbook (2).

<figure><img src="https://3356808761-files.gitbook.io/~/files/v0/b/gitbook-x-prod.appspot.com/o/spaces%2FEBQHGJABNTj5ISSOTRxM%2Fuploads%2F3SfiuVlhB0xcI2iZcmaE%2Fimage.png?alt=media&amp;token=6de07a62-c470-4959-8e83-579f05aeb9f4" alt=""><figcaption></figcaption></figure>

The playbook will open the conversation on Web using a [say node](/studio/flows/nodes/say) and a [prompt](/studio/flows/nodes/iterate-iterate) in order to elicit the user intention. You can see this by inspecting the little badges at the [main](/studio/flows/triggers) entry point. The prompt will then try to answer the question (in case no questions are trained therefore the unknown flow will trigger the auto reply flow).

<figure><img src="https://3356808761-files.gitbook.io/~/files/v0/b/gitbook-x-prod.appspot.com/o/spaces%2FEBQHGJABNTj5ISSOTRxM%2Fuploads%2Fol7vcn3YxFP5CNsUTdu0%2Fimage.png?alt=media&amp;token=67eb3daf-b7c4-46ce-b78c-a8c1a7dec4c4" alt=""><figcaption></figcaption></figure>

However, on Whatsapp the conversation is never started by the bot (unless a template message is sent) but only by a Contact. Therefore, the auto\_reply will kick in directly when a message is sent that isn't automatically replied by a [dialog trigger](https://manuals.dialox.ai/studio/flows/nodes/flow-control-invoke-dialog). The auto\_reply flow is invoked by the node [Go to flow](https://manuals.dialox.ai/studio/flows/nodes/flow-control-go-to-flow).

## Auto\_reply

The auto\_reply flow is configured to escalate to a human employee. You can use this flow also to ask some more preliminary or qualifying questions before escalating to a human. To change the behaviour, go to Flows (1) and then open the Auto\_reply flow (2).

<figure><img src="https://3356808761-files.gitbook.io/~/files/v0/b/gitbook-x-prod.appspot.com/o/spaces%2FEBQHGJABNTj5ISSOTRxM%2Fuploads%2FQMBsPAbpll20BhStyVEY%2Fimage.png?alt=media&amp;token=d35d96d0-4ee8-4400-814a-b0d73ad76abd" alt=""><figcaption></figcaption></figure>

The Auto\_reply flow will just explain the fact that the message is escalated to a human. When closed or when no agents are available it can display another message. See the [Smart Escalate node](https://manuals.dialox.ai/studio/flows/nodes/escalate-smart) for explanation about the behaviour of this node.

<figure><img src="https://3356808761-files.gitbook.io/~/files/v0/b/gitbook-x-prod.appspot.com/o/spaces%2FEBQHGJABNTj5ISSOTRxM%2Fuploads%2FIKhfDsuRziHvhfJfenRE%2Fimage.png?alt=media&amp;token=3e23fd8c-62ed-4f2c-8bef-74763a235033" alt=""><figcaption></figcaption></figure>

By default it will continue to the Whatsapp flow when no agent is available, see next paragraph.

## Whatsapp

The Whatsapp flow will only kick off on the Web Widget or Web PWA channels, since these channels have no way to re-engage the Contact. So on Whatsapp this is flow is skipped (we are already on Whatsapp). The little badges that are displayed next to the entry point indicate this fact.

![](https://manuals.dialox.ai/~gitbook/image?url=https:%2F%2F3356808761-files.gitbook.io%2F%7E%2Ffiles%2Fv0%2Fb%2Fgitbook-x-prod.appspot.com%2Fo%2Fspaces%252FEBQHGJABNTj5ISSOTRxM%252Fuploads%252FOhhKL3b6EO2WkIuqGZHx%252FScreenshot%25202024-04-04%2520at%252013.48.32.png%3Falt=media%26token=378e4eed-1d83-43eb-8670-fd0613b57f64\&width=768\&dpr=4\&quality=100\&sign=426150a208411640ad87b4b7d16599989000c9fefc6bb905e413cf1eb71b2244)![](https://manuals.dialox.ai/~gitbook/image?url=https:%2F%2F3356808761-files.gitbook.io%2F%7E%2Ffiles%2Fv0%2Fb%2Fgitbook-x-prod.appspot.com%2Fo%2Fspaces%252FEBQHGJABNTj5ISSOTRxM%252Fuploads%252FdV7tqDy0WDrn3T6Cr82D%252Fimage%2520%283%292.png%3Falt=media%26token=63dd0ccb-fec3-45af-a3c5-e28d1297d84e\&width=768\&dpr=4\&quality=100\&sign=b189f9557bc83f1a24271046c4c5f3d06859e64a2883bcddf857c0b7d6888168)

The Show Whatsapp link node needs to be properly configured in order for it to work. See [Show Whatsapp node](https://manuals.dialox.ai/studio/flows/nodes/show-whatsapp-link) for more details.


# Basic Group Voicemail

{% hint style="info" %}
Read this if you have Smart Apps in use that have been ordered before 21 october 2024. New Smart Apps documentation can be found within the [Marketplace](/store/marketplace-apps).
{% endhint %}

The Basic Group Voicemail app can be used as an alternative voicemail box. Simple forward your calls to this bot whenever you are unavailable.&#x20;

The bot will ask for the callers name, phone number, and reason of the call. These details will be stored so you can follow up on the call on a later moment.

The app can be configured with a welcome and a goodbye message. By default, the bot will create a note with the details left by the caller. However when you provide an email address, the bot will send the details to that email address instead of creating a note in the Inbox.&#x20;

### Generic setup

1. Make sure your [phone channel](/studio/channels/phone) is enabled
2. Provide the welcome and goodbye text<br>

   <figure><img src="https://3356808761-files.gitbook.io/~/files/v0/b/gitbook-x-prod.appspot.com/o/spaces%2FEBQHGJABNTj5ISSOTRxM%2Fuploads%2Fq9bdRleoO7NnWyAPj8Cq%2Fimage.png?alt=media&amp;token=4ab52f9b-e2a5-4c65-a2e6-a0b971aa37d6" alt=""><figcaption></figcaption></figure>
3. (Optional) Provide an email address<br>

   <figure><img src="https://3356808761-files.gitbook.io/~/files/v0/b/gitbook-x-prod.appspot.com/o/spaces%2FEBQHGJABNTj5ISSOTRxM%2Fuploads%2FRabLK3peTKwbonoSpvy9%2Fimage.png?alt=media&amp;token=cc6b12c8-fd95-4df4-89ac-2b0b04eb3f8a" alt=""><figcaption></figcaption></figure>

Notes that are generated by your Voicemail are collected in the Notes section. There notes can be followed up by marking them as completed. This way you'll never forget to follow up on made promises by your bot.


# Group Voicemail

Answers the phone, takes a message and sends it as an email

{% hint style="info" %}
Read this if you have Smart Apps in use that have been ordered before 21 october 2024. New Smart Apps documentation can be found within the [Marketplace](/store/marketplace-apps).
{% endhint %}

The Group Voicemail (previously called Company Voicemail) template can be used as an alternative voicemail box. Simple forward your calls to this bot whenever you are unavailable. The Company Voicemail template is configured with only one Flow: playbook. Read about flows in the [Flows](/studio/flows) section to understand what type of nodes your can use for configuring the Voicemail bot for your use case.

## Quick steps

### Generic setup

1. Make sure your [phone channel](/studio/channels/phone) is enabled
2. Make sure to change the [Send Note](/studio/flows/nodes/note-create) node to a [Send email](/studio/flows/nodes/send-email) node and fill in the email address, see step 6 below under playbook.

### Playbook

Make sure to review and change the following nodes in the Playbook flow. Click on Flows and then open your Playbook.

<figure><img src="https://3356808761-files.gitbook.io/~/files/v0/b/gitbook-x-prod.appspot.com/o/spaces%2FEBQHGJABNTj5ISSOTRxM%2Fuploads%2FM6XnHmdu96m6y41kcCMU%2FScreenshot%202024-03-21%20at%2009.36.10.png?alt=media&amp;token=cf437e3c-1b5c-4955-918d-c45c12dbcdde" alt=""><figcaption></figcaption></figure>

Review the following nodes:

1. [say](/studio/flows/nodes/say) welcome text (can be used to be more specific about whoms voicemail it is)
2. say what is expected now (we need some details)
3. [ask name](/studio/flows/nodes/ask-name)
4. [ask phone](/studio/flows/nodes/ask-phone)
5. [ask open](/studio/flows/nodes/ask-open) for the reason of the call
6. [send note](/studio/flows/nodes/note-create) (replace this for [send email](/studio/flows/nodes/send-email) to receive an email instead of a note in the studio)
7. say what can be expected from here (we will call you back asap)
8. say goodbye

<figure><img src="https://3356808761-files.gitbook.io/~/files/v0/b/gitbook-x-prod.appspot.com/o/spaces%2FEBQHGJABNTj5ISSOTRxM%2Fuploads%2FnVJJEc07h7EahWTAUvBf%2FScreenshot%202024-03-21%20at%2009.39.41.png?alt=media&amp;token=17d75b54-89a7-41cc-aca9-704667fa7491" alt=""><figcaption></figcaption></figure>

Notes that are generated by your Voicemail are collected in the Notes section. There notes can be followed up by marking them as completed. This way you'll never forget to follow up on made promisses by your bot. Notes can also be integrated in your (back office) systems using the [nodes API](https://developer.dialox.ai/dev/rest/#/Notes) and [Note Webhook](https://developer.dialox.ai/dev/webhooks/#note-events).

## Skills

* [Base flows](/store/skills/base-flows)
* [Phone flows](/store/skills/phone-flows)

The node type [Send SMS](/studio/flows/nodes/send-sms) is excluded from this bot template.


# Oncall Assistant

{% hint style="info" %}
Read this if you have Smart Apps in use that have been ordered before 21 october 2024. New Smart Apps documentation can be found within the [Marketplace](/store/marketplace-apps).
{% endhint %}

For companies that offer on call services to their customers it is quite a hassle to configure an on call schedule in their PBX. A bot with the Oncall Assistant template installed solves this issue quite easily.

After installing the skill you can simple add the node "Dial: On Call" to your flow and configure your agents and planning in the Content section of the platform. Using this approach even users without the right to edit your flows can change the On call schedule of your agents.

<figure><img src="https://3356808761-files.gitbook.io/~/files/v0/b/gitbook-x-prod.appspot.com/o/spaces%2FEBQHGJABNTj5ISSOTRxM%2Fuploads%2FpjbT4VtN9OSK3kjinYNQ%2Fimage.png?alt=media&amp;token=cf77df1e-878d-41ef-bcd8-f9da543efa94" alt=""><figcaption></figcaption></figure>

## Add Dial: On Call to your Flows

There will be a new flow node introduced to your bot called "Dial: on call". This node needs to be added to your flow in order to enable it.

1. Go to the Flows section of the platform
2. Find the place in your flow where you want to have the bot to dial the on call agent.
3. Click right mouse button, click on Dial and then on On call.
4. Now make sure your flow routes a link (Arrow) to your new Dial: on call node. In case this is the only node in your Flow, you need to connect it to the Entry trigger.
5. Open the side panel of the node by clicking on the title bar of the **Dial: On call** node.

<figure><img src="https://3356808761-files.gitbook.io/~/files/v0/b/gitbook-x-prod.appspot.com/o/spaces%2FEBQHGJABNTj5ISSOTRxM%2Fuploads%2F60sj25l4wWfIiHbkJGbu%2FScreenshot%202024-04-16%20at%2009.43.47.png?alt=media&amp;token=ae085621-4a05-4ca0-951d-82cd8b192144" alt=""><figcaption></figcaption></figure>

6. Now fill in the text and the fallback number.
7. Now go to the Content section and add your agents to the **On-call Phonebook**.
8. Then configure who is available for on call services from when in the **On-call Schedule** page in the Content section.

<table><thead><tr><th width="140">Property</th><th>Description</th><th>Explanation</th></tr></thead><tbody><tr><td>SIP</td><td>The SIP method to use for dialing</td><td>Choose Refer</td></tr><tr><td>Text</td><td>The text the bot should say just before dialing</td><td>By embedding <strong>#{oncall_name}</strong> the name of the agent can be used in the text</td></tr><tr><td>Fallback</td><td>What number to dial when no schedule is found in the <a href="#oncall-assistant-schedule">Content</a> section</td><td></td></tr></tbody></table>

### Oncall Assistant Template

<figure><img src="https://3356808761-files.gitbook.io/~/files/v0/b/gitbook-x-prod.appspot.com/o/spaces%2FEBQHGJABNTj5ISSOTRxM%2Fuploads%2F7YcuWiOwFGkE1PEph07Y%2FScreenshot%202024-04-16%20at%2009.41.18.png?alt=media&amp;token=af226ff6-0565-4f38-ba9f-34947c9a136d" alt=""><figcaption></figcaption></figure>

### Oncall Assistant Phonebook

In order for the On call function to work the system must know which agents there are to route the call to. The on call agents can be configured in the Content section.

1. Click on Content
2. Click on On-call Phonebook
3. Click Add

<figure><img src="https://3356808761-files.gitbook.io/~/files/v0/b/gitbook-x-prod.appspot.com/o/spaces%2FEBQHGJABNTj5ISSOTRxM%2Fuploads%2FytzZhPw9WsBBwkHmfR2x%2FScreenshot%202024-04-16%20at%2010.00.13.png?alt=media&amp;token=fc606915-68a2-41c3-ab55-2dbbbaa210cb" alt=""><figcaption></figcaption></figure>

<table><thead><tr><th width="125">Property</th><th width="241">Description</th><th>Explanation</th></tr></thead><tbody><tr><td>Name</td><td>Name of the agent</td><td></td></tr><tr><td>Number </td><td>Number of the agent</td><td>Make sure to enable or disable the extension option depending on the number you need</td></tr><tr><td>Extension</td><td>Uncheck for public numbers</td><td>To make sure the number is validated on correctness</td></tr></tbody></table>

### Oncall Assistant Schedule

When the agents are configured we can configure the schedule. This will help the system to know when to route the call to which agent.

1. Click on Content
2. Click on On-call Schedule
3. Click Add

<figure><img src="https://3356808761-files.gitbook.io/~/files/v0/b/gitbook-x-prod.appspot.com/o/spaces%2FEBQHGJABNTj5ISSOTRxM%2Fuploads%2Fz5MICRpqoqa48WPz97ne%2FScreenshot%202024-04-16%20at%2010.01.43.png?alt=media&amp;token=e0be946f-33ab-4966-8b8b-d04bebff41cc" alt=""><figcaption></figcaption></figure>

<table><thead><tr><th>Property</th><th>Description</th><th data-hidden>Explanation</th></tr></thead><tbody><tr><td>From</td><td>The date and time at which this schedule becomes active </td><td></td></tr><tr><td>Route to</td><td>The agent to route the call to</td><td></td></tr></tbody></table>

{% hint style="info" %}
The system always searches for the schedule that is closest to the current date time.
{% endhint %}


# Web App

{% hint style="info" %}
Read this if you have Smart Apps in use that have been ordered before 21 october 2024. New Smart Apps documentation can be found within the [Marketplace](/store/marketplace-apps).
{% endhint %}

Put together a Progressive Web App (Web App) in just a few seconds. Users would be able to interact with your bot directly within the Web app interface. This could involve asking questions, receiving responses, and engaging in conversation as they would with a traditional chatbot interface.

<figure><img src="https://3356808761-files.gitbook.io/~/files/v0/b/gitbook-x-prod.appspot.com/o/spaces%2FEBQHGJABNTj5ISSOTRxM%2Fuploads%2Fwy4WpiB1LUCrZSWtAol3%2FScreenshot%202024-04-10%20at%2014.10.09.png?alt=media&amp;token=18124da2-9d91-4777-9ad4-49fe2c0d59ce" alt=""><figcaption></figcaption></figure>

## Setup

1. Click on [Channels](/studio/channels)
2. Choose Progressive Web App
3. Fill in a subdomain to use for your Web App.

## Manage&#x20;

Manage your Web app by using the three tabs after following the setup steps above. Click on the buttons below for more information.

<details>

<summary>Settings</summary>

You can either host this PWA on the generic bsqd.me subdomain, or link your own domain name.

Options:

* PWA hosted on bsqd.me
* PWA hosted on top-level domain

![](https://3356808761-files.gitbook.io/~/files/v0/b/gitbook-x-prod.appspot.com/o/spaces%2FEBQHGJABNTj5ISSOTRxM%2Fuploads%2FyuK1ZBrJ7hwD0xPq8JqU%2FScreenshot%202024-04-10%20at%2015.01.41.png?alt=media\&token=42295410-b071-4691-85c1-c66a9439b566)

</details>

<details>

<summary>Design</summary>

Customize your Web app by using the Design tab. The design tab will give you a couple of options to whitelabel your Webapp such as:

* PWA chat app
* Full page chat
* Customization of colours
* Add introduction chat

![](https://3356808761-files.gitbook.io/~/files/v0/b/gitbook-x-prod.appspot.com/o/spaces%2FEBQHGJABNTj5ISSOTRxM%2Fuploads%2Ft6FDQtEPBCaJ4OyqyzRZ%2FScreenshot%202024-04-10%20at%2015.02.46.png?alt=media\&token=6fac9049-4ddb-4ae3-b6ed-fa4d684cc9fa)

</details>

<details>

<summary>Code</summary>

There is an optional tab called Code. This feature is on request. When granted access you will be able to edit CSS / JS to further enhance your Web app.

![](https://3356808761-files.gitbook.io/~/files/v0/b/gitbook-x-prod.appspot.com/o/spaces%2FEBQHGJABNTj5ISSOTRxM%2Fuploads%2FJc5ehGpuqJr6hu8zrDrN%2FScreenshot%202024-04-10%20at%2015.07.13.png?alt=media\&token=ec2e9c4d-8a20-4380-aac8-d4b8df93b0c4)

</details>


# Basic Callback Note

Bot template to create callback notes from incoming phone calls

{% hint style="info" %}
Read this if you have Smart Apps in use that have been ordered before 21 october 2024. New Smart Apps documentation can be found within the [Marketplace](/store/marketplace-apps).
{% endhint %}

The Basic Callback Note app can be used as to create notes when you are unable to take the phone call.&#x20;

The bot will ask the caller for their name, phone number, and reason for calling. It will then create a note with the provided details in the [Notes ](/inbox/notes)folder which you can find in the menu on the left.&#x20;

<figure><img src="https://3356808761-files.gitbook.io/~/files/v0/b/gitbook-x-prod.appspot.com/o/spaces%2FEBQHGJABNTj5ISSOTRxM%2Fuploads%2FLz76UajEoOeBofc3SH19%2FAfbeelding%20van%20WhatsApp%20op%202024-04-10%20om%2012.39.54_4e679ae9.jpg?alt=media&amp;token=6fdfe5c1-f158-46ff-83b3-28ba410800d0" alt=""><figcaption></figcaption></figure>

The app can be configured with a welcome and a goodbye message. By default, the bot will create a note with the details left by the caller. However when you provide an email address, the bot will send the details to that email address instead of creating a note in the Inbox.&#x20;

### Generic setup

1. Make sure your [phone channel](/studio/channels/phone) is enabled
2. Provide the welcome and goodbye text\ <br>

   <figure><img src="https://3356808761-files.gitbook.io/~/files/v0/b/gitbook-x-prod.appspot.com/o/spaces%2FEBQHGJABNTj5ISSOTRxM%2Fuploads%2FnsarCr4pS8zpZICjBqPu%2Fimage.png?alt=media&amp;token=64d9570a-6546-45f8-9143-456db13cb68e" alt=""><figcaption></figcaption></figure>

Notes that are generated by your Voicemail are collected in the Notes section. There notes can be followed up by marking them as completed. This way you'll never forget to follow up on made promises by your bot.

The callback note can be handled accordingly by Marking it as done or Assigning it to one of your colleagues in the manage panel on the right side.

<table><thead><tr><th width="142">Property</th><th width="300">Description</th><th>Explanation</th></tr></thead><tbody><tr><td>Status</td><td>Either To Do or Done</td><td></td></tr><tr><td>Note</td><td>Subject of a note</td><td></td></tr><tr><td>Start at</td><td>Start of a note to be handled accordingly</td><td>Mostly used with calendering feature</td></tr><tr><td>Due at</td><td>Deadline for note to be handled accordingly</td><td>Mostly used with calendering feature</td></tr><tr><td>Tags</td><td>Added tags to categorize a specific note.</td><td></td></tr><tr><td>Created at</td><td>Date of creation</td><td></td></tr></tbody></table>


# Callback Note

{% hint style="info" %}
Read this if you have Smart Apps in use that have been ordered before 21 october 2024. New Smart Apps documentation can be found within the [Marketplace](/store/marketplace-apps).
{% endhint %}

During the callback request process, the Callback Note bot may prompt the user to provide certain information such as their name, phone number, reason for callback, and preferred callback time. This information helps ensure that the callback note is efficient and relevant to the customers needs.

Once the user submits the callback request along with the required information, the Callback Note schedules the callback based on the specified preferences. This scheduling functionality ensures that the callback occurs at a convenient time for the user and helps manage the workload for representatives handling callbacks.

<figure><img src="https://3356808761-files.gitbook.io/~/files/v0/b/gitbook-x-prod.appspot.com/o/spaces%2FEBQHGJABNTj5ISSOTRxM%2Fuploads%2FUySXOxgNcrUgSr7gXknY%2FAfbeelding%20van%20WhatsApp%20op%202024-04-10%20om%2012.32.02_2c1860d4.jpg?alt=media&amp;token=2788854b-3eb8-4cf8-bfd6-b260b4d59468" alt=""><figcaption></figcaption></figure>

The [Send Note](/studio/flows/nodes/note-create) node capture a few variables such as [name](/studio/flows/nodes/ask-name), [phone ](/studio/flows/nodes/ask-phone)& reason. These will be sent to the [Notes ](/inbox/notes)folder which you can find in the menu on the left.&#x20;

<figure><img src="https://3356808761-files.gitbook.io/~/files/v0/b/gitbook-x-prod.appspot.com/o/spaces%2FEBQHGJABNTj5ISSOTRxM%2Fuploads%2FLz76UajEoOeBofc3SH19%2FAfbeelding%20van%20WhatsApp%20op%202024-04-10%20om%2012.39.54_4e679ae9.jpg?alt=media&amp;token=6fdfe5c1-f158-46ff-83b3-28ba410800d0" alt=""><figcaption></figcaption></figure>

Once your customer has spoken in the variables as stated above, this will eventually result in a Callback Note. Handle accordingly by Marking it as done or Assigning it to one of your colleagues in the manage panel on the right side.

<table><thead><tr><th width="181">Property</th><th width="271">Description</th><th>Explanation</th></tr></thead><tbody><tr><td>Status</td><td>Either To Do or Done</td><td></td></tr><tr><td>Note</td><td>Subject of a note</td><td></td></tr><tr><td>Start at</td><td>Start of a note to be handled accordingly</td><td>Mostly used with calendering feature</td></tr><tr><td>Due at</td><td>Deadline for note to be handled accordingly</td><td>Mostly used with calendering feature</td></tr><tr><td>Tags</td><td>Added tags to categorize a specific note.</td><td></td></tr><tr><td>Created at</td><td>Date of creation</td><td></td></tr></tbody></table>


# Callback Planner

The Callback Planner schedules callback appointments in your own calendar for you. Useful for when you're unavailable to take on calls right now.

{% hint style="info" %}
Read this if you have Smart Apps in use that have been ordered before 21 october 2024. New Smart Apps documentation can be found within the [Marketplace](/store/marketplace-apps).
{% endhint %}

## Introduction

Can't answer the phone during peak moments? Or are you contacted outside of your service hours?\
Have the Callback Planner offer your customers some convenience by making it easy for them to plan a callback appointment.&#x20;

This way callers don't need to wait in the queue or  remind themselves to call back sometime later.

<figure><img src="https://3356808761-files.gitbook.io/~/files/v0/b/gitbook-x-prod.appspot.com/o/spaces%2FEBQHGJABNTj5ISSOTRxM%2Fuploads%2FoCRZwMfRPaIEjyJNGXDY%2Fimage.png?alt=media&amp;token=53ccd27c-c5e6-41b0-ab15-9198c1f110de" alt=""><figcaption><p>Example 1: The Callback planner proposes one option</p></figcaption></figure>

The Callback planner will try to find the right date and time together with the customer. You can configure the planner to either directly offer one or multiple suggestions, or even ask the customer directly for a desired date and time.&#x20;

The user can either confirm or decline. When the user declines, the bot will find the next possible slot. When users ask for a specific alternative, the bot will try to find the best possible option that corresponds to the request. In the below example, the bot found the next available slot that comes closest to the question to be Monday at 10:00:

<figure><img src="https://3356808761-files.gitbook.io/~/files/v0/b/gitbook-x-prod.appspot.com/o/spaces%2FEBQHGJABNTj5ISSOTRxM%2Fuploads%2FMq9eZhfeWYVIQOc7z1ia%2Fimage.png?alt=media&amp;token=5bcf9fed-76db-4bd2-a6e5-9421331942d0" alt=""><figcaption><p>Example 2: When asked for a specific date / time, the bot finds to most suitable option</p></figcaption></figure>

After finding the right point in time for the callback appointment, the planner will ask the customer for their name, phone number, and reason for the call.

When finishing the conversation, the bot will create a Todo item with the registered details in the [Today view within the Inbox](/inbox/today) for a human agent to handle.

<figure><img src="https://3356808761-files.gitbook.io/~/files/v0/b/gitbook-x-prod.appspot.com/o/spaces%2FEBQHGJABNTj5ISSOTRxM%2Fuploads%2F4DqeUOkhhBuwMWizYjfc%2Fimage.png?alt=media&amp;token=c3180630-d46f-4819-ac65-e355ae1a7040" alt=""><figcaption><p>Today view in DialoX Inbox</p></figcaption></figure>

## Installing the bot

### Configuring the planner

The Bot App is plug and play. It does however need to know when it can plan appointments. \
To do this we will hook up a planner for the bot. The planner is a view across one or multiple calendars (e.g. different colleagues or departments). But it is also fine to just use a single calendar for the planner.

Let's configure our first calendar and planner.

1. Go to 'Settings', and then 'Calendars' <br>

   <figure><img src="https://3356808761-files.gitbook.io/~/files/v0/b/gitbook-x-prod.appspot.com/o/spaces%2FEBQHGJABNTj5ISSOTRxM%2Fuploads%2Fqsdf2sSH3ckuXRmZ7NwG%2Fimage.png?alt=media&amp;token=9583d374-47de-4fd9-8793-aac6ad68468c" alt=""><figcaption></figcaption></figure>
2. From there, click on 'Add calendar', name your first calendar and hit 'Save'.

Now that we have a calendar we can link it to a planner.&#x20;

1. In the left sidebar, go to Planning.

2. Then via the planner selector in the top left, click 'Add new planner'<br>

   <figure><img src="https://3356808761-files.gitbook.io/~/files/v0/b/gitbook-x-prod.appspot.com/o/spaces%2FEBQHGJABNTj5ISSOTRxM%2Fuploads%2FhIBD75LdFuaU5iCGvdKF%2Fimage.png?alt=media&amp;token=df25b287-a7bb-4959-bf05-b08a81c7c887" alt=""><figcaption></figcaption></figure>

3. Provide a name, configure the limits and choose between a free/busy or a slots planner, then click 'Save'.

{% hint style="info" %}
**Free/busy or Slots?**

The Free/busy planner attempts to find gaps in the calendar that haven't been filled yet. As a result, events will not overlap. Free/busy can work with multiple calendars to find the first one that has an open spot.\
\
The Slots planner tries to find slots that haven't been completely filled yet, and plans an event that matches the starting and ending time of the slot. Events will overlap if the capacity is greater than one.

**Both planners require availability slots**

To plan appointments, both the free/busy and the slots planner require you to create slots upfront.&#x20;

When creating slots in the free/busy planner, you can think of these slots as your opening hours. Appointments can be scheduled anywhere in these slots, as long as they do not overlap or exceed the capacity limit. The bot cannot plan events outside of these availability windows.&#x20;

The slots planner can create as many appointments in the same slot as the capacity limit allows. These appointments all have the starting time their chosen slot.
{% endhint %}

### Creating slots for appointments&#x20;

You can create a slot by selecting and dragging a time window on the planner.

You will then be shown a modal where you can set up the recurrence of the slot, and the maximum capacity.

<figure><img src="https://3356808761-files.gitbook.io/~/files/v0/b/gitbook-x-prod.appspot.com/o/spaces%2FEBQHGJABNTj5ISSOTRxM%2Fuploads%2FZ0WLqOtDKbLbMJmotpwQ%2Fimage.png?alt=media&amp;token=7d83e494-e45f-4cea-a3f8-117da9c04154" alt=""><figcaption></figcaption></figure>

## Flows

This Bot App comprises three Flow files:

* Playbook, to start the conversation
* Appointment, to make the appointment
* Details, to capture the details for the appointment

The Playbook and the Details flows use common Flow nodes which you can read all about in the [here](/studio/flows/playbook).

The Appointment flow is specific for this Bot App and introduces a new Flow Node type called "Planner - Plan". It is introduced by the [Planner skill](/store/skills/planner).&#x20;

<figure><img src="https://3356808761-files.gitbook.io/~/files/v0/b/gitbook-x-prod.appspot.com/o/spaces%2FEBQHGJABNTj5ISSOTRxM%2Fuploads%2FNm58metp1yK12RjcnGSW%2Fimage.png?alt=media&amp;token=f6b4b2c9-fef3-47eb-9ba2-1d883c411b76" alt=""><figcaption></figcaption></figure>

The [Plan node](/studio/flows/nodes/plan) is responsible for having the dialog with the user to elicit the right date and time to make the appointment.

Once the date and time are selected, the plan node will fire the Details flow for gathering the details needed to making the callback appointment, which are in this case asking for the name, the phone number and the reason for the call:

<figure><img src="https://3356808761-files.gitbook.io/~/files/v0/b/gitbook-x-prod.appspot.com/o/spaces%2FEBQHGJABNTj5ISSOTRxM%2Fuploads%2F0el84kv7O0LXihAFeIbx%2Fimage.png?alt=media&amp;token=4341eff2-f2dc-4dc3-94a8-6ce205e22865" alt=""><figcaption></figcaption></figure>

When the details flow is finished, the appointment will be planned in the calendar of this bot. Inbox users will be able to find the Callback appointments in the [Today view of the inbox](/inbox/today).

## Skills

This bot is composed out of the following skills. Click on the skill to read the details.

* [Base flows](/store/skills/base-flows)
* [Phone flows](/store/skills/phone-flows)
* [Planner](/store/skills/planner)


# Caller Based Router

{% hint style="info" %}
Read this if you have Smart Apps in use that have been ordered before 21 october 2024. New Smart Apps documentation can be found within the [Marketplace](/store/marketplace-apps).
{% endhint %}

The Callback Based Router allows you to route directly from number to number. This can be from external to extension, extension to external, extension to extension and vice versa. This creates a structured workflow in which you can create the desired routings without any effort.

<figure><img src="https://3356808761-files.gitbook.io/~/files/v0/b/gitbook-x-prod.appspot.com/o/spaces%2FEBQHGJABNTj5ISSOTRxM%2Fuploads%2F2OhkuXYqsht2D9nN9OfJ%2FScreenshot%202024-05-16%20at%2009.09.51.png?alt=media&amp;token=e6b1780a-024c-44d5-8cec-6f28ee65c6ef" alt=""><figcaption></figcaption></figure>

### Using the Called Based Router

When you want to start routing numbers you need to do the following steps:

1. Navigate to the left menu.
2. Click on Content.
3. Go to Routing Table.
4. Fill in the Caller.
5. Then fill in the designated destination that the caller needs to be routed to.&#x20;

<figure><img src="https://3356808761-files.gitbook.io/~/files/v0/b/gitbook-x-prod.appspot.com/o/spaces%2FEBQHGJABNTj5ISSOTRxM%2Fuploads%2Fd3cG7E8VRFM1pIUIWOpK%2FScreenshot%202024-05-16%20at%2009.10.58.png?alt=media&amp;token=a117138a-2015-4277-bc98-8e2c6083bc66" alt=""><figcaption></figcaption></figure>

As you can see in the image above, you see that the **caller**, the person who is calling, is routed to the **target**, or the desired destination. After you connected a public number to your Caller Based Router and start calling this number, the **caller** (+31612345678 in this situation) will be routed to the **target**.


# Skills

The modules that make up the Apps

A skill is like a plugin that adds one or more capabilities to a Smart App. The Platform Defaults and [Base Flows](/store/skills/base-flows) are included in all Smart Apps from Level 2 - Advanced and above. Then, depending on the channels the App supports, the skills [Phone flows](/store/skills/phone-flows), [Chat flows](/store/skills/chat-flows) and/or [Web flows](/store/skills/web-flows) are included.&#x20;

## Optional skills

The following table displays which optional skill is available in which bot and which level.

| Apps                                                                                    | Timeplans                       | Zipcode Flows                       | LLM Flows                       | LLM Knowledgebase                        | Hubspot Integration                        | Jira Integration                        | Zendesk Integration                        | Oauth Flows                       |
| --------------------------------------------------------------------------------------- | ------------------------------- | ----------------------------------- | ------------------------------- | ---------------------------------------- | ------------------------------------------ | --------------------------------------- | ------------------------------------------ | --------------------------------- |
| **Apps Level 2**                                                                        | [Link](/store/skills/timeplans) | [Link](/store/skills/zipcode-flows) | [Link](/store/skills/llm-flows) | [Link](/store/skills/llm-knowledge-base) | [Link](/store/skills/integrations/hubspot) | [Link](/store/skills/integrations/jira) | [Link](/store/skills/integrations/zendesk) | [Link](/store/skills/oauth-flows) |
| [Call Deflector](/store/marketplace-apps/level-2-advanced/call-deflector)               | X                               | X                                   | X                               | L3                                       | X                                          | X                                       | X                                          |                                   |
| [Callback Note](/store/marketplace-apps/level-2-advanced/callback-note)                 | X                               | X                                   | X                               | L3                                       | X                                          | X                                       | X                                          |                                   |
| [Order Assistant](/store/marketplace-apps/level-2-advanced/order-assistant)             | X                               | X                                   | X                               | L3                                       | X                                          | X                                       | X                                          |                                   |
| [Smart IVR](/store/marketplace-apps/level-2-advanced/smart-ivr)                         | X                               | X                                   | X                               | L3                                       | X                                          | X                                       | X                                          |                                   |
| [Survey](/store/marketplace-apps/level-2-advanced/survey)                               | X                               | X                                   | X                               | L3                                       | X                                          | X                                       | X                                          |                                   |
| [Website Chat](/store/marketplace-apps/level-2-advanced/website-chat)                   | X                               | X                                   | X                               | L3                                       | X                                          | X                                       | X                                          |                                   |
| [QR Connect](/store/marketplace-apps/level-2-advanced/qr-connect)                       | X                               | X                                   | X                               | L3                                       | X                                          | X                                       | X                                          |                                   |
| **Apps Level 3**                                                                        |                                 |                                     |                                 |                                          |                                            |                                         |                                            |                                   |
| [Callback Planner](/store/marketplace-apps/level-3-professional/callback-planner)       | X                               | X                                   | X                               | X                                        | X                                          | X                                       | X                                          |                                   |
| [Appointment Planner](/store/marketplace-apps/level-3-professional/appointment-planner) | X                               | X                                   | X                               | X                                        | X                                          | X                                       | X                                          |                                   |
| **Apps Level 4**                                                                        |                                 |                                     |                                 |                                          |                                            |                                         |                                            |                                   |
| Creator                                                                                 | X                               | X                                   | X                               | X                                        | X                                          | X                                       | X                                          | X                                 |


# Base flows

Common flow nodes that are useful on any of the supported communication channels

The Base flows skill provides the basic framework for your bot and the capability to design your bot using Flows. Without it you cannot design Flows using the visual modeller and your bot will not function unless you write your own [Bubblescript](https://developer.botsquad.com) scripts.

The Base flows skill contains the following node types:

Send:

* [Send email](/studio/flows/nodes/send-email)
* [Send SMS](/studio/flows/nodes/send-sms)
* [Send whatsapp](/studio/flows/nodes/send-whatsapp)

Ask:

* [Iterate](/studio/flows/nodes/iterate-iterate)
* [Iterate continue](/studio/flows/nodes/iterate-continue)
* [Ask choice](/studio/flows/nodes/ask-choice)
* [Ask open](/studio/flows/nodes/ask-open)
* [Ask name](/studio/flows/nodes/ask-name)
* [Ask phone](/studio/flows/nodes/ask-phone)
* [Ask language](/studio/flows/nodes/ask-language)
* [Ask date](/studio/flows/nodes/ask-date)
* [Ask time](/studio/flows/nodes/ask-time)
* [Ask custom entity](/studio/flows/nodes/ask-custom-entity)

Note:

* [Note create](/studio/flows/nodes/note-create)
* [Note update](/studio/flows/nodes/note-update)

Control flow:

* [Pause](/studio/flows/nodes/control-flow-pause)
* [Branch](/studio/flows/nodes/control-flow-branch)
* [Invoke dialog](/studio/flows/nodes/control-flow-invoke-dialog)
* [Switch language](/studio/flows/nodes/control-flow-switch-language)
* [Goto flow](/studio/flows/nodes/control-flow-go-to-flow)
* [Restart](/studio/flows/nodes/control-flow-restart)
* [Close](/studio/flows/nodes/control-flow-close)


# Platform defaults

The platform defaults skill is a framework containing all default behaviour and logic that is needed for the [Base flows](/store/skills/base-flows) skill to support its flow nodes.

Furthermore, this skill introduces the following system intents in the AI section:

<figure><img src="https://3356808761-files.gitbook.io/~/files/v0/b/gitbook-x-prod.appspot.com/o/spaces%2FEBQHGJABNTj5ISSOTRxM%2Fuploads%2FGIUOBUjBgiklkojBhLNc%2Fimage.png?alt=media&amp;token=4cf46018-a3be-4d71-96f9-42f3c6182042" alt=""><figcaption><p>System Intents</p></figcaption></figure>

System intents are intents that are managed by the DialoX team since they are needed for other platform skills to work properly, like Yes, No, etc.&#x20;

| Intent   | Description                        | Examples                          |
| -------- | ---------------------------------- | --------------------------------- |
| Yes      | When the user says yes             | Sure, yep, absolutely             |
| No       | When the user says no              | Not at all, nope, negative        |
| Escalate | When the user asks for a human     | I want to speak to a human please |
| Hello    | When the user says hello           | Hi there, hello, hi               |
| Thanks   | When the user thanks the agent     | Thank you, thank you so much      |
| Finish   | When the user indicates to be done | Thanks, that's it                 |


# Phone flows

Adds flow nodes that are only relevant on phone channels

The Phone flows skill enables your bot to be used for telephony. It adds the following node types:

* [dial number](/studio/flows/nodes/dial-number)
* [dial smart](/studio/flows/nodes/dial-smart)

### Content

As part of the phone flows the content page Voice lexicon is exposed. Using this content page translations can be made for words to their phonatic versions when text to speech fails or can be improved. See [Voice lexicon](/studio/content/voice-lexicon) for more information.


# Chat flows

Adds flow nodes that are only relevant on chat channels

The Chat flows skill introduces nodes that only apply to generic chat interfaces, like for instance asking an email address, showing an image or escalating to a human operator. These are functions that cannot be done over phone.

The following node types are introduced in this skill:

* [Escalate default](/studio/flows/nodes/escalate-default)
* [Escalate smart](/studio/flows/nodes/escalate-smart)
* [Ask email](/studio/flows/nodes/ask-email)
* [Show Whatsapp](/studio/flows/nodes/show-whatsapp-link)
* [Show Image](/studio/flows/nodes/show-image)
* [Show Video](/studio/flows/nodes/show-video)
* [Show File](/studio/flows/nodes/show-file)
* [Show Location](/studio/flows/nodes/show-location)

### Content

The chat interface introduces a content page called [Whatsapp optout](/studio/content/whatsapp-optout) to manage the default response provided when opting in or opting out of business initiated conversations on Whatsapp.


# Web flows

Adds flow nodes that are only relevant on Web Chat channels

The Web flows skill introduces node types and functions that only apply to chat on Web channels, like the Web PWA or the [Chatwidget](/studio/channels/chat-widget).

Node types:

* [Ask selection](/studio/flows/nodes/ask-selection)
* [Ask form](broken://pages/p3fjVmgSc8kmEh5ZOTii)

### Hide input setting

The Web flows skill introduces a specific settings page to manage the availability of the input bar in the conversation.

When the input bar is disabled your bot doesn't need to be able to respond to off topic user intents. Your users will keep on the path you've set out for them in your dialogs easier compared to when you leave the input bar open for free format text messages.

You can disable the input bar by going to the settings page of this skill, called Settings for web.&#x20;


# LLM Flows

Adds flow nodes that use Large Language Models for their functioning

The LLM Flows skills adds capabilities to your Smart App to generate responses to users using a large language model AI service. The capabilities are exposed in the following flow nodes that you can add to your flow canvas:

* [Say: LLM](/studio/flows/nodes/say-llm)
* [Iterate: LLM](/studio/flows/nodes/iterate-llm)
* [Run prompt](/studio/flows/nodes/run-prompt)

## What is a large language model?

A Large Language Model (LLM) is a type of artificial intelligence (AI) model designed to understand and generate human-like text based on the input it receives. These models are trained on massive datasets of text from books, articles, websites, and other written content, enabling them to process and generate coherent language.

The DialoX platform uses mainly the ChatGPT models from Open AI, hosted on the Microsoft Azure platform and Gemini models from google hosting within Google cloud.

## How to install?

Depending on your license the LLM Flows skill can be installed in the packages section of the platform.

Not all Smart Apps support the LLM Flows skill. When they do however you can perform the following steps to install the skill to your App.

1. Go to packages
2. Click on Browse skills
3. Click on LLM Flows
4. Click on Install

<figure><img src="https://3356808761-files.gitbook.io/~/files/v0/b/gitbook-x-prod.appspot.com/o/spaces%2FEBQHGJABNTj5ISSOTRxM%2Fuploads%2FxGePPhr8IZzp5wrcqBiz%2Fimage.png?alt=media&amp;token=5c92217e-aedf-484d-972a-1cb014210b52" alt=""><figcaption><p>Find the LLM Flows skill in your packages browser</p></figcaption></figure>

<figure><img src="https://3356808761-files.gitbook.io/~/files/v0/b/gitbook-x-prod.appspot.com/o/spaces%2FEBQHGJABNTj5ISSOTRxM%2Fuploads%2FQYPJN24JShIEYUFD9Ri5%2Fimage.png?alt=media&amp;token=0608cfe3-8357-443f-9209-5edb987f8381" alt=""><figcaption><p>Install the LLM Flows skill</p></figcaption></figure>


# LLM Knowledge base

Adds flow nodes that use Large Language Models using Knowledge bases for their functioning

{% hint style="info" %}
**0.6.0 update** - With the update of the LLM Knowledge base skill to version 0.6.0, we now make use of Google Vertex which improves both the quality and reliability for retrieving information from the uploaded documents. \
\
When creating a new knowledge base make sure to set '**Google Vertex AI RAG**' as the retrieval strategy.\
\
For more info, [read below](#getting-started-with-google-vertex-knowledge-bases).
{% endhint %}

The LLM Knowledge base skill adds two capabilities to your Smart App to generate responses to users and operators using a large language model AI service that uses a predefined Knowledge base as its content.&#x20;

## How to install?

### Installing the package

Depending on your license, the LLM Knowledge base skill can be installed in the packages section of the platform.

Not all Smart Apps support the LLM Knowledge base skill. When they do however you can perform the following steps to install the skill to your App.

1. Go to packages
2. Click on Browse skills
3. Click on LLM Knowledge base
4. Click on Install
5. Publish the app to gain access to the 'AI - Knowledge bases' page

### Configuring the AI

The prompts can be configured in the Prompts page in the AI section, see [here](/studio/ai/prompts) for more details.

Knowledge bases can be configured in the Knowledge bases page in the AI section, see [here](/studio/ai/knowledge-bases) for more details. &#x20;

### Configuring the Inbox settings

If you want to use the knowledge base and the LLM Prompt in the inbox to generate suggestions to the operators and agents, make sure to configure the Prompt and Knowledge base in the Settings page called "Inbox AI", see below:

<figure><img src="https://3356808761-files.gitbook.io/~/files/v0/b/gitbook-x-prod.appspot.com/o/spaces%2FEBQHGJABNTj5ISSOTRxM%2Fuploads%2FuVkFeS1IlQtJkkRp2tNa%2Fimage.png?alt=media&amp;token=cf32a4da-b04a-4abb-8ff6-048f067c3d34" alt=""><figcaption><p>Configuring which knowledge base and prompt to use for providing inbox suggestions</p></figcaption></figure>

## How to use?

### In the Flow Designer

The LLM Knowledge base skill introduces the following flow nodes to your Flow designer in order to provide responses that are generated by the LLM to users of your Smart App:

* [Iterate: LLM Knowledge base](/studio/flows/nodes/iterate-llm-knowledgebase)
* [Say: LLM Knowledge base](/studio/flows/nodes/say-llm-knowledgebase)

### In the Inbox

The LLM Knowledge base skill also introduces an Inbox Command for generating response suggestions using the LLM. The Inbox Command is available in the input bar when an operator or agent has joined the conversation.

<figure><img src="https://3356808761-files.gitbook.io/~/files/v0/b/gitbook-x-prod.appspot.com/o/spaces%2FEBQHGJABNTj5ISSOTRxM%2Fuploads%2FMrcQ2r5jpTFUeMiwcBgX%2Fimage.png?alt=media&amp;token=065cf4c7-4f3f-48fe-9803-213cc89986d8" alt=""><figcaption><p>Inbox commands</p></figcaption></figure>

When clicking the inbox commands button a list appears with the available commands. Depending on the skills you have installed you get zero, one or more options. When the LLM KB Skill is installed you should at least see the option "AI Suggestions".

<figure><img src="https://3356808761-files.gitbook.io/~/files/v0/b/gitbook-x-prod.appspot.com/o/spaces%2FEBQHGJABNTj5ISSOTRxM%2Fuploads%2FuA9977AxpzJWFTZWPdEA%2Fimage.png?alt=media&amp;token=de613f43-7511-4aab-9015-16fd5382dce4" alt=""><figcaption><p>AI suggestions</p></figcaption></figure>

You can click the AI suggestions option directly (so without having typed anything yet in the input bar) as shown above, or first type a hint to the AI and then click on the AI suggestions option to hint the AI into a specific direction for its answer:

<figure><img src="https://3356808761-files.gitbook.io/~/files/v0/b/gitbook-x-prod.appspot.com/o/spaces%2FEBQHGJABNTj5ISSOTRxM%2Fuploads%2FLKctc7PM6XGRyXDVaLCs%2F2025-03-24_13-42-34%20(1).gif?alt=media&amp;token=d9b77149-a086-4309-b73e-5424679e9870" alt=""><figcaption><p>How to hint the AI for a specific answer</p></figcaption></figure>

## Getting started with Google Vertex Knowledge bases

Since the 0.6.0 update of the Knowledge base skill the preferred way of creating knowledge bases is to use the **Google Vertex AI RAG** retrieval stategy.

When creating a new Knowledge base you will be given this option:

<figure><img src="https://3356808761-files.gitbook.io/~/files/v0/b/gitbook-x-prod.appspot.com/o/spaces%2FEBQHGJABNTj5ISSOTRxM%2Fuploads%2FI2Ok4lAzSnPA2dsYpHa1%2FCleanShot%202026-06-09%20at%2008.45.31%402x.png?alt=media&amp;token=9da9e858-e23d-4e6e-b310-80463030d045" alt=""><figcaption></figcaption></figure>

For existing knowledge bases, make sure to first create a new Google Vertex version.

Then, you can download the files you've uploaded in your old knowledge base before by right clicking on the name of the file and then click Download:

<figure><img src="https://3356808761-files.gitbook.io/~/files/v0/b/gitbook-x-prod.appspot.com/o/spaces%2FEBQHGJABNTj5ISSOTRxM%2Fuploads%2F5yQpINfWsX8HFbgfdDI6%2FCleanShot%202026-06-09%20at%2008.47.18%402x.png?alt=media&amp;token=b7d5e687-3bf3-43ee-ad6e-e41273bc3e2b" alt=""><figcaption></figcaption></figure>

After downloading, you can simply upload them in the recently created Google Vertex version of your Knowledge base.&#x20;

## Frequently asked questions

### I have no 'Knowledge bases' page in the AI section after installing the skill?

After installing the skill you need to publish the app again. After publishing you should gain access to the Knowledge bases. Just by dragging a node in the Flows section, or changing a line in the Script section you can get your app in a publishable state.

### I get a warning in the inbox when I try to use the Inbox Command: AI Suggestions

You should configure the prompt and/or knowledge base in the Settings section, see above, when you get this message.

<figure><img src="https://3356808761-files.gitbook.io/~/files/v0/b/gitbook-x-prod.appspot.com/o/spaces%2FEBQHGJABNTj5ISSOTRxM%2Fuploads%2FLTUCuTUvSJjMv8R606Aq%2Fimage.png?alt=media&amp;token=42ff80d2-f1a8-4697-b606-fc2d8306c44c" alt=""><figcaption><p>Prompt and/or knowledge base not configured yet</p></figcaption></figure>

### How do I download the files from my Knowledge base?

You can download the files you've uploaded before by right clicking on the name of the file and then click Download:

<figure><img src="https://3356808761-files.gitbook.io/~/files/v0/b/gitbook-x-prod.appspot.com/o/spaces%2FEBQHGJABNTj5ISSOTRxM%2Fuploads%2F5yQpINfWsX8HFbgfdDI6%2FCleanShot%202026-06-09%20at%2008.47.18%402x.png?alt=media&amp;token=b7d5e687-3bf3-43ee-ad6e-e41273bc3e2b" alt=""><figcaption></figcaption></figure>


# Address Flows

Adds flow node that uses Google Maps for address lookup

The Address Flows skill can be used to ask a user for an address. The skill will perform an address lookup via Google Maps to validate whether or not it exists.

## How to install?

### Installing the package

Depending on your license, the Address Flows skill can be installed in the packages section of the platform.

Not all Smart Apps support the Address Flows skill. When they do however you can perform the following steps to install the skill to your App.

1. Go to packages
2. Click on Browse skills
3. Click on Address Flows
4. Click on Install

### Configuring the API key

For the lookup in Google Maps to work, you need an API key. An API key can be obtained by [following this guide](https://developers.google.com/maps/documentation/geocoding/get-api-key) <https://developers.google.com/maps/documentation/geocoding/get-api-key>.

Enter the generated API key in the 'Integrations - Secrets' section.

## How to use?

### In the Flow Designer

The Address Flows skill introduces a new Ask node to ask for a users' address:

* [Ask: Address](/studio/flows/nodes/ask-address)


# Email flows

Adds flow nodes that are only relevant for the Email channel

This skill enables you to add Email as a channel to your bot.&#x20;

This option is currently only supported in custom propositions.

Installation of the skill in your bot is at own risk.


# Zipcode flows

In order to elicit a postalcode from the user, you could use for instance the Ask: open or Ask: number nodes, depending on the format of your postalcode. However, if you really want a valid postalcode check, this skill helps you do just that by introducing a node to your Flow designer that will ask a postalcode and check the validity.

## Installing the Zipcode flows skill

1. Go to packages&#x20;
2. Click on Browse skills
3. Click on the corresponding tile
4. Click install

<figure><img src="https://3356808761-files.gitbook.io/~/files/v0/b/gitbook-x-prod.appspot.com/o/spaces%2FEBQHGJABNTj5ISSOTRxM%2Fuploads%2FCeaM1UNA204IcmfZsY51%2Fimage.png?alt=media&amp;token=35af831e-8c89-42fd-805c-e0df7fa201b1" alt=""><figcaption><p>Find the zipcode flows skill</p></figcaption></figure>

<figure><img src="https://3356808761-files.gitbook.io/~/files/v0/b/gitbook-x-prod.appspot.com/o/spaces%2FEBQHGJABNTj5ISSOTRxM%2Fuploads%2FFbgx83HAcKQArjyWglBR%2Fimage.png?alt=media&amp;token=813a774b-6cd4-495b-b116-77085bcb761f" alt=""><figcaption><p>Install the skill</p></figcaption></figure>

## Use the Ask Zipcode node

Now you can go to your flow canvas and start using the [Ask zipcode](/studio/flows/nodes/ask-zipcode) node.


# Timeplans

The standard bot skills work with the opening hours that are managed in the Bot settings section, see [opening hours](/settings/app-settings/opening-hours).

However, sometimes more flexibility is required. For this the Timeplan skill can be used. It allows users to define one or more alternative timeplans, for instance to allow for Lunch time.

The skill will set a predefined tag when the current time fall within the defined day and time. Using the tag you can define [conditions](/studio/flows/conditions) in flow nodes, for instance to skip over a node or to [branch](/studio/flows/nodes/control-flow-branch).

## Installing the Timeplans skill

{% hint style="info" %}
The Timeplans skill isn't installed automatically with your template. Therefore you need to install it by request.&#x20;

Ask the DialoX team to install it for you. &#x20;
{% endhint %}

## What is a timeplan

A timeplan is a scheduled event that can overwrite your online or offline status set by the default Opening hours settings and even set an additional tag so you can define specific behaviour in your flow that needs to happen when this scheduled event occurs.

A timeplan can trigger weekly, yearly, at one single date and time, or for a period. Examples:

* use a yearly timeplan to schedule Christmas closing
* use a weekly timeplan to schedule daily lunch time closing
* use a one time timeplan to schedule closing due to a company offsite or event
* use a period timeplan to schedule closing for non-repeating holidays

## Adding a timeplan

The skill adds a page to manage your timeplans in the Settings section.

1. Go to settings and click Timeplans.

<figure><img src="https://3356808761-files.gitbook.io/~/files/v0/b/gitbook-x-prod.appspot.com/o/spaces%2FEBQHGJABNTj5ISSOTRxM%2Fuploads%2FEtwaq5BSrHW6hWwgkUmC%2FScreenshot%202024-05-30%20at%2009.24.35.png?alt=media&amp;token=d157be1e-d2e9-4ace-a82b-d20333d354f4" alt=""><figcaption></figcaption></figure>

1. Click Add to add a new timeplan.

This will add a new line:

<figure><img src="https://3356808761-files.gitbook.io/~/files/v0/b/gitbook-x-prod.appspot.com/o/spaces%2FEBQHGJABNTj5ISSOTRxM%2Fuploads%2F0QiPxVvLjmBf5RrvtIII%2Fimage.png?alt=media&amp;token=816d49ec-2333-4dfa-8f17-43fc2fc21cfe" alt=""><figcaption></figcaption></figure>

3. Click on the newly created line to unfold the form

<figure><img src="https://3356808761-files.gitbook.io/~/files/v0/b/gitbook-x-prod.appspot.com/o/spaces%2FEBQHGJABNTj5ISSOTRxM%2Fuploads%2F1OpCyESFNgnCoWEnWwiJ%2Fimage.png?alt=media&amp;token=4e7c9c80-4029-48ea-bbe8-63a5f8807abf" alt=""><figcaption></figcaption></figure>

4. Now provide a description (for you to keep track of the different timeplans)
5. Select what kind of Timeplan it is: One time, Yearly or Weekly.
6. Choose the "Set system status" to be nothing when your timeplan doesn't affect the online or offline status of your bot, otherwise choose online or offline when it does impact the status.
7. Choose to add a specific tag which then can be used in your flow to make specific logic based on this tag, for instance when you want to say to the user "We are currently having lunch" or something.
8. Now, dependent on what kind of Timeplan you selected you can fill in the details (see examples below for more information):
   1. Weekly: days of the week followed by a from and until time
   2. Yearly: month, day and a from and until time
   3. One time: date and a from and until time&#x20;
   4. Period: a range between a from and until date
   5. Fixed: a recurring predefined public holiday or public observatory day, like Easter or Christmas

## Fields

| Property          | Description                                                                        | Explanation                                                                                                                                                          |
| ----------------- | ---------------------------------------------------------------------------------- | -------------------------------------------------------------------------------------------------------------------------------------------------------------------- |
| Description       | A human readable description                                                       | For you to keep track of your timeplans. It has no utilitarian purpuse.                                                                                              |
| Kind              | What type of timeplan? Weekly, Yearly, One time, Period or Fixed                   | This has effect on what date and time details are asked below                                                                                                        |
| Set system status | Does your timeplan affect the online or offline status of your bot?                | Choose online when it should set the status to **online**. Set offline when it should set the status to **offline** and leave empty if it doesn't impact the status. |
| Add tag           | Sets a specific tag when this Timeplan is active.                                  | This helps you to define specific logic in your flows for this Timeplan, for instance a special text that explains the company is heaving lunch.                     |
| Office hours      | Define a time period per week day                                                  | Only visible when Kind is configured with "Weekly"                                                                                                                   |
| Month and day     | Define the month and day at which this Timeplan should be active on a yearly basis | Only visible when Kind is configured with "Yearly". Notice that when 29/2 is selected for example, the system will automatically fallback to 28/2                    |
| Date              | Define the exact date at which this timeplan becomes active                        | Only when Kind is configured as "One time"                                                                                                                           |
| From              | Define the exact time at which this timeplan becomes active on the given day       |                                                                                                                                                                      |
| Until             | Define the exact time until this timeplan is active on the given day               |                                                                                                                                                                      |

## Examples

### One time: Beach day

A one time Timeplan that sets the general status to offline and even adds a tag to indicate there is a beach day going on that day.

<figure><img src="https://3356808761-files.gitbook.io/~/files/v0/b/gitbook-x-prod.appspot.com/o/spaces%2FEBQHGJABNTj5ISSOTRxM%2Fuploads%2F2SDrAYaPqzH3ReJ6UrBY%2Fimage.png?alt=media&amp;token=e2fb4287-d510-4e05-b70b-6811a24637e0" alt=""><figcaption></figcaption></figure>

### Yearly: Christmas

A yearly timeplan to manage Christmas day as a closed day can be configured as following:

<figure><img src="https://3356808761-files.gitbook.io/~/files/v0/b/gitbook-x-prod.appspot.com/o/spaces%2FEBQHGJABNTj5ISSOTRxM%2Fuploads%2FsWXZxEliAuzNbn8ZE6pX%2Fimage.png?alt=media&amp;token=c10cfc2e-e375-46ff-8236-e5df36613264" alt=""><figcaption></figcaption></figure>

### Weekly: Lunch break

A weekly recurring schedule to manage a closed situation due to lunch can be configured as such:

<figure><img src="https://3356808761-files.gitbook.io/~/files/v0/b/gitbook-x-prod.appspot.com/o/spaces%2FEBQHGJABNTj5ISSOTRxM%2Fuploads%2FVPfV2MxLfD6fpy5osBXF%2Fimage.png?alt=media&amp;token=ec4461e0-e89a-474e-9247-bbc70f86b406" alt=""><figcaption></figcaption></figure>

### Period: Spring break

When you're closed for a couple of days, e.g. during spring break, you can configure an offline situation as follows:

<figure><img src="https://3356808761-files.gitbook.io/~/files/v0/b/gitbook-x-prod.appspot.com/o/spaces%2FEBQHGJABNTj5ISSOTRxM%2Fuploads%2FzO7erwz43hJeCm0NUW1K%2FCleanShot%202025-04-30%20at%2008.55.52%402x.png?alt=media&amp;token=107eb77a-ed94-40ea-bf5c-2d26394b062d" alt=""><figcaption></figcaption></figure>

Note that the "Until" date is inclusive. In the example above, that would mean that on the 25th of april, the system status would be offline.

### Fixed: Easter Sunday

There are many public holidays or public observatory days that are yearly recurring. When they have a fixed date every year, you can easily add a timeplan for them using the yearly timeplan type. But when it is a date that differs per year it can be a real pain to update the configuration every year. For instance Easter or any easter based event like Good Friday, Ash Wednesday, etc. For this reason we introduced the "fixed" timeplans type.

<figure><img src="https://3356808761-files.gitbook.io/~/files/v0/b/gitbook-x-prod.appspot.com/o/spaces%2FEBQHGJABNTj5ISSOTRxM%2Fuploads%2FL6MwN06wKnhCqrvIfP0s%2Fimage.png?alt=media&amp;token=4452d128-3a7d-4eaa-8ec6-85b1333b0a2e" alt=""><figcaption></figcaption></figure>

## Timeplan tags

The tags you can add as part of a timeplan need to be part of the Timeplan group. This group is automatically added to your bot Tags at install of the Timeplans skill. This way, whenever you add a tag in your timeplan, it will group it as a Timeplan tag:

<figure><img src="https://3356808761-files.gitbook.io/~/files/v0/b/gitbook-x-prod.appspot.com/o/spaces%2FEBQHGJABNTj5ISSOTRxM%2Fuploads%2FZQIY50e2oUwzgYeILJ7e%2Fimage.png?alt=media&amp;token=7d0a3b23-37ea-490f-971b-75284cf7a865" alt=""><figcaption></figcaption></figure>

So simply type the name of your tag and click on the "+ Create tag…" button that appears to create the tag inside the tag group "timeplan".

{% hint style="info" %}
Read more about tags [here](/settings/app-settings/tags).
{% endhint %}

The skill will set a predefined tag when the current time fall within the defined day and time. Using the tag you can define [conditions](/studio/flows/conditions) in flow nodes, for instance to skip over a node or to [branch](/studio/flows/nodes/control-flow-branch).

### Use Timeplan accordingly

To create a well-functioning time plan, you must ensure that your time plan comes before all other system tags. For instance, if you have the online and offline situations, you must put your timeplan on the left side of these statuses. This way the system knows that it must execute the time plan on that specific day and will overwrite the other statuses.&#x20;

<figure><img src="https://3356808761-files.gitbook.io/~/files/v0/b/gitbook-x-prod.appspot.com/o/spaces%2FEBQHGJABNTj5ISSOTRxM%2Fuploads%2FPh5b0JmtUoZJDnXQKcNH%2FScreenshot%202024-05-30%20at%2009.32.18.png?alt=media&amp;token=816d75c1-47b8-4673-a8f4-9794e2106f2e" alt=""><figcaption></figcaption></figure>


# How to add a flow for lunch breaks

The opening hours settings of your bot don't allow for specific exceptions or additional timeplans. For this the [Timeplan skill](/store/skills/timeplans) can be very helpful.  The Timeplan skill allows you to set a specific tag for specific time plans. This way you could configure specific logic for a certain time plan.&#x20;

In case of lunch time you need to add a Timeplan that looks like this:

<figure><img src="https://3356808761-files.gitbook.io/~/files/v0/b/gitbook-x-prod.appspot.com/o/spaces%2FEBQHGJABNTj5ISSOTRxM%2Fuploads%2Fw3AuDSbLKdw6LsxBeEyV%2FScreenshot%202024-02-12%20at%2012.04.48.png?alt=media&amp;token=b736a7b2-c3a6-4662-b2a5-da283544b035" alt=""><figcaption></figcaption></figure>

Now you can change your Flow to branch specifically on the tag `timeplan:lunch` the same way we implemented the out of office logic.

Add a link (1) from a [Branch node](/studio/flows/nodes/control-flow-branch) to a [Say node](/studio/flows/nodes/say) (2) that explains it is lunch time. This Say node will then link to the Note flow using the [Go to flow node](/studio/flows/nodes/control-flow-go-to-flow) (3).

<figure><img src="https://3356808761-files.gitbook.io/~/files/v0/b/gitbook-x-prod.appspot.com/o/spaces%2FEBQHGJABNTj5ISSOTRxM%2Fuploads%2F9ieNZxXbiHw6yPW4X7rH%2FScreenshot%202024-02-12%20at%2012.13.50.png?alt=media&amp;token=2e808b6b-2a5e-4a7a-a874-eb4ca08f0d3c" alt=""><figcaption></figcaption></figure>

Click on the link to the Say node and change the Link details on the right hand side:

<figure><img src="https://3356808761-files.gitbook.io/~/files/v0/b/gitbook-x-prod.appspot.com/o/spaces%2FEBQHGJABNTj5ISSOTRxM%2Fuploads%2FnX3PC5QNy6CGtDSdf3lX%2FScreenshot%202024-02-12%20at%2012.14.32.png?alt=media&amp;token=8440c4a7-45b8-4259-90ed-a2bbef384d0f" alt=""><figcaption></figcaption></figure>

Select the Timeplan tag and provide a label for explanatory purposes.

<figure><img src="https://3356808761-files.gitbook.io/~/files/v0/b/gitbook-x-prod.appspot.com/o/spaces%2FEBQHGJABNTj5ISSOTRxM%2Fuploads%2FRazYuYf8MPd2qcjrKTSZ%2FScreenshot%202024-02-12%20at%2012.16.08.png?alt=media&amp;token=771493d4-7da2-456c-b7b9-59cc9c966abc" alt=""><figcaption></figcaption></figure>

And now you have a flow that handles lunch breaks too!

<figure><img src="https://3356808761-files.gitbook.io/~/files/v0/b/gitbook-x-prod.appspot.com/o/spaces%2FEBQHGJABNTj5ISSOTRxM%2Fuploads%2FGFQvs654qd3H9Hgv4vLT%2FScreenshot%202024-02-12%20at%2012.17.01.png?alt=media&amp;token=aac73f66-79fe-4393-bbd9-24fdc6d30170" alt=""><figcaption></figcaption></figure>


# On-call schedule

For companies that offer on call services to their customers it is quite a hassle to configure an on call schedule in their PBX. A bot with the Oncall dialer skill installed solves this issue quite easily.

After installing the skill you can simple add the node "Dial: On Call" to your flow and configure your agents and planning in the Content section of the platform. Using this approach even users without the right to edit your flows can change the On call schedule of your agents.&#x20;

## Install the On-call schedule skill

1. To install the skill go to Skills -> Browse

<figure><img src="https://3356808761-files.gitbook.io/~/files/v0/b/gitbook-x-prod.appspot.com/o/spaces%2FEBQHGJABNTj5ISSOTRxM%2Fuploads%2FoMWmxjExftNmS59e0ULa%2Fimage.png?alt=media&amp;token=27503020-2a9c-44ca-bcdf-f76edc8783bf" alt=""><figcaption></figcaption></figure>

2. Click the On-call schedule skill so the following popup opens:

<figure><img src="https://3356808761-files.gitbook.io/~/files/v0/b/gitbook-x-prod.appspot.com/o/spaces%2FEBQHGJABNTj5ISSOTRxM%2Fuploads%2FfdwMKOrMA80TDC83ngtz%2Fimage.png?alt=media&amp;token=314d82dd-2fe0-4d66-b232-3c50cdc1ede6" alt=""><figcaption></figcaption></figure>

3. Click on the Install On call schedule button to install the skill in your bot.
4. Publish your bot

Now the skill should appear in the Installed page of your Skills section.

## Add Dial: On call to your Flow

This skill introduces a new flow node to your bot called "Dial: on call". This node needs to be added to your flow in order to enable it.

1. Go to the Flows section of the platform&#x20;
2. Find the place in your flow where you want to have the bot to dial the on call agent.
3. Click right mouse button, click on Dial and then on On call.

<figure><img src="https://3356808761-files.gitbook.io/~/files/v0/b/gitbook-x-prod.appspot.com/o/spaces%2FEBQHGJABNTj5ISSOTRxM%2Fuploads%2FNxYOHzXonMCwMnD5dpVI%2Fimage.png?alt=media&amp;token=e6bdedc5-8646-43a4-8e91-65cfc1e6ba0d" alt=""><figcaption></figcaption></figure>

4. Now make sure your flow routes a link (Arrow) to your new Dial: on call node. In case this is the only node in your Flow, you need to connect it to the Entry trigger.

<figure><img src="https://3356808761-files.gitbook.io/~/files/v0/b/gitbook-x-prod.appspot.com/o/spaces%2FEBQHGJABNTj5ISSOTRxM%2Fuploads%2FupfUSnw0Fe79SJCvqsju%2Fimage.png?alt=media&amp;token=8dbbf20d-a37b-467e-a63d-d48e54aef11a" alt=""><figcaption></figcaption></figure>

5. Open the side panel of the node by clicking on the title bar of the **Dial: On call** node.
6. Now fill in the text and the fallback number

<figure><img src="https://3356808761-files.gitbook.io/~/files/v0/b/gitbook-x-prod.appspot.com/o/spaces%2FEBQHGJABNTj5ISSOTRxM%2Fuploads%2F3RmUcSlDdA6DSxnDqzmK%2Fimage.png?alt=media&amp;token=b90a54bb-0b74-4d3e-963b-86660e24044f" alt=""><figcaption></figcaption></figure>

7. Now go to the Content section and add your agents to the **On-call Phonebook**&#x20;
8. Then configure who is available for on call services from when in the **On-call Schedule** page in the Content section.

## Fields for Dial: On call

| Property | Description                                                          | Explanation                                                                |
| -------- | -------------------------------------------------------------------- | -------------------------------------------------------------------------- |
| SIP      | The SIP method to use for dialing                                    | Choose REFER                                                               |
| Text     | The text the bot should say just before dialing.                     | By embedding #{oncall\_name} the name of the agent can be used in the text |
| Fallback | What number to dial when no schedule is found in the Content section |                                                                            |

## On call content

### On-call Phonebook

In order for the On call function to work the system must know which agents there are to route the call to. The on call agents can be configured in the Content section.

1. Click on Content
2. Click on On-call Phonebook
3. Click Add

<figure><img src="https://3356808761-files.gitbook.io/~/files/v0/b/gitbook-x-prod.appspot.com/o/spaces%2FEBQHGJABNTj5ISSOTRxM%2Fuploads%2FSO8ePbFilpBVwSgXKro3%2Fimage.png?alt=media&amp;token=04c40196-503b-474c-8afc-e84787f1457a" alt=""><figcaption></figcaption></figure>

Fill in the following fields:

<figure><img src="https://3356808761-files.gitbook.io/~/files/v0/b/gitbook-x-prod.appspot.com/o/spaces%2FEBQHGJABNTj5ISSOTRxM%2Fuploads%2F8DNWiLjG9dcLJ12tHc3H%2Fimage.png?alt=media&amp;token=697edb7f-9255-4793-a978-70f51b55bc87" alt=""><figcaption></figcaption></figure>

| Property  | Description                | Explanation                                                                          |
| --------- | -------------------------- | ------------------------------------------------------------------------------------ |
| Name      | Name of the agent          |                                                                                      |
| Number    | Number of the agent        | Make sure to enable or disable the extension option depending on the number you need |
| Extension | Uncheck for public numbers | To make sure the number is validated on correctness.                                 |

### On-call schedule

When the agents are configured we can configure the schedule. This will help the system to know when to route the call to which agent.

1. Click on Content
2. Click on On-call Schedule
3. Click Add

<figure><img src="https://3356808761-files.gitbook.io/~/files/v0/b/gitbook-x-prod.appspot.com/o/spaces%2FEBQHGJABNTj5ISSOTRxM%2Fuploads%2FfKuEnB3DLqr98aw85RlL%2Fimage.png?alt=media&amp;token=6ddaeb04-80d0-4343-ac27-025d79eb5595" alt=""><figcaption></figcaption></figure>

No fill in your first schedule:

<figure><img src="https://3356808761-files.gitbook.io/~/files/v0/b/gitbook-x-prod.appspot.com/o/spaces%2FEBQHGJABNTj5ISSOTRxM%2Fuploads%2F3WbLCmo61g1zAp7VBnl2%2Fimage.png?alt=media&amp;token=ed6f3cb4-dab7-4522-a6e9-20307fc31b75" alt=""><figcaption></figcaption></figure>

| Property | Description                                             | Explanation |
| -------- | ------------------------------------------------------- | ----------- |
| From     | The date and time at which this schedule becomes active |             |
| Route to | The agent to route the call to                          |             |

{% hint style="info" %}
The system always searches for the schedule that is closest to the current date time.
{% endhint %}


# Planner

The Planner enables working with calendars, like scheduling a meeting or planning a callback appointment. The skill implements the Calendaring features of the DialoX platform. Developers could have a look [here](https://developer.dialox.ai/ref/planning/) for more details.

## Planning outcomes

The Planner skills can deliver the following type of outcomes

| Planner outcome | Description                                                                                                                               |
| --------------- | ----------------------------------------------------------------------------------------------------------------------------------------- |
| **Event**       | An event is like any regular calendar event you would find in your Google or Microsoft calendars having  a date, start time and duration. |
| **Todo**        | A todo is modelled as a Note in the DialoX platform, but with a due date.                                                                 |

{% hint style="info" %}
When using todo's with external calendars, created apppointments may not show up in your external calendar. If you need them to show up there, **do not check** the "Create a note when an event is created".
{% endhint %}

## Determine availability

For the skill is able to support two different ways for determining which moments to allow to be scheduled. The availability of a certain moment in time can be determined according the following two strategies:

| Availability is based on… | Description                                                                                                                                                                                     |
| ------------------------- | ----------------------------------------------------------------------------------------------------------------------------------------------------------------------------------------------- |
| **Free/busy**             | Scheduling is based on free space in the calendar since there can only be one event on any given moment in time. Once planned, this moment in time is no longer available for planning.         |
| **Slots**                 | Scheduling is based on the predefined capacity for a certain moment in time, called a slot. This slot capacity depletes once all slots are planned causing this slot to be no longer available. |

## Planner configuration

The planner can be configured to either create events (by not creating notes) or by creating todo's (by creating notes).&#x20;

The planner will return availability based on either the free/busy or the slots strategy mentioned earlier.

Then there are two more settings.

* **Day limit**\
  This limits the amount of days a customer can plan ahead. E.g. for scheduling an appointment at a barbershop, we might want to have a much higher limit than for scheduling a callback appointment for pharmacies.&#x20;
* **Minutes from now**\
  This prevents users from scheduling appointments that take place shortly after making the appointment. E.g. for realtors you might need to prepare a lot for an appointment, so there should be at least 4 hours between now and the start of the appointment. For callback appointments of an ISP it might be much shorter.

## Conversation strategy options

This node allows for four different conversation strategies for eliciting the plan:

<table><thead><tr><th width="326">Strategy</th><th>Description</th></tr></thead><tbody><tr><td>directly suggest 1 option</td><td>The bot will directly propose the first available option to which the user only has to reply with yes or no. When answering no, the bot will propose the next available option.</td></tr><tr><td>directly suggest multiple options</td><td>The bot will directly propose a couple of options out of which the user can choose. The user can also ask for more options after which the bot will present the next couple of slots.</td></tr><tr><td>first ask before suggesting 1 option</td><td>The bot will ask for the user's preferred date and time first before proposing an option that comes closest to the user's preference. The user can then answer with either yes or no.</td></tr><tr><td>first ask before suggesting multiple options</td><td>The bot will ask for the user's preferred date and time first before proposing a couple of options that come close to the user's preference.</td></tr></tbody></table>

## Variables

In order to work with this data this skill is producing, the skill introduces the following variables to your Flow designer. They can be used to interpolate with your texts and questions in your Flow.

| Variable       | Description                                 | Example                   |
| -------------- | ------------------------------------------- | ------------------------- |
| Plan date      | Start date of the plan (friendly formatted) | Monday 5 January          |
| Plan ISO       | Start date and time in ISO format           | 2014-01-05T10:00:00Z      |
| Plan datetime  | Friendly formatted start date and time      | Monday 5 January at 10:00 |
| Plan day       | Name of the start date (relative)           | Tomorrow                  |
| Plan time      | Start time of the plan                      | 10:00                     |
| Plan until     | End time of the plan                        | 11:00                     |
| Plan until ISO | End date and time in ISO format             | 2014-01-05T11:00:00Z      |

You can also store the made appointment in a variable. This variable holds the entire planned appointment. This allows you to take a more custom approach on what to do with the result.&#x20;


# OAuth Flows

OAuth Flows lets your users authenticate via third parties as Google, Microsoft or Operator.&#x20;

You can do this to verify users' identity in the app.&#x20;

The skill allows users to authenticate both via phone or via chat channels.

### Phone channel

When authenticating users via phone, the skill will send the caller an SMS, containing a link to a login page for either Google, Microsoft or Operator.

After logging in with their personal user credentials, the app will be notified, and receive the authenticated details of the caller.&#x20;

The user will be updated based on the identity received by the third party.

### Chat based channels

When authenticating users via chat, the skill will show the users a login button for the selected third party. After logging in, as in the phone channel, the app will receive the identity from the third party.


# Integrations

Integrations are a special type of skill in the DialoX platform. They are used to connect your Smart App to external sources, both to give the App access to data it needs and enabling it to perform tasks in the connected systems.


# Contact Connect

The Contact Connect integration will automatically pull any data on the caller from your CRM into the bot. This allows you to build a flow tailored to the needs of your customers.

The integration will use the callers' phone number to look up any known data.

## Installation

### Add CloudCTI to your license in Operator

To enable CloudCTI on your bot, you need to enable the Contact Connect for DialoX add-on in Operator on a Smart App license. Existing orders can also be edited to include this feature. See the [Operator documentation](https://help.enreach.com/contact/1.00/web/Enreach/en-US/#page/help/chap_ordering.04.16.html) for more information.

<figure><img src="https://3356808761-files.gitbook.io/~/files/v0/b/gitbook-x-prod.appspot.com/o/spaces%2FEBQHGJABNTj5ISSOTRxM%2Fuploads%2FRV1zjgoVxQNsFQoD249t%2FScreenshot%20from%202025-10-08%2013-26-29.png?alt=media&amp;token=9b09287a-5b6b-4965-a43e-62336fc0b8eb" alt=""><figcaption></figcaption></figure>

### Link the CRM to CloudCTI&#x20;

To link your CRM to CloudCTI, go to the [web configurator](https://contactconnect.enreach.com/). Use your Operator credentials to log in. See [documentation](https://help.enreach.com/contactconnect/1.00/web/Enreach/en-US/#page/help/chap_installation.html) for more information.

<figure><img src="https://3356808761-files.gitbook.io/~/files/v0/b/gitbook-x-prod.appspot.com/o/spaces%2FEBQHGJABNTj5ISSOTRxM%2Fuploads%2FnUtv0seR9I2cq9IHaV1K%2FCleanShot%202025-09-24%20at%2011.21.36%402x.png?alt=media&amp;token=02b2d646-a21f-40c0-926f-466891ffdee6" alt=""><figcaption></figcaption></figure>

From there, you can add a new integration, and select the CRM of your choice. Follow the integration specific instructions to complete the setup.

### Installing the Contact Connect skill

The Contact Connect skill isn't installed automatically with your Smart App. Therefore you need to install it manually in the DialoX studio.

Go to Packages -> Browse skills and search for the Contact Connect skill.

{% hint style="info" %}
If you don't see this skill here, it needs to be added to your account. Please consult your partner or Enreach DialoX support team.
{% endhint %}

### Link data from CloudCTI to your app

Before we can start using the data from your CRM, we need to know which fields are available to the app. We do this by synchronizing a contact based on their phone number.

From the 'Content - Contact Connect' page, click on the Synchronize button. This will start the bot in a special mode where we can fetch data from your CRM through CloudCTI.

<figure><img src="https://3356808761-files.gitbook.io/~/files/v0/b/gitbook-x-prod.appspot.com/o/spaces%2FEBQHGJABNTj5ISSOTRxM%2Fuploads%2Fp8aPkkkCzYpKp4R12TOB%2FCleanShot%202025-09-24%20at%2008.36.17%402x.png?alt=media&amp;token=f679e32f-ed02-42b2-aea0-b5bf21108e51" alt=""><figcaption></figcaption></figure>

We will try to use the phone number from your DialoX profile to perform a lookup, but any given phone number will work, as long as it is present in your CRM.

After successfully fetching a contact from your CRM, you will be able to map the data to the variables in DialoX:

<figure><img src="https://3356808761-files.gitbook.io/~/files/v0/b/gitbook-x-prod.appspot.com/o/spaces%2FEBQHGJABNTj5ISSOTRxM%2Fuploads%2FMhsEG1vOT1a6hS54SxU6%2FCleanShot%202025-08-22%20at%2009.27.02%402x.png?alt=media&amp;token=8f761e12-fce2-4207-85d2-07e7d7011cf2" alt=""><figcaption></figcaption></figure>


# Hubspot

The Hubspot skill enables you to interact with Tickets and Contacts from your own Hubspot environment.&#x20;

## Installing the Hubspot skill

The Hubspot skill isn't installed automatically with your Smart App. Therefore you need to install it manually in the DialoX studio.

Go to Packages -> Browse skills and search for the Hubspot integration skill.

{% hint style="info" %}
If you don't see this skill here, it needs to be added to your account. Please consult your partner or Enreach DialoX support team.
{% endhint %}

## Creating Hubspot API Token

To connect the bot to your Hubspot environment you will need an API token.

The API Token is your access token that needs to be created in the Hubspot 'Integrations' section. To create this token we need to create a **Private app**:

* Log in with your admin user in Hubspot and go to **Hubspot Settings** > **Account Management** > **Integrations** > **Private App**
* Create a private app

<figure><img src="https://3356808761-files.gitbook.io/~/files/v0/b/gitbook-x-prod.appspot.com/o/spaces%2FEBQHGJABNTj5ISSOTRxM%2Fuploads%2FFYLyWE0XOXFsmq0qAMr1%2Fimage.png?alt=media&amp;token=ebb3f044-201d-4013-bca8-735a790cecbc" alt=""><figcaption></figcaption></figure>

* Fill in the **Basic information** *(name, logo…)*:

<figure><img src="https://3356808761-files.gitbook.io/~/files/v0/b/gitbook-x-prod.appspot.com/o/spaces%2FEBQHGJABNTj5ISSOTRxM%2Fuploads%2FHfURdo5xLTqQI6Bi9HA6%2Fimage.png?alt=media&amp;token=bcafcfcc-cdb3-4c77-b5e3-1517847931fc" alt=""><figcaption></figcaption></figure>

* Choose the **Scopes for the App** *(the scopes are the access permissions to the app: read contacts, create tickets…). For example:*
  * To **create and search tickets** choose the scopes&#x20;
    * **Other** > **tickets**
  * To **create and search contacts** choose the scopes:
    * &#x20;**CRM** > **crm.objects.contacts.read**
    * &#x20;**CRM** > **crm.objects.contacts.write**

<figure><img src="https://3356808761-files.gitbook.io/~/files/v0/b/gitbook-x-prod.appspot.com/o/spaces%2FEBQHGJABNTj5ISSOTRxM%2Fuploads%2FFO131Sdb3GJDgfI9Lx4J%2FCleanShot%202025-01-29%20at%2012.31.04%402x.png?alt=media&amp;token=5cb5dd32-7167-42a8-8e99-a6f910ffb911" alt="" width="563"><figcaption></figcaption></figure>

* Create the app and copy the access token

<figure><img src="https://3356808761-files.gitbook.io/~/files/v0/b/gitbook-x-prod.appspot.com/o/spaces%2FEBQHGJABNTj5ISSOTRxM%2Fuploads%2FKDGkXW2kUvrE30MYFklG%2FCleanShot%202025-01-29%20at%2012.32.51%402x.png?alt=media&amp;token=cd95d1db-530f-4eb5-b1fe-af9f2845f021" alt="" width="375"><figcaption></figcaption></figure>

* Navigate back to your app in DialoX, then to 'Integrations - Secrets'.
* Paste the token which was provided when creating the private app

<figure><img src="https://3356808761-files.gitbook.io/~/files/v0/b/gitbook-x-prod.appspot.com/o/spaces%2FEBQHGJABNTj5ISSOTRxM%2Fuploads%2F3fY7kLjQUN7ET1iLr7ZS%2FCleanShot%202025-01-29%20at%2012.34.33%402x.png?alt=media&amp;token=9dbf62ce-30c6-499c-8131-b40347c3e842" alt=""><figcaption></figcaption></figure>

## Implement Hubspot in your Flow

After installing the skill and storing the credentials. You can use the Hubspot nodes in your flow.&#x20;

1. Hubspot: Create ticket\
   This will allow you to create new tickers in your Hubspot environment.&#x20;
2. Hubspot: Get ticket\
   Retrieve the current status of a ticket. Useful for customers when their ticket might be pending.
3. Hubspot: Create contact\
   Create a Hubspot contact based on contact details extracted in the conversation.
4. Hubspot: Search contact\
   Look up a Hubspot contact via their phone number or email address. The details of the user found will be stored in the Hubspot contact variables.

<figure><img src="https://3356808761-files.gitbook.io/~/files/v0/b/gitbook-x-prod.appspot.com/o/spaces%2FEBQHGJABNTj5ISSOTRxM%2Fuploads%2FVIXDge68oYgeziAIgC0z%2FCleanShot%202025-01-29%20at%2012.38.18%402x.png?alt=media&amp;token=a781b9dc-ef16-43c6-a136-c9a931bcbf05" alt="" width="375"><figcaption></figcaption></figure>

## Hubspot variables

When looking up a ticket or a user from Hubspot, the following "Hubspot Ticket" and "Hubspot contact" variables will be filled:

<figure><img src="https://3356808761-files.gitbook.io/~/files/v0/b/gitbook-x-prod.appspot.com/o/spaces%2FEBQHGJABNTj5ISSOTRxM%2Fuploads%2FA7odEhYtonPHVgw7s6OR%2FCleanShot%202025-01-29%20at%2012.39.04%402x.png?alt=media&amp;token=702e0b7d-3c22-451b-adb3-f93a8013f183" alt=""><figcaption></figcaption></figure>


# Jira

One of the outcomes of a bot might be a human action that needs to be executed, like changing an appointment, processing a product return or update a database. In most cases these actions need to be performed by human employees that work out of tickets created in a ticketing system, like Jira.

This skill exposes the following new nodes to your Flow designer:

1. Jira: Create ticket
2. Jira: Get ticket

## Installing the Jira integrations skill

The Jira integrations skill isn't installed automatically with your Smart App. Therefore you need to install it manually in the DialoX studio.

Go to Packages -> Browse skills and search for the Jira integrations skill.

{% hint style="info" %}
If you don't see this skill here, it needs to be added to your account. Please consult your partner or Enreach DialoX support team.
{% endhint %}

## Prerequisites

To connect the bot to your Jira or Service Desk instance you will need to prepare the following information.

* URL to your Jira or Service Desk instance
* Personal API Token
* The email address of the user to whom the Personal API token belongs

The Personal Access Token is your own personal access token that needs to be created in your Jira profile. To create this token:

* Log in to your Jira environment
* Click on your profile button in the upper right corner and go to Profile
* Go to Manage account, and then to 'Security', and click on 'Create and manage API tokens'
* Provide a name of your token (any name is sufficient)
* Set the expiration date to next year and make a note in your calendar to create a new token in time
* Hit Create and store the API Token somewhere safe

<figure><img src="https://3356808761-files.gitbook.io/~/files/v0/b/gitbook-x-prod.appspot.com/o/spaces%2FEBQHGJABNTj5ISSOTRxM%2Fuploads%2FqUGAmEKjQmAzKsv34Mfv%2FCleanShot%202025-02-10%20at%2016.04.01.png?alt=media&amp;token=6a5a5c67-5c89-418e-8531-b6106dcd2b2a" alt=""><figcaption></figcaption></figure>

## Configuring the Jira integrations skill

Before you can use the Jira integration in your flow you need to configure the credentials needed for the bot the make the connection. This can be done in the settings.

<figure><img src="https://3356808761-files.gitbook.io/~/files/v0/b/gitbook-x-prod.appspot.com/o/spaces%2FEBQHGJABNTj5ISSOTRxM%2Fuploads%2FgCzWzN34RwrkKpnKYP0d%2FCleanShot%202025-02-10%20at%2016.33.51.png?alt=media&amp;token=8cfdb7ef-c3d8-495b-90f3-e6171369d3a2" alt=""><figcaption></figcaption></figure>

Fill in the fields as described. Read the previous chapter to read how to get an API Token.

The user email **must be** the same as the user which created the API token.

{% hint style="info" %}
Notice that the API Token needs to be saved separately from the form. So the Save button next to the access token needs to be clicked separately from the save button at the bottom of the page. The latter only stores the URL and the Project key in the database.
{% endhint %}

## Implement Jira integration to your Flow

The following flows shows how the skill can be used to create a ticket and then retrieve the ticket and display a certain piece of information from the ticket.

This flow introduces the following two nodes which are described in the Flows -> Nodes section:

* Jira: Create ticket
* Jira: Get ticket

<figure><img src="https://3356808761-files.gitbook.io/~/files/v0/b/gitbook-x-prod.appspot.com/o/spaces%2FEBQHGJABNTj5ISSOTRxM%2Fuploads%2FIaACOmOWIijrTyQPRd7Z%2FCleanShot%202025-02-11%20at%2009.12.18%402x.png?alt=media&amp;token=fac70fb8-2da2-435d-b4bc-fe1e85bc95c2" alt=""><figcaption></figcaption></figure>


# Zendesk

The Zendesk skill enables you to interact with Tickets and Users, providing a direct integeration with your support desk.

## Installing the Zendesk skill

The Zendesk integrations skill isn't installed automatically with your Smart App. Therefore you need to install it manually in the DialoX studio.

Go to Packages -> Browse skills and search for the Zendesk integrations skill.

{% hint style="info" %}
If you don't see this skill here, it needs to be added to your account. Please consult your partner or Enreach DialoX support team.
{% endhint %}

## Creating Zendesk API Token

To connect the bot to your Zendesk environment you will need to prepare the following information.

* URL to your Zendesk environment
* Zendesk API Token

The Zendesk API Token is your access token that needs to be created in the Zendesk 'Apps and integrations' section. To create this token:

* Log in with your admin user in Zendesk and go to the **Admin Centre**.
* Go to Apps and integrations > APIs
* Click into Add API Token and name it "DialoX".
* Save the API Key.

<figure><img src="https://3356808761-files.gitbook.io/~/files/v0/b/gitbook-x-prod.appspot.com/o/spaces%2FEBQHGJABNTj5ISSOTRxM%2Fuploads%2FTPEK9mTrNd7Ne68EI8cE%2Fimage.png?alt=media&amp;token=69aa7a93-0d36-4bda-8eb0-51b1b411ce86" alt=""><figcaption></figcaption></figure>

* Navigate back to your app in DialoX, then to 'Settings - Zendesk'.
* Fill the form with your Zendesk URL, the account email used to create the token, and the token itself.

<figure><img src="https://3356808761-files.gitbook.io/~/files/v0/b/gitbook-x-prod.appspot.com/o/spaces%2FEBQHGJABNTj5ISSOTRxM%2Fuploads%2FGCrZcGn68GVZimftu2Ad%2Fimage.png?alt=media&amp;token=d2eb1bce-6471-49f8-9fe2-0337e80497ec" alt=""><figcaption></figcaption></figure>

## Implement Zendesk in your Flow

After installing the skill and storing the credentials. You can use the Zendesk nodes in your flow.&#x20;

1. Zendesk: Create ticket\
   This will allow you to create new support requests in your Zendesk environment.&#x20;
2. Zendesk: Get ticket\
   Retrieve the current status of a ticket. Useful for customers when their ticket might be pending.
3. Zendesk: Create ticket comment\
   Allow users to leave some extra details on a ticket. Can also be used to log private comments on tickets for internal use.
4. Zendesk: Create user\
   Create a Zendesk end-user based on contact details extracted in the conversation.
5. Zendesk: Search user\
   Look up a Zendesk user via their phone number or email address. The details of the user found will be stored in the Zendesk User variables.
6. Zendesk: Ask choice\
   Allow users to select a value from a Zendesk custom field, providing predefined options for streamlined ticket creation.

<figure><img src="https://3356808761-files.gitbook.io/~/files/v0/b/gitbook-x-prod.appspot.com/o/spaces%2FEBQHGJABNTj5ISSOTRxM%2Fuploads%2FybxBdZg3UIWl7ZXJvz1q%2Fimage.png?alt=media&amp;token=70330a1e-18b1-456c-ba68-66944c20fe67" alt="" width="375"><figcaption></figcaption></figure>

## Zendesk variables

When looking up a ticket or a user from Zendesk, the following "Ticket" and "Zendesk User" variables will be filled:

<figure><img src="https://3356808761-files.gitbook.io/~/files/v0/b/gitbook-x-prod.appspot.com/o/spaces%2FEBQHGJABNTj5ISSOTRxM%2Fuploads%2FxhbdPfFtOFlPXilCZc0r%2Fimage.png?alt=media&amp;token=8e7824c2-886f-4a68-b8c2-8b0f0851cc37" alt=""><figcaption></figcaption></figure>


# User Settings

How to set up your User and Profile settings.

Here are the arcticles in this section:

<table data-card-size="large" data-view="cards"><thead><tr><th></th><th data-hidden data-card-target data-type="content-ref"></th></tr></thead><tbody><tr><td>Availability settings</td><td><a href="/settings/user-settings/availability-settings">Availability settings</a></td></tr><tr><td>Profile settings</td><td><a href="/settings/user-settings/profile-settings">Profile settings</a></td></tr><tr><td>Security</td><td><a href="/settings/user-settings/security">Security</a></td></tr><tr><td>Notifications</td><td><a href="/inbox/notifications">Notifications</a></td></tr></tbody></table>


# Availability settings

The Availability Settings in DialoX allow you to manage your online status and control when you are available to receive calls, chats, and other customer interactions. By configuring your availability, you ensure that communication is handled effectively and during appropriate hours, enhancing the customer experience.

## Accessing availability settings

To adjust your availability in DialoX:

{% stepper %}
{% step %}

### Login

Log in to your account via the DialoX platform
{% endstep %}

{% step %}

### Profile

Open your profile in either of the domains down below:

* [studio.dialox.ai](https://studio.dialox.ai) \
  Click on your profile picture.
* [inbox.dialox.ai](https://inbox.dialox.ai/) \
  Click on the drop down list below your name in the menu bar.
  {% endstep %}

{% step %}

### Set status

Choose from predefined statuses like **Available**, **Invisible**, or **Unavailable**.

Studio

<img src="https://3356808761-files.gitbook.io/~/files/v0/b/gitbook-x-prod.appspot.com/o/spaces%2FEBQHGJABNTj5ISSOTRxM%2Fuploads%2F05QfM7X9GHb4tiM3ZrK7%2FScreenshot%202024-02-01%20at%2010.45.45.png?alt=media&amp;token=7f8e17ec-6556-40d4-a416-e442a311a1b4" alt="" data-size="original">&#x20;

Inbox

![](https://3356808761-files.gitbook.io/~/files/v0/b/gitbook-x-prod.appspot.com/o/spaces%2FEBQHGJABNTj5ISSOTRxM%2Fuploads%2FN1u9D4g9KHEQ9PFK7iYU%2Fimage.png?alt=media\&token=bf656e3a-a83a-4348-94eb-af22ce7d24aa)

{% endstep %}
{% endstepper %}

## Define working hours

Under **Profile**, specify your active working hours by setting start and end times. You can create different schedules for each day of the week to accommodate varying work patterns.

Regularly update your status to accurately reflect your availability. Leverage [notifications](/inbox/notifications) settings to ensure you’re alerted to important updates while minimizing distractions.


# Profile settings

The first page in your Profile is used for generic profile settings such as name, contact details and working hours.

<figure><img src="https://3356808761-files.gitbook.io/~/files/v0/b/gitbook-x-prod.appspot.com/o/spaces%2FEBQHGJABNTj5ISSOTRxM%2Fuploads%2FnSFTrEvo2PnhHvtWAa5Q%2FScreenshot%202024-02-01%20at%2010.48.53.png?alt=media&amp;token=82a51277-8757-4ca9-8600-9eb9f98507de" alt=""><figcaption></figcaption></figure>

| Setting             | Explanation                                                                                                                                            |
| ------------------- | ------------------------------------------------------------------------------------------------------------------------------------------------------ |
| Profile picture     | The profile picture is used to show in the Web Widget and in the menu bar of DialoX studio to indicate your presence.                                  |
| Full name           | Your name.                                                                                                                                             |
| Alias               | The name you want to show in the chat to customers (to hide your own name for privacy reasons).                                                        |
| Email               | Your email address, used for notifications by the platform.                                                                                            |
| Mobile phone number | Your phone number, used for testing voice apps.                                                                                                        |
| Time zone           | So the app knows how to interpret your office hours.                                                                                                   |
| Language            | <p>The language of the Inbox user interface.<br>Note: It can only be selected in the Inbox environment and the language only applies to the Inbox.</p> |
| Office hours        | Your personal working hours. The system will use this to determine your presence.                                                                      |


# Security

The Security page allows you to change your password and to enable or disable multi-factor authentication.

## Password

Your password must contain at least 8 characters of which minimally one capital, one lower case and one numeric digit.

Note: You cannot change your password here if you log in with Microsoft, Google, Facebook or Operator.

<figure><img src="https://3356808761-files.gitbook.io/~/files/v0/b/gitbook-x-prod.appspot.com/o/spaces%2FEBQHGJABNTj5ISSOTRxM%2Fuploads%2FFDOD4jqUGYrmMulBJBxx%2FScreenshot%202024-02-01%20at%2010.53.21.png?alt=media&amp;token=f19f3ef5-58a1-45b1-889c-d3a023e636e7" alt=""><figcaption></figcaption></figure>

## Multi-factor authentication (MFA)

<figure><img src="https://3356808761-files.gitbook.io/~/files/v0/b/gitbook-x-prod.appspot.com/o/spaces%2FEBQHGJABNTj5ISSOTRxM%2Fuploads%2F6zH7cOJRcmzLsjl3TgEC%2FScreenshot%202024-02-01%20at%2010.54.16.png?alt=media&amp;token=5e791523-2756-483e-960b-08b4942fca2e" alt=""><figcaption></figcaption></figure>


# App Settings

How to configure the settings of your app.


# App identity

The first thing you need to take care of when setting up your app is to configure the languages and time zone you want to support.

## Instructions

* Click on **Settings** in the main menu on the left hand side
* Click on **Identity** to open the app Identity page (should be selected by default)
* Type the name of your Bot
* Change or add **languages** by clicking in the language field. Repeat this for all additional languages you want to support
* Configure the **Timezone** to your preferred time zone
* Configure the **Country of origin**
* If your company has a privacy policy page, fill in the URL in the **Privacy policy URL**. There will be a button shown in the chat window with the customer so it will always be available to them, see Privacy below.
* If you want to protect your bot from editing, you can activate the option **Protected**.
* Click **Save** (you might need to scroll first to find the save button)
* Click the **Publish** button to publish your changes

<figure><img src="https://3356808761-files.gitbook.io/~/files/v0/b/gitbook-x-prod.appspot.com/o/spaces%2FEBQHGJABNTj5ISSOTRxM%2Fuploads%2FXiLBjultDrxndY3HEtbd%2FScreenshot%202024-07-29%20at%2010.25.33.png?alt=media&amp;token=fd1b4683-fb8e-4035-8f17-fccd1e6dcd53" alt=""><figcaption></figcaption></figure>

{% hint style="info" %}
It might be that your SAVE button is not visible and you need to scroll first. Please don't click on the PUBLISH button before you clicked on the SAVE button first.
{% endhint %}

## Privacy policy

The privacy URL that you provide under Identity settings will be displayed in the Web Widget as "Privacy statement".

<figure><img src="https://3356808761-files.gitbook.io/~/files/v0/b/gitbook-x-prod.appspot.com/o/spaces%2FEBQHGJABNTj5ISSOTRxM%2Fuploads%2FPrOqhB7x9dWlNoBSJJ77%2FScreenshot%202024-02-01%20at%2013.01.43.png?alt=media&amp;token=0ca203b0-d5fe-446a-bd54-5fd259847da7" alt=""><figcaption></figcaption></figure>

## Supported languages

From time to time new supported languages are added. At the moment of writing this documentation the following languages are supported:

1. Dutch
2. German
3. French
4. Spanish
5. Danish
6. Finnish
7. Portuguese
8. Russian
9. Swedish
10. Turkish
11. Ukranian
12. Japanese
13. Polish
14. Latvian
15. Italian
16. Arabic
17. Hindi
18. And many more...

{% hint style="info" %}
When setting up your App you can configure multiple languages, but only **one** language is supported at any given time per conversation.
{% endhint %}

## Formal language&#x20;

Some of the languages have a FORMAL option. It will enable the language produced by your bot to be in formal writing. For the dutch it means using "u" and "uw" rather than "je" and "jouw".

## Icon

Optionally the icon can be replaced by your own. Click on it to see the options:

<figure><img src="https://3356808761-files.gitbook.io/~/files/v0/b/gitbook-x-prod.appspot.com/o/spaces%2FEBQHGJABNTj5ISSOTRxM%2Fuploads%2FAMAdSlcoJ4SONLkS0AY8%2Fimage.png?alt=media&amp;token=2f5ad3dd-f41f-4378-8029-047fa4ce378e" alt=""><figcaption></figcaption></figure>

The logo is used for displaying in the chat widget (see image under privacy policy) and as avatar of the app when chatting.


# Opening hours

Where do I configure the opening hours of our business?

Rules for escalation (i.e. forwarding to an agent, taking a note or deflecting to another channel) are often dependent on the opening hours of the business.&#x20;

## Instructions

1. Go to **Settings**.
2. Click on **Openings hours**.
3. Enable or disable a day with the toggle.
4. Enter the opening and closing times in the time boes for the enabled days.
5. Click on the **Save** button.

### (1/2) Office hours

Generally office hours will dictate the bots behavior according to the openings hours you have defined in the first tab of the opening hours.

<figure><img src="https://3356808761-files.gitbook.io/~/files/v0/b/gitbook-x-prod.appspot.com/o/spaces%2FEBQHGJABNTj5ISSOTRxM%2Fuploads%2FHJW1ksT0pf3ttvjfqGCz%2FScreenshot%202024-07-29%20at%2010.29.55.png?alt=media&amp;token=1b67c7c6-0423-4629-b2cd-cd2138ed0238" alt=""><figcaption></figcaption></figure>

### (2/2) Operator occupancy

Operator occupancy will show you a list of yourself and/or coworkers that are **Available for chat** through the bot's opening hours.

<figure><img src="https://3356808761-files.gitbook.io/~/files/v0/b/gitbook-x-prod.appspot.com/o/spaces%2FEBQHGJABNTj5ISSOTRxM%2Fuploads%2Fmp9zw4Lz7m6l1nZC1ydP%2FScreenshot%202024-07-29%20at%2010.30.31.png?alt=media&amp;token=b5e73ffb-6919-494d-8666-81dddee551b9" alt=""><figcaption></figcaption></figure>


# Tags

To use tags in [Flows](/studio/flows) or other parts of the system it is recommended to explicitly configure them in the Tags Settings. This way both the system as well as you and your colleagues can understand which tags are set. Even the system tags are listed here.

### Custom tags

To use tags in Flows or other parts of the system it is recommended to explicitly configure them in the Tags Settings. This way both the system as well as you and your colleagues can understand what tags are set. Even the system tags are listed here.

<figure><img src="https://3356808761-files.gitbook.io/~/files/v0/b/gitbook-x-prod.appspot.com/o/spaces%2FEBQHGJABNTj5ISSOTRxM%2Fuploads%2FUlhEJIvjZaaP3tOoOg1d%2FScreenshot%202024-07-29%20at%2010.31.14.png?alt=media&amp;token=02df62bd-e550-4008-82d4-c150522a7893" alt=""><figcaption></figcaption></figure>

To make items in the Content section conditional to a specific state we use [conditions](/studio/flows/conditions). Conditions are based on the existence or non-existence of tags.  Any flow node can be configured to set a tag when executed. Tags can also be set automatically by the system based on a context or system event.

### Tag toggles

Get insights into your Apps performance by turning these toggles on (optionally):

* Show as funnel on dashboard.
* Show as KPI in dashboard.

Get insights and manage your Inbox by turning these toggles on (optionally):&#x20;

* Show as assignable in inbox (this will give you the opportunity to categorise a specific conversation into a designated inbox).
* Show in inbox sidebar.

Get insights into your tag based conversation by turning these toggles on (optionally):

* Show in tag analysis.

### System tags&#x20;

This paragraph gives an overview of all the tags that are set by the system.

| Tag          | Explanation                                                                           |
| ------------ | ------------------------------------------------------------------------------------- |
| online       | The conversation happens within [office hours](/settings/app-settings/opening-hours)  |
| offline      | The conversation happens outside [office hours](/settings/app-settings/opening-hours) |
| web\_capable | The conversations happens on a web like channel (PWA, widget or studio)               |

### User tags

The following tags are automatically set based on the basic user fields for name, email, phone and language.

{% hint style="info" %}
When you introduce new user fields, make sure to add a tag for them here too.
{% endhint %}

The remember option in [ask choice](/studio/flows/nodes/ask-choice), [ask open](/studio/flows/nodes/ask-open), etc will store their value in the user object as well as set a user tag using the Assign-to property.

| Tag        | Explanation                               |
| ---------- | ----------------------------------------- |
| user:phone | The phone number of the contact is known. |
| user:name  | The name of the contact is known          |
| user:email | The email of the contact is known         |

### CRM Tags

The use of specific tags can be used to quickly filter in your CRM. This way you ensure that you can create groups in your contact list using a tag. You can assign tags per user, but also in bulk (multiple) tags. For example, you could use this for quick filtering for a campaign.

Make sure to set the inbox tags as shown down below. You can set the tags via [Contacts](broken://pages/EbE68j7b8bmwEg4GjNnq).

<figure><img src="https://3356808761-files.gitbook.io/~/files/v0/b/gitbook-x-prod.appspot.com/o/spaces%2FEBQHGJABNTj5ISSOTRxM%2Fuploads%2FDWeXkmDPhmbQtfJsGHIL%2FScreenshot%202024-07-16%20at%2012.41.44.png?alt=media&amp;token=473f9cf5-4205-4de4-a9a8-df0a77bf1ee2" alt=""><figcaption></figcaption></figure>


# Studio

The studio settings section will give you the ability to save specific contact fields such as Last seen, Email, Phone, Language which will be converted into User details once contact has been made. Our Contacts page will store them accordingly.

{% hint style="info" %}
&#x20;You need the role Developer in order to have access to **Studio tab** below **Settings**.
{% endhint %}

<figure><img src="https://3356808761-files.gitbook.io/~/files/v0/b/gitbook-x-prod.appspot.com/o/spaces%2FEBQHGJABNTj5ISSOTRxM%2Fuploads%2FCdUqvLqqvsFFUVc2Xqb0%2FScreenshot%202024-07-29%20at%2010.31.58.png?alt=media&amp;token=753ad83c-bf21-4ba4-a100-cbc56d0fe44f" alt=""><figcaption></figcaption></figure>


# Extra options

There is an option for Organisation Managers to be able to take control of their bot by having a general settings section which is called **Extra options**. You will be able to **Export** (download a copy of a bot's code as backup) or **Import** (restore a backup of this bot from a zip file).

<figure><img src="https://3356808761-files.gitbook.io/~/files/v0/b/gitbook-x-prod.appspot.com/o/spaces%2FEBQHGJABNTj5ISSOTRxM%2Fuploads%2FQfoZ9mb4cmwIPHnj6fmX%2FScreenshot%202024-07-29%20at%2010.32.30.png?alt=media&amp;token=9bb62c5e-e734-486c-9a51-e25733dfcc90" alt=""><figcaption></figcaption></figure>

Optionally: there is a possibility to get the source code of a bot to be synchronizeed to a Git respository. Each time a publish is done, a git commit is made and is pushed to the configured respository. The synchronization works one-way only.

Even more options such as:

| Setting               | Explanation                                                                        |
| --------------------- | ---------------------------------------------------------------------------------- |
| Deactivate (bot name) | Deactive this bot to make it (temporarily) unavailable for new conversations.      |
| Clone bot             | You can clone this bot to make a backup copy or start a new bot based on this one. |
| Move bot              | You can move this bot to one of your other environments.                           |
| Delete bot            | With this button you can remove your bot, deleting all files and user data.        |


# Backups

The backups will support manual and automatic bot backups, automatically backup on bot upgrade and support mass upgrade of bots.

<figure><img src="https://3356808761-files.gitbook.io/~/files/v0/b/gitbook-x-prod.appspot.com/o/spaces%2FEBQHGJABNTj5ISSOTRxM%2Fuploads%2FCYXqudMgUEKYtoKDOokp%2FScreenshot%202024-07-09%20at%2010.04.35.png?alt=media&amp;token=fa7e1684-96fe-4fd7-96f9-437f8070bb8a" alt=""><figcaption><p>Creating backup</p></figcaption></figure>

<figure><img src="https://3356808761-files.gitbook.io/~/files/v0/b/gitbook-x-prod.appspot.com/o/spaces%2FEBQHGJABNTj5ISSOTRxM%2Fuploads%2Fvr26NjvgOSIatlIzWyOk%2FScreenshot%202024-07-09%20at%2010.06.13.png?alt=media&amp;token=70627a4f-48d5-4c12-86ce-4bbde6825a30" alt=""><figcaption><p>Created a backup</p></figcaption></figure>

{% hint style="info" %}
You can now change the titles of your backups and download them as zip file.
{% endhint %}


# Error handling

Every now and then a conversation can run into an unexpected technical problem. When that happens, the bot needs to respond gracefully instead of leaving the user stuck. By default it shows a short apology and ends the conversation. With the **Error handling** settings you can decide for yourself what the bot does in that situation: show your own message, or hand the conversation over to a flow that takes care of the fallback.

{% hint style="info" %}
This feature is relevant for all flow based Smart Apps&#x20;
{% endhint %}

### Instructions

1. Go to **Settings**.
2. Click on **Error handling**.
3. Optionally change the **Custom error message** that is shown to the user.
4. Optionally pick a **Fallback flow** that should handle the error instead.
5. Click on the **Save** button.

### What happens when an error occurs

The bot decides what to do based on what you configured. The order of precedence is:

| Configuration                          | What the bot does                                                                   |
| -------------------------------------- | ----------------------------------------------------------------------------------- |
| A **Fallback flow** is selected        | The bot hands the conversation to that flow, which fully handles what happens next. |
| Only a **Custom error message** is set | The bot shows your message and ends the conversation.                               |
| Nothing is configured                  | The bot shows the standard apology message and ends the conversation.               |

If you have selected a fallback flow, it always takes precedence over the custom message.

### Custom error message

This is the message the bot shows the user when a technical error occurs. It comes pre-filled with the standard wording, which you are free to replace with your own.

* The message is **multilingual**: provide a translation per language so users always see it in their own language.
* You can use **variables** in the text to personalise the message.
* Leave this field empty (and select no fallback flow) to keep the standard apology.

### Fallback flow

Instead of a single message, you can let a **flow** take over completely when an error occurs. This is useful when a simple apology is not enough — for example to escalate the conversation to a human agent, offer the user a choice to try again, or send a notification.

* Pick any existing flow from the dropdown.
* When an error occurs, the bot jumps to this flow, and the flow is fully responsible for the rest of the conversation (including whether and when to close it).
* To stop using a fallback flow, simply clear the selection.

> **Note:** If you select a flow here and later delete that flow from your bot, the reference becomes invalid. Make sure to pick another flow or clear the selection so your error handling keeps working as expected.


# Inbox

This section explains the usage of the inbox.


# Assigning

When a new conversation is escalated to the Inbox it will arrive in the **New** folder where it will wait to be assigned to a user. The general idea is that you and your team strive to keep this folder as empty as possible. As soon as a new conversation is escalated into this folder it needs to be assigned as soon as possible.

<figure><img src="https://3356808761-files.gitbook.io/~/files/v0/b/gitbook-x-prod.appspot.com/o/spaces%2FEBQHGJABNTj5ISSOTRxM%2Fuploads%2FLYF72Hs1wlHFioUyEOfW%2FScreenshot%202024-02-01%20at%2014.14.57.png?alt=media&amp;token=4294048a-f6f5-4002-b6b6-8b007dd32aa6" alt=""><figcaption></figcaption></figure>

## Assign to me

Either users with the role Agent or Operator can then assign the conversation to themselves by selecting the conversation and clicking the **Assign to me** button. Now the conversation will move from the New folder to the **Mine** folder. Your colleagues can see the conversation move to the **Assigned** folder. This way, conversations don't get lost and remain transparent to the entire team. Once assigned, you can join the conversation in order to start responding.

## Reassign to someone else

You can also have someone else to handle the conversation by using the Reassign button. This buttons is only available when you or someone else is already assigned to the conversation.&#x20;

<figure><img src="https://3356808761-files.gitbook.io/~/files/v0/b/gitbook-x-prod.appspot.com/o/spaces%2FEBQHGJABNTj5ISSOTRxM%2Fuploads%2FqaAygwVxnJDk30WTrT4c%2FScreenshot%202024-02-01%20at%2014.23.42.png?alt=media&amp;token=fb7934f3-85b9-427b-8d3b-b99b755c7162" alt=""><figcaption></figcaption></figure>


# Joining and leaving

Once you've assigned the conversation to yourself you can either reassign the conversation to someone else you find more suitable (press the Reassign button and choose a team member) or take it yourself by pressing the **Join** button.

<figure><img src="https://3356808761-files.gitbook.io/~/files/v0/b/gitbook-x-prod.appspot.com/o/spaces%2FEBQHGJABNTj5ISSOTRxM%2Fuploads%2Fz63mfIGXPLaN4hRBmGpI%2FScreenshot%202024-02-01%20at%2014.28.19.png?alt=media&amp;token=2d0c5432-06a8-441d-9cdd-916ddc398884" alt=""><figcaption></figcaption></figure>

When joined, the input bar shows and the following new options become available to you.

<figure><img src="https://3356808761-files.gitbook.io/~/files/v0/b/gitbook-x-prod.appspot.com/o/spaces%2FEBQHGJABNTj5ISSOTRxM%2Fuploads%2FjU5HWHDxlW8YgSoMpBDU%2FScreenshot%202024-02-01%20at%2014.29.02.png?alt=media&amp;token=39dc1e47-23e7-46ed-94f0-d74082f3a72e" alt=""><figcaption></figcaption></figure>

| Button                                                                                                                                                                                                                                                                                      | Explanation                                                                                                 |
| ------------------------------------------------------------------------------------------------------------------------------------------------------------------------------------------------------------------------------------------------------------------------------------------- | ----------------------------------------------------------------------------------------------------------- |
| <img src="https://3356808761-files.gitbook.io/~/files/v0/b/gitbook-x-prod.appspot.com/o/spaces%2FEBQHGJABNTj5ISSOTRxM%2Fuploads%2FizNw4PvDSXWyvChJF6Le%2FScreenshot%202024-02-01%20at%2014.30.38.png?alt=media&amp;token=b7da345c-7489-4154-a37d-34b9b0daf44b" alt="" data-size="original"> | Send your responses to the contact.                                                                         |
| <img src="https://3356808761-files.gitbook.io/~/files/v0/b/gitbook-x-prod.appspot.com/o/spaces%2FEBQHGJABNTj5ISSOTRxM%2Fuploads%2F0TxAt5LuTbUUhui8dmXc%2FScreenshot%202024-02-01%20at%2014.31.01.png?alt=media&amp;token=22dc2c68-e6d7-4f1c-84e7-b664a48034c0" alt="" data-size="original"> | Stop being joined and be able to reassign or close this conversation.                                       |
| <img src="https://3356808761-files.gitbook.io/~/files/v0/b/gitbook-x-prod.appspot.com/o/spaces%2FEBQHGJABNTj5ISSOTRxM%2Fuploads%2FqwT1MNPHzYLIS4LKoF8U%2FScreenshot%202024-02-01%20at%2014.31.44.png?alt=media&amp;token=49b9b063-35a3-4aa4-9dcc-241aa08d39e7" alt="" data-size="original"> | Use this button to activate the team chat,  to consult with one of your colleagues about this conversation. |


# Sending messages

When you are joined you can use the input bar to type your message:

<figure><img src="https://3356808761-files.gitbook.io/~/files/v0/b/gitbook-x-prod.appspot.com/o/spaces%2FEBQHGJABNTj5ISSOTRxM%2Fuploads%2FoRrqJQG0RiCAbhxD2V4T%2Fimage.png?alt=media&amp;token=6713a940-b45b-4efd-9a65-31af4e2902f9" alt=""><figcaption><p>Inputbar buttons</p></figcaption></figure>

The icons displayed on the bottom within the input bar represent additional options for composing your response.

|                                                                                                                                                                                                                                                           |                           |                                                                        |
| --------------------------------------------------------------------------------------------------------------------------------------------------------------------------------------------------------------------------------------------------------- | ------------------------- | ---------------------------------------------------------------------- |
| ![](https://4069993657-files.gitbook.io/~/files/v0/b/gitbook-x-prod.appspot.com/o/spaces%2FdpjXUaTbd3CDIs8bnffO%2Fuploads%2FKpJAMftTXCKtqb40nSTz%2Fimage.png?alt=media\&token=9a9403b8-e9b3-4462-9aff-d731c4418fb1)                                       | Team chat                 | Switch to 'team chat' mode.                                            |
| ![](https://4069993657-files.gitbook.io/~/files/v0/b/gitbook-x-prod.appspot.com/o/spaces%2FdpjXUaTbd3CDIs8bnffO%2Fuploads%2F664iXuLsBJxFqjtNVzwN%2Fimage.png?alt=media\&token=db3f8380-eeeb-4ee3-9cb0-ccecf1c114bf)                                       | Toggle formatting toolbar | Shows toolbar to enable bold, italic, etc.                             |
| <img src="https://3356808761-files.gitbook.io/~/files/v0/b/gitbook-x-prod.appspot.com/o/spaces%2FEBQHGJABNTj5ISSOTRxM%2Fuploads%2FmooNEe33Hi3SXMhcxRjV%2Fimage.png?alt=media&amp;token=b34b7eb7-18ec-40c9-90ca-98971efc2c38" alt="" data-size="original"> | Send file(s)              | To upload and send a file (not image) from your device to the contact. |
| <img src="https://3356808761-files.gitbook.io/~/files/v0/b/gitbook-x-prod.appspot.com/o/spaces%2FEBQHGJABNTj5ISSOTRxM%2Fuploads%2FZHVrAPts8o8mxYDiBtHU%2Fimage.png?alt=media&amp;token=4318fb6d-d48a-44ee-8802-af52cad51b86" alt="" data-size="original"> | Canned responses          | To manage canned responses.                                            |
| <img src="https://3356808761-files.gitbook.io/~/files/v0/b/gitbook-x-prod.appspot.com/o/spaces%2FEBQHGJABNTj5ISSOTRxM%2Fuploads%2Fp0NS1djHggiyZ3bpAhwm%2Fimage.png?alt=media&amp;token=75b6dd17-be24-4e73-8544-0111ec7079b2" alt="" data-size="original"> | Auto translate            | Enable automatic translation.                                          |

## Input bar buttons

{% tabs %}
{% tab title="Files and images" %}
Images can also be send by simply pasting them into the input bar (Ctrl+V on Windows and Cmd+V on Mac). Additionally, you can drag-and-drop files and images from the file manager onto the input bar to have them uploaded.

<figure><img src="https://3356808761-files.gitbook.io/~/files/v0/b/gitbook-x-prod.appspot.com/o/spaces%2FEBQHGJABNTj5ISSOTRxM%2Fuploads%2F5zSHi2aUKo9py9iBn7CB%2FScreenshot%202024-02-01%20at%2014.45.19.png?alt=media&amp;token=9048ed79-e693-47b9-91ed-cc71444e88eb" alt=""><figcaption></figcaption></figure>
{% endtab %}

{% tab title="Team Chat" %}
In *team chat* mode (![](https://3356808761-files.gitbook.io/~/files/v0/b/gitbook-x-prod.appspot.com/o/spaces%2FEBQHGJABNTj5ISSOTRxM%2Fuploads%2FrfxIQHDVk7RvIgdLCF9O%2Fimage.png?alt=media\&token=6bcbbee3-1ae4-49f2-b3e9-36d15613b2a9)), the input bar changes color and any messages will not be delivered to the end user but will stay internal. This way you can leave notes for your colleagues and @mention them.

<figure><img src="https://3356808761-files.gitbook.io/~/files/v0/b/gitbook-x-prod.appspot.com/o/spaces%2FEBQHGJABNTj5ISSOTRxM%2Fuploads%2FHkuY8yptx5AdPoUTJN1H%2FScreenshot%202024-02-01%20at%2014.47.27.png?alt=media&amp;token=6a0ca2b0-77a1-41fa-afcd-6f830a7ae2ed" alt=""><figcaption></figcaption></figure>

Either auto detect or choose the language by clicking on the "User speaks" field and then click on Enable. You might need to close this popup in order to continue chatting. From now on all incoming chat messages will be translated to your language and your replies will be translated to the language of the contact.
{% endtab %}

{% tab title="Automatic Translation" %}
When clicking on the *auto translation* (![](https://3356808761-files.gitbook.io/~/files/v0/b/gitbook-x-prod.appspot.com/o/spaces%2FEBQHGJABNTj5ISSOTRxM%2Fuploads%2FZbft6jHoIXcwy9tFYQDN%2Fimage.png?alt=media\&token=56ea9baf-b922-415f-be41-c0aad620199f)) button you can specify which language to translate from and too when chatting to this contact. Clicking on the button will open the following popup page.

<figure><img src="https://3356808761-files.gitbook.io/~/files/v0/b/gitbook-x-prod.appspot.com/o/spaces%2FEBQHGJABNTj5ISSOTRxM%2Fuploads%2FnrQlOI7jpnecNsCVcEOv%2FScreenshot%202024-02-01%20at%2014.51.36.png?alt=media&amp;token=42934a49-e294-4f3c-9832-053048d82e21" alt=""><figcaption></figcaption></figure>
{% endtab %}
{% endtabs %}

## Emoji reactions

### Incoming message reaction

Your contact may respond to your message via emoji and not via text. This works both ways. Incoming messages via emoji will be rendered in the inbox as shown down below. Its good to know that emojis can only used on WhatsApp currently... so no other channel supports the emoji reactions yet besides WhatsApp.

<figure><img src="https://3356808761-files.gitbook.io/~/files/v0/b/gitbook-x-prod.appspot.com/o/spaces%2FEBQHGJABNTj5ISSOTRxM%2Fuploads%2Fd0zioXbswGuvhqUxdmm4%2FScreenshot%202024-07-22%20at%2013.54.57.png?alt=media&amp;token=5d9dcf8f-ea3c-4ecb-b297-52fe8deaefe5" alt=""><figcaption></figcaption></figure>

### Outbound reaction picker

By hovering over the text you can now choose to reply via Emoji. If you click on the + you can choose from a variety of emojis. Outbound reactions via emoji will be rendered in the inbox as shown down below.

<figure><img src="https://3356808761-files.gitbook.io/~/files/v0/b/gitbook-x-prod.appspot.com/o/spaces%2FEBQHGJABNTj5ISSOTRxM%2Fuploads%2FI3Agm45wNFkrLPnAfjRk%2Fimage.png?alt=media&amp;token=299ded5a-d70a-4379-8600-647969533c9a" alt=""><figcaption></figcaption></figure>

## Direct reply

Inside of a conversation it is now possible to reply to a direct message which allows for a more clear conversation method. This will also be shown in WhatsApp as a reply.

<figure><img src="https://3356808761-files.gitbook.io/~/files/v0/b/gitbook-x-prod.appspot.com/o/spaces%2FEBQHGJABNTj5ISSOTRxM%2Fuploads%2FAlvXZGoIegmXAtZyQDM2%2FScreenshot%202024-09-03%20at%2010.02.06.png?alt=media&amp;token=2d28f8b4-e7fc-4f64-9303-e8d4ec2ab5e2" alt=""><figcaption></figcaption></figure>


# Sending SMS

The Inbox SMS skill empowers operators to efficiently send one-time SMS messages directly from the Inbox interface to users. This feature allows SMS to be sent regardless of the current conversation channel, ensuring important updates reach the user promptly.

This skill is particularly advantageous for customer support teams looking to enhance their communication strategies with timely SMS outreach.

### How to get started

#### Setting Up the Inbox SMS Skill

To set up the Inbox SMS Skill, follow these steps:

1. **Navigate to the Skills Section**: In the studio, go to the Packages - Browse skills section where you'll find a list of available skills.
2. **Install the Inbox SMS skill**: Select the skill and click 'Install'.&#x20;

That's it! When new conversations enter your Inbox, you'll see a new action button below the chat input bar. Clicking it will open the actions, showing our just installed 'Send SMS' action.

<figure><img src="https://3356808761-files.gitbook.io/~/files/v0/b/gitbook-x-prod.appspot.com/o/spaces%2FEBQHGJABNTj5ISSOTRxM%2Fuploads%2FJkPN5z5h4FEAXmgL6Hj1%2FCleanShot%202025-10-10%20at%2012.41.44%402x.png?alt=media&amp;token=1326fbff-1d32-42f4-baae-ad3df67e2b85" alt=""><figcaption></figcaption></figure>

Clicking 'Send SMS' will open up a form. We'll automatically pre-fill the form with the phone number of the user to whom you were talking.

<figure><img src="https://3356808761-files.gitbook.io/~/files/v0/b/gitbook-x-prod.appspot.com/o/spaces%2FEBQHGJABNTj5ISSOTRxM%2Fuploads%2FJxvuFNklJCORxJx50dM1%2FCleanShot%202025-10-10%20at%2012.45.04%402x.png?alt=media&amp;token=8f3d74fe-9e9c-4042-b4e1-459921586748" alt=""><figcaption></figcaption></figure>


# Canned responses

Some messages are quite generic for your business and can be re-used for more conversations. These messages can be added to the **Canned Responses** list so next time they are needed they can be "auto completed".

## Manage canned responses

Click on the canned responses icon in the input bar when you joined a conversation.

<figure><img src="https://3356808761-files.gitbook.io/~/files/v0/b/gitbook-x-prod.appspot.com/o/spaces%2FEBQHGJABNTj5ISSOTRxM%2Fuploads%2FoxkAcvHzTwkMBbdgUGer%2Fimage.png?alt=media&amp;token=6486cef7-7638-410f-ad37-91031027ba03" alt=""><figcaption></figcaption></figure>

Now a popup appears in which you can change, remove or add canned responses. When you click **Save** the canned responses are stored in the database, ready to be used.

<figure><img src="https://3356808761-files.gitbook.io/~/files/v0/b/gitbook-x-prod.appspot.com/o/spaces%2FEBQHGJABNTj5ISSOTRxM%2Fuploads%2F1DtwUTPjj1FmtYnMlbTm%2FScreenshot%202024-02-01%20at%2015.03.56.png?alt=media&amp;token=c1614dbe-223f-4400-afc3-97affe7c0f12" alt=""><figcaption></figcaption></figure>

## Use a canned response

Now you can start to type a sentence in the input bar. When the system finds a matching canned response it will offer it for selection.

<figure><img src="https://3356808761-files.gitbook.io/~/files/v0/b/gitbook-x-prod.appspot.com/o/spaces%2FEBQHGJABNTj5ISSOTRxM%2Fuploads%2FXJbS5KozC9ThN9VG46Mz%2FScreenshot%202024-02-01%20at%2015.18.16.png?alt=media&amp;token=d638c4f7-d6b9-4798-9e9b-60ae4bd2d285" alt=""><figcaption></figcaption></figure>


# Team chat

Using the team chat function you can consult a colleague about the conversation you are having with a contact without the contact being able to see it.

<figure><img src="https://3356808761-files.gitbook.io/~/files/v0/b/gitbook-x-prod.appspot.com/o/spaces%2FEBQHGJABNTj5ISSOTRxM%2Fuploads%2F54M9DZiwJ6O7bhLR9A38%2Fimage.png?alt=media&amp;token=eb140950-323f-442e-aa0c-81005218e404" alt=""><figcaption></figcaption></figure>

Click on the little icon on the left hand side to open the team chat panel in the conversation.

<figure><img src="https://3356808761-files.gitbook.io/~/files/v0/b/gitbook-x-prod.appspot.com/o/spaces%2FEBQHGJABNTj5ISSOTRxM%2Fuploads%2FTaQqfkGmcGU5a962JyEu%2FScreenshot%202024-02-01%20at%2014.47.27.png?alt=media&amp;token=6e4bce30-a046-4516-b8b6-58b66876a652" alt=""><figcaption></figcaption></figure>

Now you can invite a colleague to the conversation by typing the **@** character which will allow you to pick one of your colleagues from a list.

<figure><img src="https://3356808761-files.gitbook.io/~/files/v0/b/gitbook-x-prod.appspot.com/o/spaces%2FEBQHGJABNTj5ISSOTRxM%2Fuploads%2FpeoerEbY8LhUIjHcDqi4%2FScreenshot%202024-02-01%20at%2015.24.25.png?alt=media&amp;token=3c0ac368-e9a0-4303-863e-dd09007a97be" alt=""><figcaption></figcaption></figure>

Just pick one of your colleagues, type a message and press **Send**. This will notify your colleague about the question or remark. The conversation will now automatically be watched by your colleague.&#x20;

{% hint style="info" %}
You can only mention users that are registered with the roles **Operator** and **Agent** in the same environment.
{% endhint %}


# Watching

There are two ways to get a conversation in the watched folder.&#x20;

1. When the **Watch** button is used.
2. When invited to a Team Chat.

The **Watch** button can be found in top of a conversation.

<figure><img src="https://3356808761-files.gitbook.io/~/files/v0/b/gitbook-x-prod.appspot.com/o/spaces%2FEBQHGJABNTj5ISSOTRxM%2Fuploads%2Fc7Er4wTtoiYoQnsKofXL%2FScreenshot%202024-02-01%20at%2015.28.07.png?alt=media&amp;token=6d41d357-76d5-4819-861e-da5a10b07d43" alt=""><figcaption></figcaption></figure>

Now the conversation will be available in your **Watched** folder.

<figure><img src="https://3356808761-files.gitbook.io/~/files/v0/b/gitbook-x-prod.appspot.com/o/spaces%2FEBQHGJABNTj5ISSOTRxM%2Fuploads%2FMeyfLaGPX73vBXkk90S1%2FScreenshot%202024-02-01%20at%2015.29.52.png?alt=media&amp;token=6144ae33-7cf2-403f-82e3-b6842f99023b" alt=""><figcaption></figcaption></figure>

The watching is continued until the **Unwatch** button is clicked which is now displayed instead of the Watch button at the top bar of a conversation.


# Close

Only when you are assigned to a conversation you are in a position to close it. The close button can be found on the right hand side in the bottom, next to the team chat button.

<figure><img src="https://3356808761-files.gitbook.io/~/files/v0/b/gitbook-x-prod.appspot.com/o/spaces%2FEBQHGJABNTj5ISSOTRxM%2Fuploads%2FUdZp10jrK1FpPkRhbcNd%2Fimage.png?alt=media&amp;token=49a84147-be3e-409d-bcfa-51832c0abf38" alt=""><figcaption></figcaption></figure>

When a conversation is closed, it will be moved from the Mine folder to the Closed folder so you can always look back and see its contents.

<figure><img src="https://3356808761-files.gitbook.io/~/files/v0/b/gitbook-x-prod.appspot.com/o/spaces%2FEBQHGJABNTj5ISSOTRxM%2Fuploads%2FYhfbjGQgjAN4s1EPioGD%2FScreenshot%202024-02-01%20at%2015.31.37.png?alt=media&amp;token=5c6520e9-fe48-4240-bed4-97d93bef016b" alt=""><figcaption></figcaption></figure>

{% hint style="info" %}
A closed conversation can never be reopened. The only way to reengage a contact is by starting a new conversation.
{% endhint %}


# Filter conversations

For every supervisor there is a function in the Studio view where you can filter the assigned operator conversations by using a operator picker and date picker. With this control you can get a quick overview of your current and handled conversations based on the operator you want to supervise.&#x20;

By default the filter is off.

<figure><img src="https://3356808761-files.gitbook.io/~/files/v0/b/gitbook-x-prod.appspot.com/o/spaces%2FEBQHGJABNTj5ISSOTRxM%2Fuploads%2FEz2vgENV2wIheMXsfnPF%2FScreenshot%202024-07-04%20at%2010.31.43.png?alt=media&amp;token=e209d378-4118-4162-a53c-91aa7326f0d3" alt=""><figcaption></figcaption></figure>

Make sure you have invited your operators in the specific environment on which you want to filter out the conversations. Below you will find an example of how to use the filter functions.

<div><figure><img src="https://3356808761-files.gitbook.io/~/files/v0/b/gitbook-x-prod.appspot.com/o/spaces%2FEBQHGJABNTj5ISSOTRxM%2Fuploads%2FAqAefu2AFkSjEzrTXrRP%2FScreenshot%202024-07-03%20at%2013.40.14.png?alt=media&amp;token=e4d8d5c8-d195-4b85-80ac-8fb3e4f8a79b" alt=""><figcaption><p>Filter operator conversations</p></figcaption></figure> <figure><img src="https://3356808761-files.gitbook.io/~/files/v0/b/gitbook-x-prod.appspot.com/o/spaces%2FEBQHGJABNTj5ISSOTRxM%2Fuploads%2FWJOJNsq6Pi5hAueSW5Df%2FScreenshot%202024-07-03%20at%2013.40.05.png?alt=media&amp;token=d94d2e5c-bafc-47b3-b9f5-49dd31287a03" alt=""><figcaption><p>Filter out the date of operator conversations</p></figcaption></figure> <figure><img src="https://3356808761-files.gitbook.io/~/files/v0/b/gitbook-x-prod.appspot.com/o/spaces%2FEBQHGJABNTj5ISSOTRxM%2Fuploads%2FRjYtBfWs3ASs8Ycq3c4I%2FScreenshot%202024-07-03%20at%2013.39.43.png?alt=media&amp;token=18fca384-661b-43b5-acef-3365c05e1cca" alt=""><figcaption><p>Default filter setting</p></figcaption></figure></div>


# Multiple inboxes

### Why do I need multiple inboxes?

When the amount of conversations is too much for a hand full of agents, or when the diversity of the conversation topics is too wide for one team to handle, you might want to consider multiple inboxes. This way you can setup an inbox for the different topics or different teams that you have.

Another good reason of having multiple inboxes is when you are using MS Teams for answering incoming messages and you want conversations to be handled on different Teams channels depending on their topic.

### How are inboxes modelled in the platform?

Inboxes are tags that are stored in a special tag group called **Inbox**. To manage the inbox tags, go to **Settings -> Tags** and open the tag group **Inbox**.

<figure><img src="https://3356808761-files.gitbook.io/~/files/v0/b/gitbook-x-prod.appspot.com/o/spaces%2FEBQHGJABNTj5ISSOTRxM%2Fuploads%2F2RF5h5zKdpRog2a4iQdT%2FScreenshot%202024-07-31%20at%2009.47.00.png?alt=media&amp;token=6570c832-10e3-4f9e-9b71-f86ac99ef3a3" alt=""><figcaption></figcaption></figure>

If the tag group doesn't exist, create it by clicking **Add tag group**.

<figure><img src="https://lh7-rt.googleusercontent.com/docsz/AD_4nXeGkBXy_2pT71J9puM13WtWx8H-X2IDJoF8MnM8kwlaUbDHpFxnjC2XMfFOMXoBYvMw7rZqDrVSarp6bxczssJFVNkhWfkbZ0FKTNDNMNNhybCN3Vwix6x93RsuQLWs6-NGg4Ah1yU1AcsSCaLzV8lAw6J3?key=WoAeEar-xk0G3lpUA9ftxw" alt=""><figcaption><p>Add a tag group and show as assignable in Inbox.</p></figcaption></figure>

Fill out the form as presented in the image above. Make sure to choose Tag type **Single** since we don't want conversations to end up in multiple inboxes at the same time.

The toggle **Show as assignable in inbox** is required to make it into an inbox filter. This way agents and flows (using the [Escalate node](/studio/flows/nodes/escalate-default)) can use the tags in this tag group to assign conversations to.

The **Show in inbox sidebar** is optional. This setting will make sure the tag is also shown in the inbox sidebar and also enable filtering in the inbox.

<figure><img src="https://lh7-rt.googleusercontent.com/docsz/AD_4nXfbTv-4ba5zPgg_8Asn38B_ZOvlvF2C3J2hrCrywHOpnBI1PemTTpnvPc4LJmQfO12PgdG-e77K_LCe0Kx3oZpc1Alt-CqiSwZnfz_SL9fFzzaNfmyMF3SnRwTAlc_Nsph5EwSm7_UQhCw60jvrT1Xxm2Dc?key=WoAeEar-xk0G3lpUA9ftxw" alt=""><figcaption><p>Show in Inbox sidebar toggle makes the tags available as filters in the Inbox.</p></figcaption></figure>

Now add a tag for each of the inboxes you want to have using the **Add tag** button.&#x20;

<figure><img src="https://lh7-rt.googleusercontent.com/docsz/AD_4nXdPvoplWKygoPfX-5W0KOOqAnr417RzwOWGvjAGMVOXv5ByWGSoMr62eK9UyEXL4XkBddIB7OPRLfGYQVqpQocjLTXukEfjwlPG3lgTsV2ea2xtNCvApazC9dcd2S_Ixzk9m_aaIGVpoqc9T0pK1MUTEsnK?key=WoAeEar-xk0G3lpUA9ftxw" alt=""><figcaption><p>Create the inbox tags</p></figcaption></figure>

### How to assign users to inboxes?

{% hint style="info" %}
Only Organisation managers can appoint users to inboxes.
{% endhint %}

Click on **Manage Environment** in the bot switcher:

<figure><img src="https://lh7-rt.googleusercontent.com/docsz/AD_4nXcU5YlzZo66-ZyODF0tmZv0OLCtrkkkLk4TrR8DoGzy8hOwyclxWiR7ApeMXxGoBHRz0bOMPoFq8JnT4YUN1x35hjDfrhgyLJZo0k5NXE8BeLC-fvIQwYI_Ts0AqUtRn9oPULtTXOJm7HMjJIjOITE6nnC0?key=WoAeEar-xk0G3lpUA9ftxw" alt=""><figcaption><p>Manage Environment</p></figcaption></figure>

Now click on **Members** in the main menu.

<figure><img src="https://lh7-rt.googleusercontent.com/docsz/AD_4nXf3lrKzYJtyO4IQi8_1q_6C1gTlscYCxxPKVSlhQ2ANkzcbS5NrPXub0ObKu1QfrqLywNIjLFadbGuq8k043pxjJjJGyEEOausfiM6whD9SU2NQI-esKi7y84ATvJzAXxQWsFzclfLmCq3SvW5jdBjmqZZg?key=WoAeEar-xk0G3lpUA9ftxw" alt=""><figcaption><p>Configure inbox tags</p></figcaption></figure>

Now add the inbox tags by clicking on the little pen icon.&#x20;

<figure><img src="https://lh7-rt.googleusercontent.com/docsz/AD_4nXffx0k-X4b4kR1pi1gdC2P0zAYjX5tyRz0WZy-Ulgp4ti1kknl36r40x1dNfGn2jqUQOvtjd54vnOSkfwk_Xade73k6aehVa2ahPLbk9RwSuuFovx8vfYinNfgr-fLBY7aG8PXClSw42rqKX_Ref982_wA?key=WoAeEar-xk0G3lpUA9ftxw" alt=""><figcaption><p>Select Inbox tags</p></figcaption></figure>

The drop down will only show the tags from the bots in your environment that are marked by the **Show as assignable in inbox** toggle as you have read previously.&#x20;

{% hint style="info" %}
&#x20;The user will only get notifications from the assigned inboxes but will be able to see all others.
{% endhint %}

### How to assign conversation to inboxes?

#### Using Flows

A flow can immediately assign a conversation to an inbox using the Tag option in the Escalate nodes:

* [Escalate default](/studio/flows/nodes/escalate-default)
* [Escalate smart](/studio/flows/nodes/escalate-smart)

#### By an agent in the Inbox

An agent can also decide to assign a conversation to a certain inbox by using the **Assign to** button for any new conversation or **Reassign** button for existing conversations:

<figure><img src="https://lh7-rt.googleusercontent.com/docsz/AD_4nXfIikClUmMJABvz_xq-eO_lenHEK79wYVb8wtdycliMuEaQ0gd6z5ao5Sw_8kQD58wAHEB4OfwItstZnxUaEi3KEOVuQCg_6MT52zOfUpoNatRfTRQJkYszm9BOt9RuxcctgaiGgD6Kkwt5ofL1qcjkR-fm?key=WoAeEar-xk0G3lpUA9ftxw" alt=""><figcaption></figcaption></figure>


# Contacts

The Contacts page shows the contacts (end users) that engaged with your bot and operators.

<figure><img src="https://3356808761-files.gitbook.io/~/files/v0/b/gitbook-x-prod.appspot.com/o/spaces%2FEBQHGJABNTj5ISSOTRxM%2Fuploads%2FXNCOtkCvKpeGWvAyD1dJ%2FScreenshot%202024-02-06%20at%2009.35.51.png?alt=media&amp;token=e0a98f36-dbad-41b9-8c81-962d2dd4fc12" alt=""><figcaption></figcaption></figure>

## Create user

By clicking on the **+ Create user** button (Inbox view) or **+Add Contact**  button (Studio view) a form will popup where you can fill in general contactdetails such as first name, last name, email, phone, choose language, insert a timezone and an optional free-form external id to identify your user(s).&#x20;

<figure><img src="https://3356808761-files.gitbook.io/~/files/v0/b/gitbook-x-prod.appspot.com/o/spaces%2FEBQHGJABNTj5ISSOTRxM%2Fuploads%2F0IFaGRSKCGihkM8vILcc%2FScreenshot%202024-02-06%20at%2010.06.00.png?alt=media&amp;token=cabf5999-2914-4df2-bd31-e5b5318ba820" alt=""><figcaption></figcaption></figure>

By clicking the **Save** button the contact you will store the newly made contact in your CRM. By making new contacts, you will see functionalities to start connecting. It should look something like this:

<figure><img src="https://3356808761-files.gitbook.io/~/files/v0/b/gitbook-x-prod.appspot.com/o/spaces%2FEBQHGJABNTj5ISSOTRxM%2Fuploads%2FslzR93BxUSfuO6XJm8Rv%2FScreenshot%202024-02-06%20at%2010.07.52.png?alt=media&amp;token=31431f9e-1a7d-4f34-a3c7-74ac3b301980" alt=""><figcaption></figcaption></figure>

## Changing contactname field

In some situation you want to name your contacts, you can now change your contact by clicking on the name in the contactname field and adjust it accordingly.

<figure><img src="https://3356808761-files.gitbook.io/~/files/v0/b/gitbook-x-prod.appspot.com/o/spaces%2FEBQHGJABNTj5ISSOTRxM%2Fuploads%2F8fszJ6j1VDzna5uaXxCj%2FScreenshot%202024-06-25%20at%2015.12.57.png?alt=media&amp;token=535968ee-47f8-4476-aba4-6f13c21cb7e7" alt=""><figcaption></figcaption></figure>

## Setting tags on a user

By setting specific tags on a user you can categorise the user related to the specific subject. You can find the tags under **Inbox** by clicking on the name of the user, under the "start new conversation" the tags will be stored.

<figure><img src="https://3356808761-files.gitbook.io/~/files/v0/b/gitbook-x-prod.appspot.com/o/spaces%2FEBQHGJABNTj5ISSOTRxM%2Fuploads%2FcedBchGZHjBIaTZR8yuN%2FScreenshot%202024-07-16%20at%2014.48.14.png?alt=media&amp;token=2b733223-c951-41a5-a5ce-08c97e859253" alt=""><figcaption><p>Inbox: Sales / Support / Billing tag set on a specific user</p></figcaption></figure>

## Export

Get a quick export of your contactlist by clicking on **Export**. Choose from the following formats such as:&#x20;

* Excel (.xlsx)
* CSV (.csv, ; as delimiter)
* CSV (.csv, , as delimiter)

<figure><img src="https://3356808761-files.gitbook.io/~/files/v0/b/gitbook-x-prod.appspot.com/o/spaces%2FEBQHGJABNTj5ISSOTRxM%2Fuploads%2FIvuTSxDmdEwFSu7mJYRU%2FScreenshot%202024-02-06%20at%2010.09.54.png?alt=media&amp;token=037734e1-d52f-42c7-b665-c28b47b545cb" alt=""><figcaption></figcaption></figure>


# Notes

On the left you will find the Notes which are made from via channels, in situations such as:

* [Telephony](/studio/channels/phone) (outside of office hours/no one available/closed)
* [Chatwidget](/studio/channels/chat-widget) (outside office hours/closed)
* [Whatsapp](/studio/channels/whatsapp/whatsapp) (outside of office hours/no one available/closed)

<figure><img src="https://3356808761-files.gitbook.io/~/files/v0/b/gitbook-x-prod.appspot.com/o/spaces%2FEBQHGJABNTj5ISSOTRxM%2Fuploads%2Fm64bqGojBzfJhpRdfAyf%2FScreenshot%202024-04-04%20at%2014.10.10.png?alt=media&amp;token=27757506-aa25-4a3d-9d91-b8ad20516974" alt=""><figcaption></figcaption></figure>

Notes will give Operators the opportunity to handle notes such as callback requests, additional information, etc, accordingly.&#x20;

<table><thead><tr><th width="232">Identifier</th><th>Details</th></tr></thead><tbody><tr><td>To Do</td><td>New note that hasn't been handled yet</td></tr><tr><td>Done</td><td>Note that has been handled accordingly</td></tr><tr><td>Assigned To</td><td>Assigning a note to a specific user</td></tr><tr><td>Mark as done</td><td>Marking the note as done</td></tr><tr><td>Unmark as done</td><td>Unmarking the note as done</td></tr><tr><td>Delete</td><td>Deleting a note</td></tr><tr><td>Open conversation</td><td>Re-engage the conversation</td></tr><tr><td>Export </td><td>Create an export of all notes inside of an environment</td></tr></tbody></table>

{% hint style="info" %}
Please remember that notifications for notes only occur during an assignment or unassignment.
{% endhint %}

### Hide columns

To provide a bit more clarity when working with Notes, there is an option to toggle which columns to display. This way certain columns can be omitted to make room for other columns. The columns to show and hide can be toggled in the Columns drop down in the upper right corner:

<figure><img src="https://3356808761-files.gitbook.io/~/files/v0/b/gitbook-x-prod.appspot.com/o/spaces%2FEBQHGJABNTj5ISSOTRxM%2Fuploads%2FHqvMtKRlS6oFz7izjClJ%2Fimage.png?alt=media&amp;token=59f869e1-3c73-4639-8c97-6a5d86f14b5e" alt=""><figcaption></figcaption></figure>


# Today

When promises are made by your app that need follow up by a human agent, the app is able to create a Todo entry in your Today view in the Inbox view.

<figure><img src="https://3356808761-files.gitbook.io/~/files/v0/b/gitbook-x-prod.appspot.com/o/spaces%2FEBQHGJABNTj5ISSOTRxM%2Fuploads%2FlcuQwdlHSLRi4Arkmlhq%2Fimage.png?alt=media&amp;token=7f07e865-bb55-43ed-be7a-8afa942696c8" alt=""><figcaption><p>Today view</p></figcaption></figure>

A Todo is like a note, except for the fact that a Todo has a due date whereas a note doesn't. So when a task or promise set out by an app has a specific due date, it is better to create a Todo.

The details of a Todo item can be opened by clicking on the drop down icon in front of the Todo item. The Todo will then unfold.

<figure><img src="https://3356808761-files.gitbook.io/~/files/v0/b/gitbook-x-prod.appspot.com/o/spaces%2FEBQHGJABNTj5ISSOTRxM%2Fuploads%2FyWiKEJrgERCDJxhHNx9R%2Fimage.png?alt=media&amp;token=15095a4b-7eed-4ab2-8631-ff728cb195d7" alt=""><figcaption><p>Todo details</p></figcaption></figure>

When the Todo is handled, in the above example that would mean this person is called back, the Todo can be marked as done by clicking on the checkmark button. This way you can easily recognize the handled Todo's compared to the ones that are still open:

<figure><img src="https://3356808761-files.gitbook.io/~/files/v0/b/gitbook-x-prod.appspot.com/o/spaces%2FEBQHGJABNTj5ISSOTRxM%2Fuploads%2FhghDzbgiKlOPMgb6nBI4%2Fimage.png?alt=media&amp;token=a5dfb792-56ca-4256-8ce0-c0ac76891ad2" alt=""><figcaption><p>Handled Todo's</p></figcaption></figure>

&#x20;


# Notifications


# Notification panel

The platform will generate notifications from time to time to draw your attention to events that require your attention. These notifications will be collected in the notifications panel, so even when you miss a notification, or when you were to quick clicking it away, you can still find it in this panel.

<figure><img src="https://3356808761-files.gitbook.io/~/files/v0/b/gitbook-x-prod.appspot.com/o/spaces%2FEBQHGJABNTj5ISSOTRxM%2Fuploads%2FmOtbJ8WySmqm7MSors9t%2FAfbeelding%20van%20WhatsApp%20op%202024-05-15%20om%2014.15.53_3d899120.jpg?alt=media&amp;token=9102d970-d0a4-4434-afdb-aba892434c6d" alt=""><figcaption></figcaption></figure>

## Notification panel

You can find the notifications panel behind the button showing a little icon of a Bell in the upper right corner. The red dot in the icon indicates there are still unhandled notifications.

### General actions

In the top of the panel there are three small icons and one larger button. From left to right:

* Settings: links to the Notification settings
* Mute / unmute: toggles between muting and unmuting new notifications
* Unread / all: toggle between showing only the unread notifications or all the notifications
* Mark all read: little power feature to mark all notifications as "read", so they dissapear from the unread list.

### Actions per notification

Clicking on a notification will bring you to the page that caused the event, for instance an Inbox escalation. This action will even mark the notification is read which therefore removes it out of your sight (when the unread toggle is enabled, see previous paragraph).

Besides helping you to address the event that caused the notification to happen, you can click on:

* Unread: to mark the notification as unread or even delete it completely
* Delete: to completely remove the notification from the database


# Notification preferences

### Setting notification preferences up

Push notifications use your browser to notify you even when the web page is closed. You will need to make sure your [browser and operating system settings](#user-content-fn-1)[^1] are correctly setup in order for this to work. <br>

In the Inbox view, go to your **Profile > Notifications** and turn on the option to "enable browser push notifications".&#x20;

<figure><img src="https://3356808761-files.gitbook.io/~/files/v0/b/gitbook-x-prod.appspot.com/o/spaces%2FEBQHGJABNTj5ISSOTRxM%2Fuploads%2FFB4UWPOLlKxRvzj97u3g%2Fimage.png?alt=media&amp;token=a73ee3af-4186-45c9-a6ac-cb54ee6986a8" alt=""><figcaption></figcaption></figure>

The button **Enable** will register DialoX to your browser in order to send Push Notifications. Your browser will then, depending on [your personal browser and operating system](#user-content-fn-1)[^1] settings, ask for your permission.

![](https://manuals.dialox.ai/~gitbook/image?url=https%3A%2F%2F3356808761-files.gitbook.io%2F%7E%2Ffiles%2Fv0%2Fb%2Fgitbook-x-prod.appspot.com%2Fo%2Fspaces%252FEBQHGJABNTj5ISSOTRxM%252Fuploads%252F3cxt5lD69Gbt0O9KY8Lk%252FAfbeelding%2520van%2520WhatsApp%2520op%25202024-05-15%2520om%252014.21.21_1d54de69.jpg%3Falt%3Dmedia%26token%3D3e44a9cb-aa32-4ad1-885c-00f799153180\&width=768\&dpr=4\&quality=100\&sign=117bb50c73f1a4fdbf0727732850d9421dff3c2387b3ffe4469799117d603b16)

After confirming your permission, the Notifications page will show that the push notifications are enabled. From now on DialoX will be able to send you push notifications.

### Advanced preferences

Your personal notification preferences can be accessed by clicking on **Profile** in the bottom left of your Inbox view. See below:

<figure><img src="https://3356808761-files.gitbook.io/~/files/v0/b/gitbook-x-prod.appspot.com/o/spaces%2FEBQHGJABNTj5ISSOTRxM%2Fuploads%2FZm7D0z5FQcbWsvI0hhu7%2FNotifications%20tab.png?alt=media&amp;token=fd199344-2062-4f55-ab40-36ddcedef97b" alt=""><figcaption></figcaption></figure>

\
You can get various types of notifications and decide whether you want to get them via browser push or via email:&#x20;

* notifications about new conversations, or conversations that are forwarded to you
* notifications when someone mentions you in a team chat
* notifications when settings of the environment have changed&#x20;
* notifications when it is outside of office hours
* notifications when new messages have come into a conversation you are assigned to\
  (automatic after a new message has not been seen for 15 minutes)

{% hint style="info" %}
Beware that these settings here only apply for the browser push notifications. If you're using MS Teams to respond to incoming messages, you can also be notified via MS Teams, but that's a different setting inside of MS Teams.\
\
**Inside MS Teams, you can only get notifications about new conversations!** You will not be notified via MS Teams about @mentions, messages forwarded/escalated to you or changes of the environment administration settings. \
\
**So even when using MS Teams to answer calls, it can be useful to define browser push notifications to get these other types of notifications.**&#x20;
{% endhint %}

[^1]: Check [Windows and Chrome settings here. ](/inbox/notifications/chrome-and-windows-settings)


# Rules for notification

Notifications are generated by the platform based on several conditions. Please check that these conditions are met before calling upon support.

1. Is the chat coming in during the [general opening hours](/settings/app-settings/opening-hours) of your application?
2. Are your [personal working hours](/settings/user-settings) configured as operator? Is the chat coming during your personal working hours? Have your colleagues check their settings too.
3. Did you check your [personal notification settings](/settings/user-settings)?&#x20;
4. Is the user who expects to get notifications currently logged into the DialoX platform or is he the user who was last logged into the DialoX platform from your browser? (If not, the notification settings from the other user will apply.)
5. Do you have the [role operator or agent](/administration/users#roles) in the same environment as the app? (being a member of the environment inherited from your agency is not the solution)
6. Toggle your own [availability settings](/settings/user-settings/availability-settings) from unavailable to available to reset your notification preferences in the platform.
7. Is your browser open or is it at least running as a [background process](#user-content-fn-1)[^1] on your computer?&#x20;

When you didn't enable push notifications or your browser or OS doesn't support them, the notifications will appear within the browser page:

<figure><img src="https://3356808761-files.gitbook.io/~/files/v0/b/gitbook-x-prod.appspot.com/o/spaces%2FEBQHGJABNTj5ISSOTRxM%2Fuploads%2Ff5doBAranON1rjQsdc8T%2Fimage.png?alt=media&amp;token=03279eab-7fa4-4907-8d80-8d7c06b87043" alt=""><figcaption></figcaption></figure>

Also when you have the Studio or Inbox opened in a visible browser tab, the system will show the notification as part of the browser page.

Only when all conditions for push notification settings described above are met, and you are currently not looking at a browser page with the Studio or Inbox loaded in it, the system will push the notifications to your PC. The way your PC will show this notification is dependent on your personal settings and specific browser you are using. On Mac OSX, working with Chrome as browser, this will look like:

<figure><img src="https://3356808761-files.gitbook.io/~/files/v0/b/gitbook-x-prod.appspot.com/o/spaces%2FEBQHGJABNTj5ISSOTRxM%2Fuploads%2FUCNB4T4Q1OrdPy4LQ6M3%2Fimage%20(2).png?alt=media&amp;token=3d3b126b-6772-44a8-bc4c-15b922ee18e4" alt=""><figcaption></figcaption></figure>

[^1]: ![](https://3356808761-files.gitbook.io/~/files/v0/b/gitbook-x-prod.appspot.com/o/spaces%2FEBQHGJABNTj5ISSOTRxM%2Fuploads%2FSYpOWcHpiBSDJuNNSs0i%2Fimage.png?alt=media\&token=1d927fa7-8119-4578-867d-d7ca1f3df8dd)


# Chrome and Windows settings

You get notifcations from Chrome on a Windows Desktop that look like this:\
\
![](https://3356808761-files.gitbook.io/~/files/v0/b/gitbook-x-prod.appspot.com/o/spaces%2FEBQHGJABNTj5ISSOTRxM%2Fuploads%2FqXLj2ozqFkA8Xa4CCV2S%2Fimage.png?alt=media\&token=e0235c07-d7b8-4387-80ef-4173d5e1f5c3)

To get these notifications, you must have these settings:

### Settings in Windows

1. In Windows, go to **Settings > System** to configure the notification settings:\
   \
   ![](https://3356808761-files.gitbook.io/~/files/v0/b/gitbook-x-prod.appspot.com/o/spaces%2FEBQHGJABNTj5ISSOTRxM%2Fuploads%2Fq45Ox5DHn1v1T3CixH3C%2Fimage.png?alt=media\&token=7027bb6b-e6d7-452e-89b5-7ec9d76a83b8)<br>
2. Turn on **Notifications** in general and for **Google Chrome** in particular.\
   \
   ![](https://3356808761-files.gitbook.io/~/files/v0/b/gitbook-x-prod.appspot.com/o/spaces%2FEBQHGJABNTj5ISSOTRxM%2Fuploads%2F4Zh3r6A7d7GoJevE6ldU%2Fimage.png?alt=media\&token=5697af92-f822-41fb-8b98-ef6e16a6814c)\
   \
   Also decide whether or not you want the notification to play a sound on your computer and if you want to see it on the lock screen.
3. **If you want to receive the notifications even when you are in "Do Not Disturb" status** in Windows (e.g. when you're in a video call, a call or you have put yourself manually on "Do Not Disturb"), you need to **set priority notifcations** for the Chrome app:\
   \
   ![](https://3356808761-files.gitbook.io/~/files/v0/b/gitbook-x-prod.appspot.com/o/spaces%2FEBQHGJABNTj5ISSOTRxM%2Fuploads%2FV4Y12J6fC84CAiMmfDKk%2Fimage.png?alt=media\&token=7eb62885-f96a-488f-9863-0a8dad57961e)\
   \
   Make sure that **Chrome** is shown in the list of apps that are allowed to send priority nofications even when you are in "Do Not Disturb status":\
   \
   ![](https://3356808761-files.gitbook.io/~/files/v0/b/gitbook-x-prod.appspot.com/o/spaces%2FEBQHGJABNTj5ISSOTRxM%2Fuploads%2FQ7TOJRf2fSvB2unwbeoQ%2Fimage.png?alt=media\&token=5f90a176-4b5b-4f6f-9319-19ddc2f0f256)\
   \
   or add Chrome to that list:\
   \
   ![](https://3356808761-files.gitbook.io/~/files/v0/b/gitbook-x-prod.appspot.com/o/spaces%2FEBQHGJABNTj5ISSOTRxM%2Fuploads%2Ffon4Umiw3FWdgCpdjRQm%2Fimage.png?alt=media\&token=66bfc479-33d4-49f5-a939-c61556f0b75b)

### Settings in Chrome

1. Go to the website [inbox.dialox.ai](https://inbox.dialox.ai) and turn on the notifications for this website in Chrome:\
   \
   ![](https://3356808761-files.gitbook.io/~/files/v0/b/gitbook-x-prod.appspot.com/o/spaces%2FEBQHGJABNTj5ISSOTRxM%2Fuploads%2FJBMXgCHXMaTd0Wr39Zm8%2Fimage.png?alt=media\&token=42918db3-0b9c-4053-a204-870f7a15a48a)<br>
2. Go to the **Site settings** and double check that notifications are turned on for [inbox.dialox.ai](https://inbox.dialox.ai):\
   \
   ![](https://3356808761-files.gitbook.io/~/files/v0/b/gitbook-x-prod.appspot.com/o/spaces%2FEBQHGJABNTj5ISSOTRxM%2Fuploads%2F8noAyQ3z8yDUhiZnpAIZ%2Fimage.png?alt=media\&token=f57ad644-22e7-447f-9c1d-4906bb880641)

{% hint style="info" %}
Note that you do not necessarily have to have Chrome open on your computer to receive the notifications! Also, you do not need to be logged into our website.\
\
To receive Chrome push notifications, it is sufficient that:&#x20;

1. You meet the criteria defined in "[rules for notfications](/inbox/notifications/rules-for-notification)"
2. Your user for which you have defined all the settings is actually the user that was logged into our DialoX website at last. If anyone else was logged in in between, you might need to temporarily log in again. (You can log out afterwards.)
3. Chrome is running at least as a [background process ](#user-content-fn-1)[^1]on your computer.
4. You must not be on "Do Not Disturb" or you must have made the correct settings to get priority notifications from Chrome even when you are in that status (see above).

{% endhint %}

[^1]: ![](https://3356808761-files.gitbook.io/~/files/v0/b/gitbook-x-prod.appspot.com/o/spaces%2FEBQHGJABNTj5ISSOTRxM%2Fuploads%2FJFfJbnSCCYUBpcNUIrPH%2Fimage.png?alt=media\&token=fa3bc832-35e3-43bc-bf48-7c35b9384e56)


# Microsoft Teams notifications

If you have set the MS Teams integration to monitor and respond to incoming conversations from the DialoX app integrated in MS Teams, you can define to be notified about new incoming conversations by MS Teams with an extra toast on your desktop that will look like this:

<div align="left"><figure><img src="https://3356808761-files.gitbook.io/~/files/v0/b/gitbook-x-prod.appspot.com/o/spaces%2FEBQHGJABNTj5ISSOTRxM%2Fuploads%2FqLzbE8w4yZE0Pzui9CLw%2Fimage.png?alt=media&amp;token=3b0d3cfd-86af-44f8-9621-f0ac303123c6" alt="" width="272"><figcaption></figcaption></figure></div>

{% hint style="info" %}
Beware that MS Teams can only notifiy you about new conversations and some status changes.&#x20;

**You will not be notified via MS Teams about @mentions, messages forwarded/escalated to you or changes of the environment administration settings.** \
\
So even when using MS Teams to answer conversations, it can be useful to [define browser push notifications](#user-content-fn-1)[^1] to get these other types of notifications.&#x20;
{% endhint %}

### MS Teams settings

To get notifications form MS Teams about new conversations you need to have these settings:

1. In your MS Teams client, click on the **three dots** next to your profile image and open **Settings**.\
   \
   ![](https://3356808761-files.gitbook.io/~/files/v0/b/gitbook-x-prod.appspot.com/o/spaces%2FEBQHGJABNTj5ISSOTRxM%2Fuploads%2FszHem1etaIVc1ZlL0Kz8%2Fimage.png?alt=media\&token=215069b9-e1bd-44bd-bb8f-77c5cd377a97)&#x20;
2. Go to **Notifications and activity** and make the settings according to your general notification preferences:<br>

   <figure><img src="https://3356808761-files.gitbook.io/~/files/v0/b/gitbook-x-prod.appspot.com/o/spaces%2FEBQHGJABNTj5ISSOTRxM%2Fuploads%2FruvLMEGoD8BthJXQdoOW%2Fimage.png?alt=media&amp;token=2a2ea51b-29cd-498f-85d8-095dc781a54d" alt=""><figcaption></figcaption></figure>
3. Go to the MS Teams Channel that is connected to the DialoX chat application where the new conversations are shown, and click on **More options > Channel notifications**.  Select to get **Banner and feed** notifications for all new posts.<br>

   <figure><img src="https://3356808761-files.gitbook.io/~/files/v0/b/gitbook-x-prod.appspot.com/o/spaces%2FEBQHGJABNTj5ISSOTRxM%2Fuploads%2FEsEZsWXCt5FajJ3fI5XS%2Fimage.png?alt=media&amp;token=0f548c7c-151f-4d4c-807f-dad33097ac28" alt=""><figcaption></figcaption></figure>

<br>

[^1]: See [Notification Preferences](/inbox/notifications/notification-preferences) and [Chrome and Windows settings](/inbox/notifications/chrome-and-windows-settings).&#x20;


# Home

**Home**, the base for your Orders & Bots. **Home** is where it all begins as far as using the Dialox Platform goes after the ordering stages. Within **Home** you have several options and tiles which are drag & dropable. We will go through them in the next steps.

<figure><img src="https://3356808761-files.gitbook.io/~/files/v0/b/gitbook-x-prod.appspot.com/o/spaces%2FEBQHGJABNTj5ISSOTRxM%2Fuploads%2FW6gl7E2O6v7pfdWjFWdq%2FScreenshot%202024-04-23%20at%2012.03.49.png?alt=media&amp;token=13585d81-6221-46e4-9780-c8c83d72c98d" alt=""><figcaption></figcaption></figure>

{% hint style="info" %}
When you are in Customer level it could be that you have multiple Environments. See it as a directory with folders, which you can navigate within. Depending on the order, your order will be shown accordingly.&#x20;

For instance this way you can navigate as a team to create a workflow between Environments which have no [users](/administration/users) but has a functional [bot](/store/legacy-apps). And a client Environment in which you take on calls, conversations or [notes](/inbox/notes).
{% endhint %}

## Orders

Once you have made an order in Operator, it will be visable in your **Home** screen due to automatic provisioning for the Enreach Contact [Orders](/administration/orders). Here you can see the Bot name, wether it needs to be connected or not.&#x20;

## Bots

All the [Bots](/store/legacy-apps) you choose, according to your order will be stored here. With a nice and quick overview there are a couple of options to choose from, which are described down below in the using section.

## How to use Home&#x20;

As stated above everything in this view is drag & dropable. For instance, if you have an order (105 extension) and want to remove the connection, go ahead and drag it to the **Not connected** area. You will see that the 105 extension will be dropped. With this action you remove the existing license from your [Bot](/store/legacy-apps).&#x20;

Drag a new or existing Bot to either Whatsapp or Smart IVR license to create a new situation. This way the power of quickly rebuilding your situation will be easily managable. Check below for reference:

<figure><img src="https://3356808761-files.gitbook.io/~/files/v0/b/gitbook-x-prod.appspot.com/o/spaces%2FEBQHGJABNTj5ISSOTRxM%2Fuploads%2FEbzgL4N4IsXOMk2nxA5o%2Fhome_drag_and_drop.gif?alt=media&amp;token=f8ce2a4e-1b12-4a5f-b63f-59a92e120a4c" alt=""><figcaption></figcaption></figure>


# Customer settings

The settings of the Customer environment can be done from out the Administration section, or from out the Studio section.

<figure><img src="https://3356808761-files.gitbook.io/~/files/v0/b/gitbook-x-prod.appspot.com/o/spaces%2FEBQHGJABNTj5ISSOTRxM%2Fuploads%2F9zjmd5wkPhCx1psJN5bQ%2Fimage.png?alt=media&amp;token=776980b0-d922-485c-8292-66c9c3cbd633" alt=""><figcaption></figcaption></figure>

1. Select the environment you want to maintain
2. Open the **Settings** page

The **Customer settings** page enables you to configure the Customer environment settings:

1. Settings
2. Advanced settings
3. Store settings

<figure><img src="https://3356808761-files.gitbook.io/~/files/v0/b/gitbook-x-prod.appspot.com/o/spaces%2FEBQHGJABNTj5ISSOTRxM%2Fuploads%2FAMZnKDuuG3jDVywkgbAn%2Fimage.png?alt=media&amp;token=079eddab-2465-4342-a03c-d69d8c59c12d" alt=""><figcaption></figcaption></figure>


---

[Next Page](/llms-full.txt/1)